
In a previous post, I discussed how to create a new Nativescript app having a splashscreen, a loading animation and a login page, with the animations done using just CSS. For simple scenarios, this works just fine, but in more complex apps you'll want to use code to control your animations. Let's see how to create the same login page and animations as before, but using Javascript in parallel with other initialization logic.
Let's start by cloning the splashscreen app of the original blog post from Github and rename it to "NSanimlogin".
git clone https://github.com/drangelod/NSsplashlogin
mv NSsplashlogin NSanimlogin
Ensure the demo animated splashscreen login app has been correctly cloned by running it in a simulator. We'll use the iOS platform for now and refine the android version later.
cd NSanimlogin
tns run ios
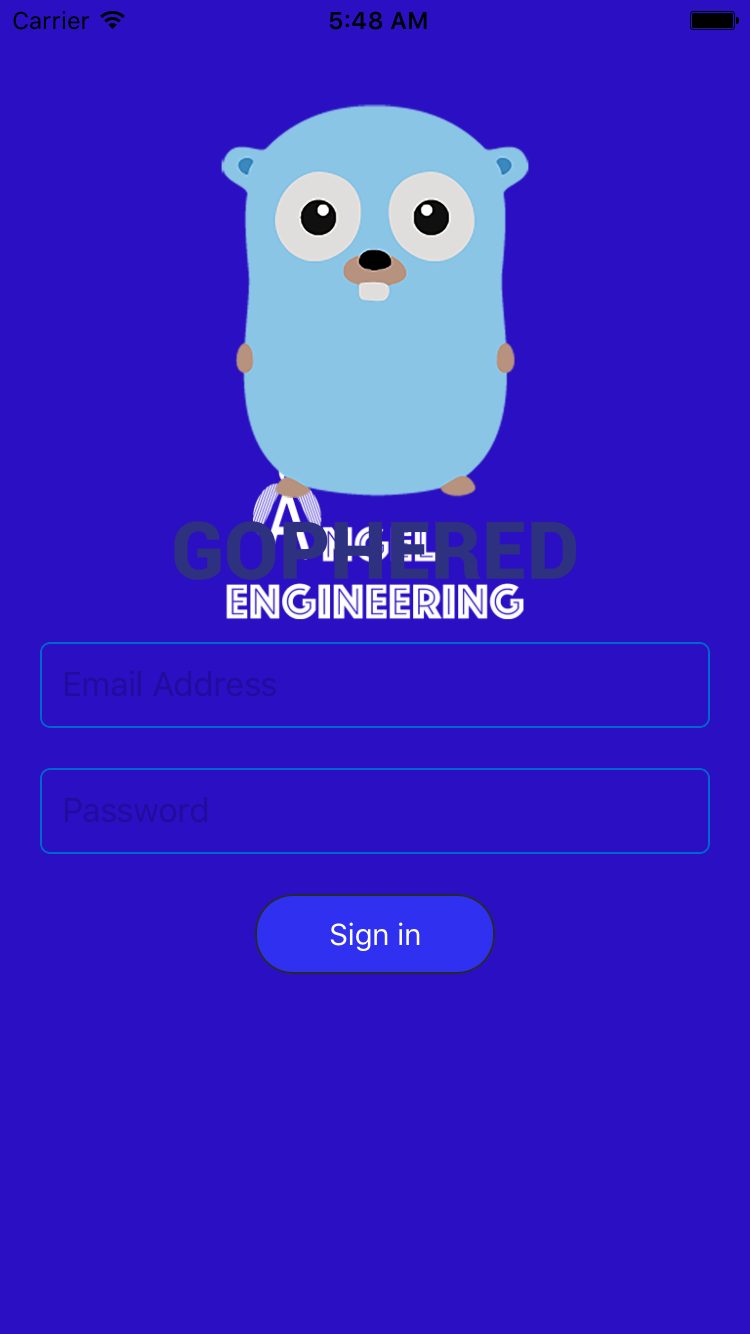
You should then see the animated login page from the earlier post.

Controlling animations with Javascript instead of CSS
As I mentioned before, you may want to control animations via Javascript to coordinate timing with other processes in your Nativescript app. For example, in my Gophered App I need to perform a few actions before allowing the user to interact with the login page, such as initializing the local database, checking for a working network connection and ensuring location permissions have been granted. Controlling the animations via code instead of css allows me to make them a parallel component of this startup process. One thing to note is that if if you wish to perform some UI calls such as displaying an alert, Nativescript animations must be finished before you can display them, particularly on Android platforms.
Let's start by removing all the CSS-based animation classes from the demo app, and later we will replace them with Javascript animation calls.
Open "/main-page.xml" and update the code to remove all the old animation classes from the elements as well as clean up element ID names:
<Page xmlns="http://schemas.nativescript.org/tns.xsd" id="objPage" backgroundSpanUnderStatusBar="true"  actionBarHidden="true" class="page-layout" loaded="onLoaded" >
    <ScrollView orientation="vertical">
        <GridLayout>
        <Image row="0" col="0" class="company-image" id="logoCompany" src="res://splashlogofull" />
        <StackLayout row="0" col="0" width="100%" height="100%" visibility="visible" id="layoutStack" horizontalAlignment="center"  verticalAlignment="center" orientation="vertical">
            <Image class="logo-image intro-anim"  id="logoGopher" src="res://gopherlogo" stretch="none" horizontalAlignment="center" />
            <TextField  editable="false" tap="setEditable" class="input-field intro-anim" id="fieldEmail" hint="Email Address" keyboardType="email" autocorrect="false" autocapitalizationType="none" />
            <TextField  editable="false" tap="setEditable" class="input-field intro-anim" id="fieldPassword" secure="true" hint="Password" />
            <Button class="btn btn-outline btn-active btn-rounded-lg  btn-def intro-anim"  id="buttonLogin"  text="Sign in" />
        </StackLayout>
        </GridLayout>
     </ScrollView>
</Page>
Edit the "/main-page.css" file and remove all the animation classes and assignments so it only contains basic styling:
.page-layout {
     background-color: #2a10c2;
 }

.input-field{
    border-width: 1;
    border-style: 'solid';
    border-color: #0266d1;
    border-radius: 10px;
    padding:10;
    margin-top:20;
    margin-left: 20;
    margin-right: 20;
}
.btn-def {
    color: white;
    background-color: rgb(48, 48, 241);
    border-color:rgb(41, 40, 40);
    width:120;
    margin-top:20;
}
You should now just see all of the login and splashscreen elements displayed, and now we can work on the Javascript code to recreate the original CSS animations.
Before working on the animation code, I'd like to modify the "main-page.js" to improve the setEditable function:
var currentPage;

function setEditable(args) {
  var un = currentPage.getViewById("fieldEmail");
  var p = currentPage.getViewById("fieldPassword");
  un.editable = true;
  p.editable = true;
  //clear the ontap handler
  un.off("tap");
  p.off("tap");
  //set focus on field tapped
  args.object.focus();
}
exports.setEditable = setEditable;

exports.onLoaded = function(args) {
  currentPage = args.object;
}
Lines 9 and 10 will remove the onTap call to this function after it sets the fields as editable as it's no longer needed afterwards. Line 12 will have Nativescript focus on the field that was tapped, which is the normal behavior if the field were editable.
Nativescript code-based animations
Before working with animations in Nativescript, it's helpful to first read up on them here, here and here. For this example, we will be using the main Nativescript Animation module to control an array of animations as opposed to calling animations on each login page object individually.
First we'll need to include the animation module, as well as an enumeration module that lets us specify the type of animation curve we would like to use for each animation. If you don't specify a curve for a particular animation, it will default to the ease curve, which is equivalent to cubic-bezier(0.25,0.1,0.25,1).
Add the following includes to the top of "main-page.js":
const animationModule = require("tns-core-modules/ui/animation");
const enumsModule = require("ui/enums");
Then, we'll add a new CSS class called intro-anim for the elements to be animated (gopher logo, email and password fields, and the login button). This will be used to ensure these elements are not visible initially and are located off the screen so they can be brought in using the animation.
Edit the "/main-page.css" file and add the following class:
.intro-anim{
    opacity:0;
    transform: translate(0,800)
}
Now, let's define our animation array by modifying the onLoaded function so it now looks like:
exports.onLoaded = function(args) {
  currentPage = args.object;

  var fieldEmail = currentPage.getViewById("fieldEmail");
  var fieldPassword = currentPage.getViewById("fieldPassword");
  var buttonLogin = currentPage.getViewById("buttonLogin");
  var objPage = currentPage.getViewById("objPage");
  var logoCompany = currentPage.getViewById("logoCompany");
  var logoGopher = currentPage.getViewById("logoGopher");

  var totalAnimTime = 1500; //all animation times are in milliseconds

  var animations = [
    {
      target: objPage,
      backgroundColor: "white",
      duration: 1000,
      delay: 0,
      curve: enumsModule.AnimationCurve.easeInOut
    },
    {
      target: logoCompany,
      opacity: 0,
      scale: {
        x: 0.6,
        y: 0.6
      },
      translate: { x:0,y:-200},
      duration: 800,
      delay: 0,
      curve: enumsModule.AnimationCurve.easeInOut
    },
    {
      target: logoGopher,
      opacity: 1,
      translate: {
        x: 0,
        y: 0
      },
      duration: totalAnimTime,
      delay: 500,
      curve: enumsModule.AnimationCurve.easeInOut
    },
    {
      target: fieldEmail,
      opacity: 1,
      translate: {
        x: 0,
        y: 0
      },
      duration: totalAnimTime,
      delay: 550,
      curve: enumsModule.AnimationCurve.easeInOut
    },
    {
      target: fieldPassword,
      opacity: 1,
      translate: {
        x: 0,
        y: 0
      },
      duration: totalAnimTime,
      delay: 550,
      curve: enumsModule.AnimationCurve.easeInOut
    },
    {
      target: buttonLogin,
      opacity: 1,
      translate: {
        x: 0,
        y: 0
      },
      duration: totalAnimTime,
      delay: 600,
      curve: enumsModule.AnimationCurve.easeInOut
    }
  ];
  introAnim = new animationModule.Animation(animations);
  introAnim
    .play()
    .then(() => {
      console.log("Animations finished");
    })
    .catch(e => {
      console.log("Caught ERROR during animation:");
      console.log(e.message);
    });
};
This function will now control the animations using Javascript. Lines 4-9 assign local variables to each of the login page elements we will be animating. Lines 13-77 define an array of animations to be performed. Looking at the first entry, you will see:
{
    target: objPage,
    backgroundColor: "white",
    duration: 1000,
    delay: 0,
    curve: enumsModule.AnimationCurve.easeInOut
},
Each animation entry in the array will have the target element to animate, and specify the animation curve to use if you don't want the default ease curve. In this case I'm using an easeInOut curve instead. You can then specify what properties to animate, which in this case will be to change the background color of the page to white from blue using backgroundColor: "white". Finally, we will need to specify the duration of this particular animation and a delay if we wish to start the animation later. All timings for the Animation module in Nativescript are in terms of milliseconds.
Looking at the animation array as a whole, I've designed this animation to have a total runtime of 1500ms or 1.5 seconds. I'll start by fading the background color to white, and fading the company logo to invisibility while scaling it down and translating it slightly upwards while doing so. Notice that for many of these elements, I've combined several animation options such as translation and opacity changes. As long as you want them all to have the same duration and delay, you can group them into a single animation entry in the array for a particular object.
Looking at this animation and comparing it to the original all-CSS approach, you'll notice some major differences. Perhaps the most jarring is that the background fade from blue to white is rather abrupt, and not nearly as smooth as in our original approach. Also, the scale and fade of the company logo image is also very abrupt and doesn't seem to get very far before the login form elements animations begin. After some experimentation, I think this is most likely due to the lack of a code-based animation keyframe interface in the Nativescript animation library. While internally there are data structures for keyframe animations, there are no constructors or easy methods to code your own keyframe based animations that work as well as the CSS parser in Nativescript. What can we do?
The approach I've decided to go with involves mixing CSS-based and Javascript-based animations to get the best of both approaches. I will use the CSS-based animation for the company logo and page background to take advantage of the smoother keyframe animation. I will then use Javascript to control the animation of the login form elements so I can mix in other initialization code while controlling the program flow until I'm ready to let the user interact with the login page.
First, let's change the onLoaded function to remove the animations from the company logo and the page objects. It will now look like:
exports.onLoaded = function(args) {
  currentPage = args.object;

  var fieldEmail = currentPage.getViewById("fieldEmail");
  var fieldPassword = currentPage.getViewById("fieldPassword");
  var buttonLogin = currentPage.getViewById("buttonLogin");
  var logoGopher = currentPage.getViewById("logoGopher");

  var totalAnimTime = 1500; //all animation times are in milliseconds

  var animations = [
    {
      target: logoGopher,
      opacity: 1,
      translate: {
        x: 0,
        y: 0
      },
      duration: totalAnimTime,
      delay: 500,
      curve: enumsModule.AnimationCurve.easeInOut
    },
    {
      target: fieldEmail,
      opacity: 1,
      translate: {
        x: 0,
        y: 0
      },
      duration: totalAnimTime,
      delay: 550,
      curve: enumsModule.AnimationCurve.easeInOut
    },
    {
      target: fieldPassword,
      opacity: 1,
      translate: {
        x: 0,
        y: 0
      },
      duration: totalAnimTime,
      delay: 550,
      curve: enumsModule.AnimationCurve.easeInOut
    },
    {
      target: buttonLogin,
      opacity: 1,
      translate: {
        x: 0,
        y: 0
      },
      duration: totalAnimTime,
      delay: 600,
      curve: enumsModule.AnimationCurve.easeInOut
    }
  ];
  introAnim = new animationModule.Animation(animations);
  introAnim
    .play()
    .then(() => {
      console.log("Animations finished");
    })
    .catch(e => {
      console.log("Caught ERROR during animation:");
      console.log(e.message);
    });
};
Now, edit the "/main-page.css" file so it now contains our original CSS animation classes in addition to the standard formatting for other login page elements:
.page-layout {
    background-color: #2a10c2;
    animation-name: bg-anim;
     animation-duration: 2;
     animation-fill-mode: forwards;
     animation-iteration-count: 1;
     animation-timing-function: cubic-bezier(0.25, 0.1, 0.25, 1);
}
@keyframes bg-anim {
    0% {
        background-color: #2a10c2;
    }
    20%{
        background-color: #2a10c2;
    }
    100% {
        background-color: white;
    }
}

.company-image{
    transform:scale(0.9,0.9) translate(0,54);
    animation-name: company-anim;
    animation-duration: 4;
    animation-fill-mode: forwards;
    animation-iteration-count: 1;
    animation-timing-function: cubic-bezier(0.25, 0.1, 0.25, 1);
}
@keyframes company-anim {
    0% {
        transform:scale(0.9,0.9) translate(0,54);
        animation-timing-function: cubic-bezier(0.25, 0.1, 0.25, 1);
        opacity: 1;
    }
    100% {
        animation-timing-function: cubic-bezier(0.25, 0.1, 0.25, 1);
        transform:scale(0,0) translate(0,-554);
        opacity: 0;
    }
}

.input-field{
    border-width: 1;
    border-style: 'solid';
    border-color: #0266d1;
    border-radius: 10px;
    padding:10;
    margin-top:20;
    margin-left: 20;
    margin-right: 20;
}
.btn-def {
    color: white;
    background-color: rgb(48, 48, 241);
    border-color:rgb(41, 40, 40);
    width:120;
    margin-top:20;
}
.intro-anim{
    opacity:0;
    transform: translate(0,800)
}
Now, if you run the app again you should see the same animation style as we had in our CSS only app:

Summary
Now we can use both predefined CSS animation, and then use Javascript animation to control initialization flow before allowing the user to interact with the login page. In a future blog post I'll show how to use Promises with this setup to initialize a local database, check and ask for location permissions, and ensure there is a working network connection before enabling the login controls for the user.
If you'd like to download the final source files for a quick start, you can download them from Github.