
This application will rely on Firebase for our server needs, providing authentication, database and cloud function services. If you haven't worked with Firebase before, you should read through my previous post where I explain how to setup a Firebase project. Run through the same steps to setup a new Firebase app, register it for use with Android and iOS and enable Email/Password under Authentication/Sign-in Methods in the Firebase console. You can also update the templates Firebase uses to send activation and password reset emails under the Templates tab on this page.
Create a new Nativescript Vue app using the CLI command tns create ns6shopping and select the Blank Vue template. This will be a single frame application that will consist of a login page, product gallery, product detail page and payment page. If you want to experiment with multi-frame applications, you can create one with the Tabs Vue template and work on a single tab to frame the store pages inside. Edit /app.js and replace it with the following:
import Vue from "nativescript-vue";
import Login from "./components/Login";
new Vue({
    template: `
        <Frame>
            <Login />
        </Frame>`,
    components: {
        Login
    }
}).$start();
This tells the application to initialize and load the Login page in a single frame. Add the new login page as /app/components/Login.vue:
<template>
<Page actionBarHidden="true" backgroundSpanUnderStatusBar="true">
<FlexboxLayout class="page">
<StackLayout class="form">
<Image class="logo" src="~/images/NativeScript-Vue.png" />
<Label class="header" text="SHOPPER" />
<StackLayout class="input-field" marginBottom="25">
<TextField class="input" hint="Email" keyboardType="email" autocorrect="false" autocapitalizationType="none" v-model="user.email" returnKeyType="next" @returnPress="focusPassword" fontSize="18" />
<StackLayout class="hr-light" />
</StackLayout>
<StackLayout class="input-field" marginBottom="25">
<TextField ref="password" class="input" hint="Password" secure="true" v-model="user.password" :returnKeyType="isLoggingIn ? 'done' : 'next'" @returnPress="focusConfirmPassword" fontSize="18" />
<StackLayout class="hr-light" />
</StackLayout>
<StackLayout v-show="!isLoggingIn" class="input-field">
<TextField ref="confirmPassword" class="input" hint="Confirm password" secure="true" v-model="user.confirmPassword" returnKeyType="done" fontSize="18" />
<StackLayout class="hr-light" />
</StackLayout>
<Button :text="isLoggingIn ? 'Log In' : 'Sign Up'" @tap="submit" class="btn btn-primary m-t-20" />
<Label v-show="isLoggingIn" text="Forgot your password?" class="login-label" @tap="forgotPassword" />
<Label class="login-label sign-up-label" @tap="toggleForm">
<FormattedString>
<Span :text="isLoggingIn ? 'Don’t have an account? ' : 'Back to Login'" />
<Span :text="isLoggingIn ? 'Sign up' : ''" class="bold" />
</FormattedString>
</Label>
</StackLayout>
</FlexboxLayout>
</Page>
</template>
<script>
import HomePage from "./Home";
var firebase = require("nativescript-plugin-firebase");
export default {
data() {
return {
isLoggingIn: true,
user: {
email: "[email protected]",
password: "foo",
confirmPassword: "foo"
},
userService: {
register(user) {
return Promise.resolve(user);
},
login(user) {
return Promise.resolve(user);
},
resetPassword(email) {
return Promise.resolve(email);
}
}
};
},
mounted(){
firebase
.init({
})
.then(
function(instance) {
console.log("firebase.init done");
},
function(error) {
console.log("firebase.init error: " + error);
}
);
},
methods: {
toggleForm() {
this.isLoggingIn = !this.isLoggingIn;
},
submit() {
if (!this.user.email || !this.user.password) {
this.alert("Please provide both an email address and password.");
return;
}
if (this.isLoggingIn) {
this.login();
} else {
this.register();
}
},
login() {
let that = this
this.userService
.login(this.user)
.then(() => {
this.$navigateTo(HomePage, { clearHistory: true });
})
.catch(() => {
this.alert("Unfortunately we could not find your account.");
});
},
register() {
if (this.user.password != this.user.confirmPassword) {
this.alert("Your passwords do not match.");
return;
}
this.userService
.register(this.user)
.then(() => {
this.alert("Your account was successfully created.");
this.isLoggingIn = true;
})
.catch(() => {
this.alert("Unfortunately we were unable to create your account.");
});
},
forgotPassword() {
let that = this
prompt({
title: "Forgot Password",
message: "Enter the email address you used to register for APP NAME to reset your password.",
inputType: "email",
defaultText: "",
okButtonText: "Ok",
cancelButtonText: "Cancel"
}).then(data => {
if (data.result) {
that.userService
.resetPassword(data.text.trim())
.then(() => {
that.alert(
"Your password was successfully reset. Please check your email for instructions on choosing a new password."
);
})
.catch(() => {
that.alert(
"Unfortunately, an error occurred resetting your password."
);
});
}
});
},
focusPassword() {
this.$refs.password.nativeView.focus();
},
focusConfirmPassword() {
if (!this.isLoggingIn) {
this.$refs.confirmPassword.nativeView.focus();
}
},
alert(message) {
return alert({
title: "Shopper",
okButtonText: "OK",
message: message
});
}
}
};
</script>
<style scoped>
.page {
align-items: center;
flex-direction: column;
}
.form {
margin-left: 30;
margin-right: 30;
flex-grow: 2;
vertical-align: middle;
}
.logo {
margin-bottom: 12;
height: 90;
font-weight: bold;
}
.header {
horizontal-align: center;
font-size: 25;
font-weight: 600;
margin-bottom: 70;
text-align: center;
color: rgb(51, 51, 206);
}
.input-field {
margin-bottom: 25;
}
.input {
font-size: 18;
placeholder-color: #A8A8A8;
}
.input-field .input {
font-size: 54;
}
.btn-primary {
height: 50;
margin: 30 5 15 5;
background-color: rgb(51, 51, 206);
color: white;
border-radius: 5;
font-size: 20;
font-weight: 600;
}
.login-label {
horizontal-align: center;
color: #A8A8A8;
font-size: 16;
}
.sign-up-label {
margin-bottom: 20;
}
.bold {
color: #000000;
}
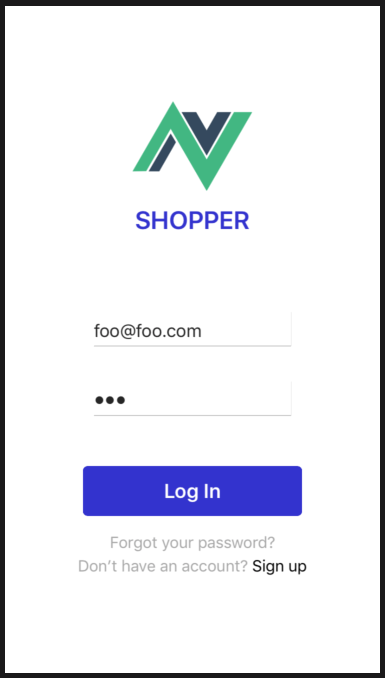
</style>This page was explained in more detail in a previous post if you'd like to read up on what's going on here. Looking at this page, you'll see we've got a single page that handles login, registration and forgotten password requests, tied to dummy functions for now. We've used the Nativescript Vue logo image from the previous post, copied to/app/images/NativeScript-Vue.png.
Run the app on the ios simulator and you should see firebase.init done printed on the console if it worked properly. If you don't, make sure have downloaded the Android and iOS configuration files from the Firebase Console and placed them in their appropriate directories under app/App_Resources. If you try to run this on Android, you'll probably run into the following error:

To resolve this we'll add the following to the defaultConfig section in app/App_Resources/Android/app.gradle:
multiDexEnabled trueYou should now see the same successful initialization message when running it on Android. Run the app and you should see something like:
Our login front-end is ready, and now we'll work on integrating Firebase to provide authentication services.
Authentication with Firebase
We'll need to install the Firebase plugin for Nativescript before continuing using :
tns plugin add nativescript-plugin-firebase
This will ask you which Firebase services to enable, to which you will respond yes for Authentication, Cloud Functions and Firestore. Before we start filling in the dummy authentication functions with real Firebase calls, let's add another plugin that displays a floating loading indicator we can show while calling authentication methods and other long latency operations.
tns plugin install @nstudio/nativescript-loading-indicator
A default options object is required when showing the indicator, which we will add to app/app.js after the imports, and accessible via the global object throughout the app.
global.loaderOptions = {
    android: {
        margin: 100,
        dimBackground: true,
        color: "#4B9ED6",
        hideBezel: true,
        mode: 3
    },
    ios: {
        dimBackground: true,
        color: "#FFFFFF",
        hideBezel: true,
        mode: 3
    }
};
Let's update the login, register and forgotPassword methods in app/components/Login.vue to make use of the loader while waiting for Firebase operations to complete:
		login() {
            let that = this
            loader.show(global.loaderOptions);
            this.userService
                .login(this.user)
                .then(() => {
                    loader.hide()
                    this.$navigateTo(HomePage, { clearHistory: true });
                })
                .catch((err) => {
                    loader.hide()
                    console.log(err)
                    this.alert("Unfortunately we could not find your account.");
                });
        },
        register() {
            if (this.user.password != this.user.confirmPassword) {
                this.alert("Your passwords do not match.");
                return;
            }
            if (this.user.password.length < 6) {
                this.alert("Your password must be at least 6 characters.");
                return;
            }
            loader.show(global.loaderOptions);
            this.userService
                .register(this.user)
                .then(() => {
                    this.isLoggingIn = true;
                    loader.hide()
                })
                .catch((err) => {
                    loader.hide()
                    console.log(err)
                    this.alert("Unfortunately we were unable to create your account.");
                });
        },
        forgotPassword() {
            let that = this
            prompt({
                title: "Forgot Password",
                message: "Enter the email address you used to register for APP NAME to reset your password.",
                inputType: "email",
                defaultText: "",
                okButtonText: "Ok",
                cancelButtonText: "Cancel"
            }).then(data => {
                if (data.result) {
                    loader.show(global.loaderOptions);
                    that.userService
                        .resetPassword(data.text.trim())
                        .then(() => {
                            loader.hide()
                            that.alert(
                                "Your password was successfully reset. Please check your email for instructions on choosing a new password."
                            );
                        })
                        .catch(() => {
                            loader.hide()
                            that.alert(
                                "Unfortunately, an error occurred resetting your password."
                            );
                        });
                }
            });
        },
Since Firebase requires that passwords be at least 6 characters in length, we added a check for that inside the register function. Now let's fill in the dummy functions in userService, starting with the register function:
				async register(user) {
                    return await firebase.createUser({
                        email: user.email,
                        password: user.password,
                    }).then(
                        function(response) {
                            firebase.sendEmailVerification().then(function() {
                                    alert("A verification email has been sent, click on the link to activate your account")
                                },
                                function(error) {
                                    console.error("Error sending email verification: ", error);
                                }
                            )
                        })
                },
You'll notice that we first call on Firebase to register a new account using the supplied email and password. If this succeeds, then we will have Firebase send an email with a verification link. Since we're creating a shopping app, we'll restrict users from logging in until they have verified they have access to that email account. Firebase does not have an option to disable logins for users with unverified email addresses, so we'll have to perform our own checks in the login method.
Fill in the userService login function with the corresponding Firebase login function:
				async login(user) {
                    return await firebase.login({
                        type: firebase.LoginType.PASSWORD,
                        passwordOptions: {
                            email: user.email,
                            password: user.password,
                        }
                    })
                },
Now we'll change the main login method to check if the user has verified their email address before allowing login:
		login() {
            let that = this
            loader.show(global.loaderOptions);
            this.userService
                .login(this.user)
                .then((currentUser) => {
                    loader.hide()
                    if (!currentUser.emailVerified) {
                        this.alert("Please click on the link in the verification email sent during registration. Check your Spam folder for a new link we've just emailed.");
                        firebase.sendEmailVerification().then(function() { console.log("email sent") },
                            function(error) {
                                console.error("Error sending email verification: ", error);
                            }
                        )
                        return false;
                    }
                    this.$navigateTo(HomePage);
                })
                .catch((err) => {
                    loader.hide()
                    console.log(err)
                    this.alert("Unfortunately we could not find your account.");
                });
        },
If the user tries to login while unverified, we'll show an alert asking them to verify via the emailed link. We could show a new link for requesting another verification email using currentUser.emailVerified as a flag, but for this post we'll just send a new verification email every time they try and login in case they haven't received the email.
Now fill in the userService resetPassword function, which will have Firebase send an email with a link to change the password:
async resetPassword(email) {
	return await firebase.sendPasswordResetEmail(email)
}
If you run the app on a simulator now, you should be able to register, login and reset your password using Firebase Authentication. After login, you'll just see the basic template app page, so let's turn that into the main store catalog page.
Creating a Store Catalog
Let's create a page that lists a series of items for sale. To skip some styling, we'll make use of the Nativescript Cardview plugin to display products inside Material Design CardViews, with the cards displayed in a 2 column format. Install the plugin using:
tns plugin add @nstudio/nativescript-cardview
We'll import it as a component inside /app/app.js:
Vue.registerElement(
    "CardView",
    () => require("@nstudio/nativescript-cardview").CardView
);
Replace the contents of app/components/Home.vue with:
<template>
    <Page>
        <ActionBar>
            <Label text="Shop"></Label>
        </ActionBar>
        <ScrollView>
            <StackLayout>
                <GridLayout rows="*" columns="*, *" v-if="rowCount>0" v-for="i in rowCount" :key="i">
                    <CardView class="card" margin="10" col="0" elevation="20" v-if="Items[(i - 1) * itemsPerRow] && Items[(i - 1) * itemsPerRow ].name" @tap="seeDetails(Items[(i - 1) * itemsPerRow])">
                        <GridLayout class="card-layout" rows="120, auto,auto,auto" columns="*, *, *">
                            <Image v-if="Items[(i - 1) * itemsPerRow].image" :src="Items[(i - 1) * itemsPerRow].image" stretch="aspectFill" colSpan="3" row="0" />
                            <Label :text="Items[(i - 1) * itemsPerRow].name" class="" row="1" colSpan="3" />
                            <Label :text="Items[(i - 1) * itemsPerRow].price | dollars" class="" row="2" colSpan="3" />
                            <Button row="3" colSpan="3" text="Buy" @tap="addItem(Items[(i - 1) * itemsPerRow])" class="btn m-t-20 add-button" />
                        </GridLayout>
                    </CardView>
                    <CardView class="card" margin="10" col="1" elevation="20" v-if="Items[(i - 1) * itemsPerRow +1] && Items[(i - 1) * itemsPerRow +1].name" @tap="seeDetails(Items[(i - 1) * itemsPerRow +1])">
                        <GridLayout class="card-layout" rows="120, auto,auto,auto" columns="*, *, *">
                            <Image v-if="Items[(i - 1) * itemsPerRow+1].image" :src="Items[(i - 1) * itemsPerRow + 1].image" stretch="aspectFill" colSpan="3" row="0" />
                            <Label :text="Items[(i - 1) * itemsPerRow + 1].name" class="" row="1" colSpan="3" />
                            <Label :text="Items[(i - 1) * itemsPerRow +1].price | dollars" class="" row="2" colSpan="3" />
                            <Button row="3" colSpan="3" text="Buy" @tap="addItem(Items[(i - 1) * itemsPerRow +1])" class="btn m-t-20 add-button" />
                        </GridLayout>
                    </CardView>
                </GridLayout>
            </StackLayout>
        </ScrollView>
    </Page>
</template>

<script>
export default {
    data() {
        return {
            Items: [
                { invId: 1, name: "An Item", image: "https://picsum.photos/300/200", price: 999, description: "This round bottle is made of opaque bright rose glass.  It has a mid-length neck, stands about seven inches tall, and the ink on its label has been washed off." },
                { invId: 2, name: "Thing", image: "https://picsum.photos/300/200", price: 1499, description: "This round bottle is made of opaque chartreuse glass.  It has a mid-length neck, stands about six inches tall, and the ink on its label has been washed off." },
                { invId: 3, name: "Doo-dad", image: "https://picsum.photos/300/200", price: 499, description: "This coffin-shaped bottle is made of opaque lilac glass.  It has a long neck, stands about five inches tall, and it has no label." },
                { invId: 4, name: "Other thing", image: "https://picsum.photos/300/200", price: 299, description: "This cylindrical bottle is made of transparent bright turquoise glass.  It has a mid-length neck, stands about twelve inches tall, and it has a simple printed label." },
                { invId: 5, name: "Last One", image: "https://picsum.photos/300/200", price: 899, description: "This teardrop-shaped bottle is made of translucent bright purple glass.  It has a mid-length neck, stands about eleven inches tall, and most of its label has been torn off." }
            ],
            itemsPerRow: 2
        }
    },
    computed: {
        rowCount: function() {
            return Math.ceil(this.Items.length / this.itemsPerRow);
        },
    },
    filters: {
        dollars: num => `$${num / 100}`
    },
    methods: {
        seeDetails(item) {
            console.log("Showing detailed view for: ");
            console.dir(item);
        },
        addItem(item) {
            console.log("Adding item:");
            console.dir(item);
        }
    },
};
</script>

<style scoped lang="scss">
@import '~@nativescript/theme/scss/variables/blue';
.add-button {
    height: 30;
    background-color: rgb(51, 51, 206);
    color: white;
    border-radius: 5;
    font-size: 20;
    font-weight: 600;
}

.card {
    background-color: #fff;
    color: #4d4d4d;
    margin: 15;
}

.card-layout {
    padding: 20;
}
</style>
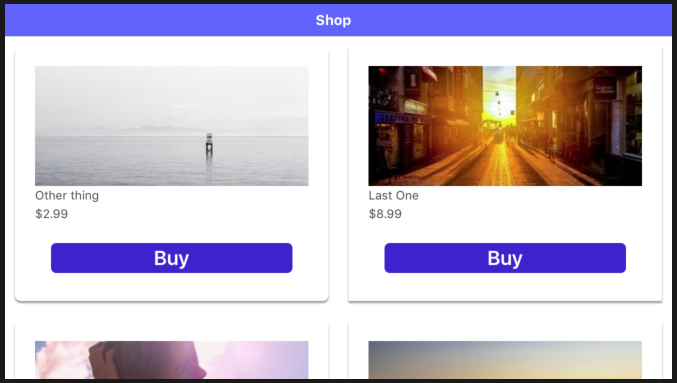
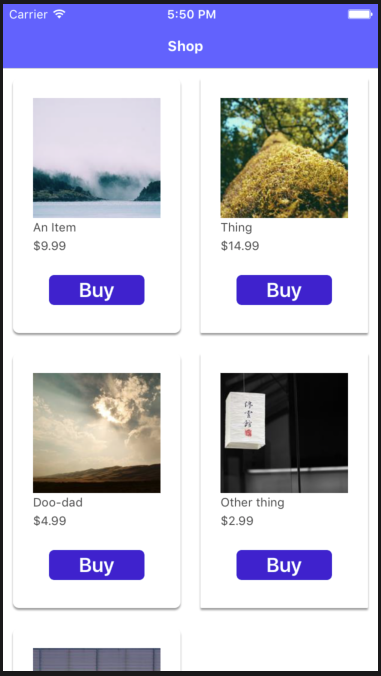
We define 5 example items, using picture urls from the Lorem Picsum website, which serves random images at specified dimensions. Run the app, login and you should see the basic catalog page:
Currently the list of items is hardcoded on this page. Instead, let's use Firebase Firestore to store the items and have the app read them from there.
Using FireStore DB
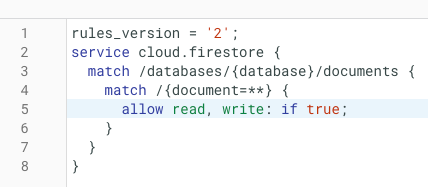
Go back to the Firebase Console, and go to the Databases section for your project and create a new Firestore DB for the app. When asked, select production security rules(restricted read/write) although we'll change them to development rules(unrestricted read/write) while we work on the app. After the database has been created, go to the rules tab and change the read/write access to true so it looks like:
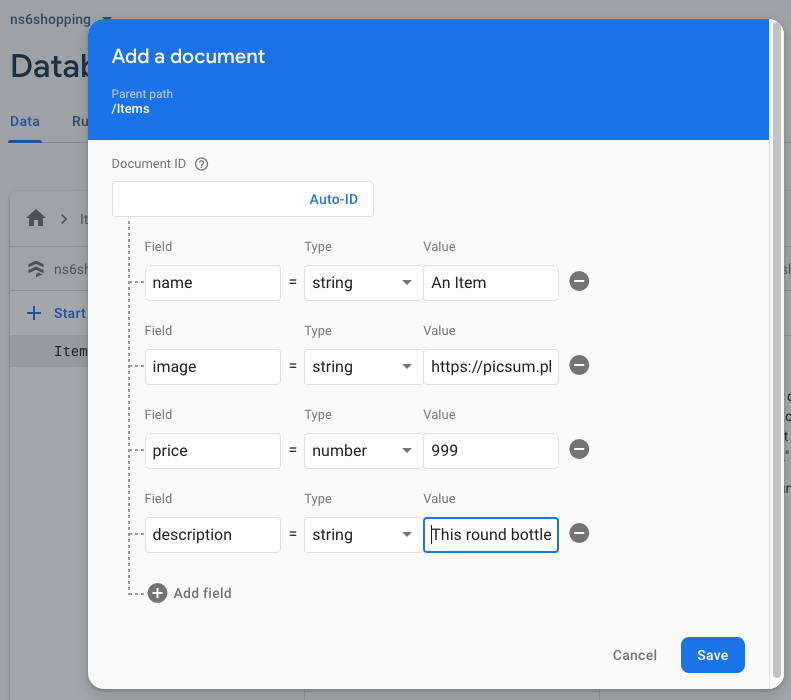
Now go back to the main data tab and start a new Collection for our store products. We'll name this collection Items and start adding documents for each item with the same fields and values as the Items array in Home.vue. The first item would look like:
After you've added the example items, let's update Home.vue to start reading these from Firebase Firestore. We'll add the import for the Firebase library, comment out the Items array entries, and add the created function to load the items from Firestore on page load. We'll also prepare for two new pages for showing item details and purchasing an item. Change the top script section so it looks like:
<script>
import firebase from "nativescript-plugin-firebase";
import ItemDetail from "./ItemDetail";
import Payment from "./Payment";
export default {
    data() {
        return {
            Items: [
                // { invId: 1, name: "An Item", image: "https://picsum.photos/300/200", price: 999, description: "This round bottle is made of opaque bright rose glass.  It has a mid-length neck, stands about seven inches tall, and the ink on its label has been washed off." },
                // { invId: 2, name: "Thing", image: "https://picsum.photos/300/200", price: 1499, description: "This round bottle is made of opaque chartreuse glass.  It has a mid-length neck, stands about six inches tall, and the ink on its label has been washed off." },
                // { invId: 3, name: "Doo-dad", image: "https://picsum.photos/300/200", price: 499, description: "This coffin-shaped bottle is made of opaque lilac glass.  It has a long neck, stands about five inches tall, and it has no label." },
                // { invId: 4, name: "Other thing", image: "https://picsum.photos/300/200", price: 299, description: "This cylindrical bottle is made of transparent bright turquoise glass.  It has a mid-length neck, stands about twelve inches tall, and it has a simple printed label." },
                // { invId: 5, name: "Last One", image: "https://picsum.photos/300/200", price: 899, description: "This teardrop-shaped bottle is made of translucent bright purple glass.  It has a mid-length neck, stands about eleven inches tall, and most of its label has been torn off." }
            ],
            itemsPerRow: 2
        }
    },
    created() {
        let that = this
        firebase.firestore
            .collection("Items")
            .get()
            .then(snapshot => {
                let itemArr = [];
                snapshot.forEach(document => {
                    itemArr.push(document.data());
                });
                that.Items = itemArr
            });
    },
    methods: {
        seeDetails(item) {
            this.$navigateTo(ItemDetail, { props: { item: item } });
        },
        addItem(item) {
            this.$navigateTo(Payment, { props: { item: item } });
   		}
    }
Let's add the item details page as app/components/ItemDetail.vue:
<template>
    <Page backgroundSpanUnderStatusBar="true">
        <ActionBar>
            <Label text="Details"></Label>
        </ActionBar>
        <ScrollView>
            <StackLayout>
                <CardView class="card" margin="10" col="0" elevation="20">
                    <GridLayout class="card-layout" rows="400, auto,auto,auto,auto,auto" columns="*, *, *">
                        <Image :src="item.image" stretch="aspectFill" colSpan="3" row="0" />
                        <Label :text="item.name" class="item-name" row="1" colSpan="3" />
                        <Label :text="item.price| dollars" class="item-price" row="2" colSpan="3" />
                        <Button row="3" colSpan="2" text="Buy" @tap="buyItem(item)" class="btn btn-primary m-t-20 add-button" />
                        <StackLayout class="line" row="4" colSpan="3" />
                        <TextView editable="false" row="5" colSpan="3" class="item-desc" textWrap="true" :text="item.description" />
                    </GridLayout>
                </CardView>
            </StackLayout>
        </ScrollView>
    </Page>
</template>

<script>
import Payment from "./Payment";
export default {
    components: {},
    filters: {
        dollars: num => `$${num / 100}`
    },
    props: {
        item: {
            type: Object,
            required: true
        }
    },
    data() {
        return {
        }
    },
    computed: {
    },
    methods: {
        buyItem(item) {
            this.$navigateTo(Payment, { props: { item: item } });
        }
    }
};
</script>

<style scoped>
.card {
    background-color: #fff;
    color: #4d4d4d;
    margin: 15;
}

.card-layout {
    padding: 20;
}

.line {
    background-color: #cecece;
    height: 1;
    margin: 0;
    padding: 4;
}

.item-name {
    font-size: 16;
    color: black;
}

.item-price {
    font-size: 14;
    color: rgb(54, 54, 54);
}

.item-desc {
    font-size: 16;
    color: black;
    padding-bottom: 10;
    background-color: transparent;
    border-color: transparent;
}

.add-button {
    height: 30;
    background-color: rgb(51, 51, 206);
    color: white;
    border-radius: 5;
    font-size: 20;
    font-weight: 600;
}
</style>
If you run the app again, you should still see the same items being read from Firestore and displayed by the app(with different images on iOS and the same image on Android due to the way url images are loaded/cached by each platform). You will get some errors if you don't create an empty file as app/components/Payment.vue, which we'll take care of next after we prepare our app to work with Stripe for payments.
Stripe
Let's add the Stripe plugin using tns plugin add nativescript-stripe. We'll need to import the Stripe Credit Card widget and declare our Stripe public token by changing app/app.js so it looks like:
import Vue from "nativescript-vue";
import Login from "./components/Login";
const application = require("tns-core-modules/application");

Vue.config.silent = false;
global.loaderOptions = {
    android: {
        margin: 100,
        dimBackground: true,
        color: "#4B9ED6",
        hideBezel: true,
        mode: 3
    },
    ios: {
        dimBackground: true,
        color: "#FFFFFF",
        hideBezel: true,
        mode: 3
    }
};
Vue.registerElement(
    "CardView",
    () => require("@nstudio/nativescript-cardview").CardView
);
Vue.registerElement(
    "CreditCardView",
    () => require("nativescript-stripe").CreditCardView
);
application.on(application.launchEvent, args => {
    if (args.ios) {
        STPPaymentConfiguration.sharedConfiguration().publishableKey = "YOUR_STRIPE_PUBLIC_TEST_KEY";
    }
});
new Vue({
    template: `
        <Frame>
            <Login />
        </Frame>`,
    components: {
        Login
    }
}).$start();
The Nativescript Stripe plugin will provide us with a credit card widget we can display in our app, as well as libraries which allow us to create a payment token using our public Stripe key, which we can then post to Stripe servers to process a payment. This approach will require running the Stripe server libraries on Firebase as a Cloud Function to process the payment using your private Stripe key.
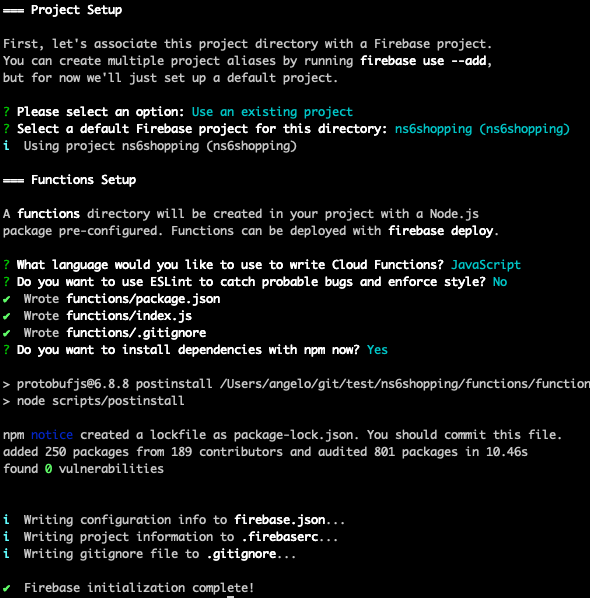
Next we'll prepare the Firebase Cloud Functions using the instructions here. Install the Firebase Console CLI package and create a new directory to store the functions code
npm install -g firebase-tools
mkdir functions
cd functions
firebase login
firebase init functions
The Firebase login CLI command should popup a window to request permission to use your Google account with Firebase CLI. Authorize it with the Google account used to create the Firebase project for this app. Once that's been authorized, you can run the CLI init command and choose to use an existing project with Javascript as the language and allow it to install the dependencies with NPM.
Now let's add the cloud function to process new entries to the Payments collection in Firestore. First, add the Stripe library with npm install stripe --save, which will be needed to call the Stripe API from the cloud function. Edit functions/functions/index.js so it looks like:
const functions = require("firebase-functions");
const admin = require("firebase-admin");
admin.initializeApp(functions.config().firebase);
const stripe = require("stripe")(functions.config().stripe.token);
exports.stripeCharge = functions.firestore
    .document("/Payments/{paymentId}")
    .onCreate(async (event, context) => {
        const payment = event.data();
        const paymentId = context.params.paymentId;
        const amount = payment.amount; // amount must be in cents
        const source = payment.token;
        const currency = "usd";
        const description = "Shopping App Purchase";
        const newcharge = {
            amount,
            currency,
            description,
            source
        };
        return await stripe.charges
            .create(newcharge, {
                idempotencyKey: paymentId //used to prevent double charges for the same payment request
            })
            .then(async function(charge, err) {
                if (err) console.error("error!:", err);
                else {
                    console.log("charge:", charge);
                    return charge;
                }
            })
            .then(newcharge => {
                return admin
                    .firestore()
                    .collection("Payments")
                    .doc(paymentId)
                    .update({ charge: newcharge })
                    .then(function(res) {
                        console.log("Updated DB", res);
                    })
                    .catch(err => {
                        console.error(err);
                    });
            });
    });
This function will trigger whenever there is a new document added to the Payments collection on Firestore. First it will send a charge request to the Stripe platform, and if that succeeds, it will store the charge receipt back into the Payments document for this purchase. We use async/await operations to ensure that both the Stripe call and the database updates are run and finish before the Cloud Function execution daemon completes and loses authorization.
Next, add your private test key to your Firebase Cloud Functions config with the CLI using:
firebase functions:config:set stripe.token=<YOUR PRIVATE STRIPE TEST API KEY>
and deploy the function with:
firebase deploy --only functions
If you get an error about the Stripe package missing during deploy, make sure a reference appears in the package.json dependencies with an entry similar to "stripe": "^8.4.0".
Now let's create the payment page in our app so the user has can enter their credit card information and make a purchase. Add the payment page as app/components/Payment.vue:
<template>
<Page backgroundSpanUnderStatusBar="true">
<ActionBar>
<Label text="Payment"></Label>
</ActionBar>
<ScrollView>
<StackLayout>
<CreditCardView ref="ccview"></CreditCardView>
<GridLayout class="" rows="*,*,*,*,*,*" columns="100,*">
<Label ref="name" text="Name:" class="" row="0" col="0" />
<TextField class="input" row="0" col="1" hint="Joe Buyer" v-model="buyer.name" fontSize="18" />
<Label text="Email:" class="" row="1" col="0" />
<TextField ref="email" class="input" row="1" col="1" hint="[email protected]" v-model="buyer.email" fontSize="18" />
<Label text="Address:" class="" row="2" col="0" />
<TextField ref="address" class="input" row="2" col="1" hint="2025 Thorntree Drive" v-model="buyer.address" fontSize="18" />
<Label text="City:" class="" row="3" col="0" />
<TextField ref="city" class="input" row="3" col="1" hint="Wallawalla" v-model="buyer.city" fontSize="18" />
<Label text="State:" class="" row="4" col="0" />
<TextField ref="state" class="input" row="4" col="1" hint="Washington" v-model="buyer.state" fontSize="18" />
<Label text="Postal Code:" textWrap="true" class="" row="5" col="0" />
<TextField ref="postalcode" class="input" row="5" col="1" hint="38291" v-model="buyer.postalcode" fontSize="18" />
</GridLayout>
<GridLayout rows="*" columns="*, *">
<Button row="0" col="0" text="Cancel" @tap="$navigateBack()" class="btn cancel-button m-t-20 " />
<Button row="0" col="1" text="Submit" @tap="submitPayment()" class="btn buy-button m-t-20" />
</GridLayout>
<CardView class="card" margin="10" elevation="20" @tap="seeDetails(item)">
<GridLayout class="card-layout" rows="50" columns="50, *,*,*">
<Image :src="item.image" stretch="aspectFill" col="0" row="0" />
<Label :text="item.name" class="" row="0" col="1" />
<Label :text="item.price | dollars" class="" row="0" col="2" />
</GridLayout>
</CardView>
<StackLayout class="line" />
<CardView class="card" margin="10" elevation="20">
<GridLayout class="card-layout" rows="50" columns="50, *,*">
<Label text="Total:" class="" row="0" col="1" />
<Label :text="total | dollars" class="" row="0" col="2" />
</GridLayout>
</CardView>
</StackLayout>
</ScrollView>
</Page>
</template>
<script>
import firebase from "nativescript-plugin-firebase";
import ItemDetail from "./ItemDetail";
import { Stripe, Card } from 'nativescript-stripe';
import { isAndroid, isIOS } from "tns-core-modules/platform";
export default {
components: {},
filters: {
dollars: num => `$${num / 100}`
},
data() {
return {
buyer: {},
stripeObj: null,
};
},
props: {
item: {
type: Object,
required: true
}
},
computed: {
total() {
return this.item.price
},
},
methods: {
seeDetails(item) {
this.$navigateTo(ItemDetail, { props: { item: item } });
},
submitPayment() {
let that = this
let cardobj
let ccview = this.$refs.ccview.nativeView
let myCallback = function getPaymentMethod(err, pm) {
if (pm) {
return that.submitStripePayment(pm.id, that.buyer.email, that.total);
} else if (err) {
console.log(err);
}
}
if (isAndroid) {
let newcard = ccview.android.getCard() //null if invalid
if (newcard && newcard.validateCard()) {
cardobj = new Card(newcard.getNumber().toString(), Number(newcard.getExpMonth()), Number(newcard.getExpYear()), newcard.getCVC().toString())
this.stripeObj.createToken(cardobj, (error, token) => {
if (!error) {
that.submitStripePayment(token.id, that.buyer.email, that.total).then(() => {
alert("Payment sent").then(() => {
that.$navigateBack()
})
}).catch(err => {
alert("Sorry, we were unable to reach our payment server. Try again later")
})
} else {
console.log("Error creating token!")
console.log(error);
alert("Sorry, we were unable to reach our payment server. Try again later")
}
})
} else {
console.log("INVALID card")
alert("Sorry, credit card is not valid")
}
} else if ((isIOS && ccview.ios && ccview.ios.isValid)) {
cardobj = new Card(ccview.ios.cardNumber.toString(), ccview.ios.expirationMonth, ccview.ios.expirationYear, ccview.ios.cvc.toString())
this.stripeObj.createToken(cardobj, (error, token) => {
if (!error) {
that.submitStripePayment(token.id, that.buyer.email, that.total).then(() => {
alert("Payment sent").then(() => {
that.$navigateBack()
})
}).catch(err => {
alert("Sorry, we were unable to reach our payment server. Try again later")
})
} else {
console.log("Error creating token!")
console.log(error);
alert("Sorry, we were unable to reach our payment server. Try again later")
}
})
} else {
alert("Sorry, credit card is not valid")
}
},
submitStripePayment(token, email, amount) {
let charge = {};
return firebase.firestore.collection("Payments").add({
email: email,
amount: amount,
token: token,
charge: charge,
createDate: new Date()
}).then(documentRef => {
console.log(`Payment Token added with auto-generated ID: ${documentRef.id}`);
return Promise.resolve(documentRef);
}).catch(
err => {
return Promise.reject(err);
});
},
},
created() {
this.stripeObj = new Stripe('YOUR_STRIPE_PUBLIC_TEST_KEY'); //public test key
}
};
</script>
<style scoped>
.card {
background-color: #fff;
color: #4d4d4d;
margin: 15;
}
.card-layout {
padding: 20;
}
.line {
background-color: #cecece;
height: 2;
margin: 0;
padding: 4;
}
.input {
font-size: 18;
placeholder-color: #a8a8a8;
}
.buy-button {
height: 30;
background-color: rgb(51, 51, 206);
color: white;
border-radius: 5;
font-size: 20;
font-weight: 600;
}
.cancel-button {
height: 30;
background-color: rgb(179, 31, 31);
color: white;
border-radius: 5;
font-size: 20;
font-weight: 600;
}
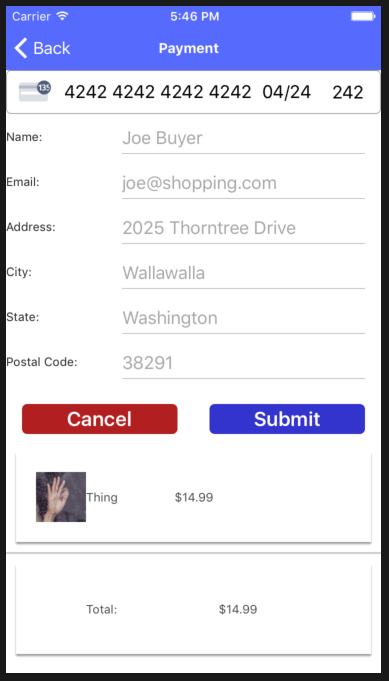
</style>You'll see that we use the plugin's credit card widget at the top of the page, followed by the usual user information to be collected for a purchase. This widget provides visual cues based on the credit card information entered, and also has functionality to verify if it has valid credit card data. When the user wishes to purchase an item, the app will validate the credit card information, create a new entry in the Payments collection on Firestore and include the payment token generated from the user credit card information and your public Stripe key. Make sure you're using your test keys for now, so you can test the payment flow with one of the test cards for Stripe. If everything is working properly, you should see the following screen when you tap on the Buy button for an item:
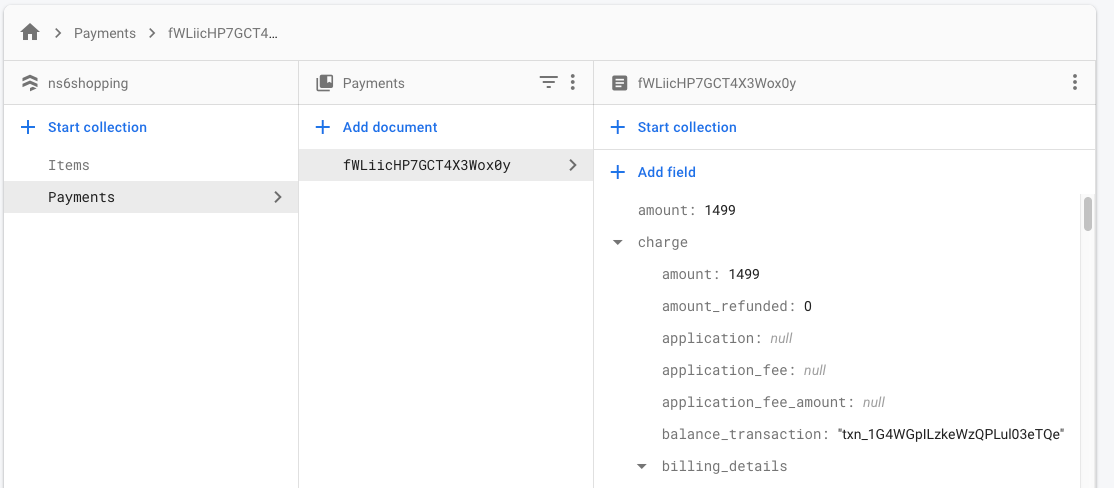
Enter the card info from one of the test credit cards, and submit a purchase request. You can now check your Firebase Console Firestore DB and see the new purchase entry made by the app by the app, and updated with the charge details after the cloud function has completed processing:
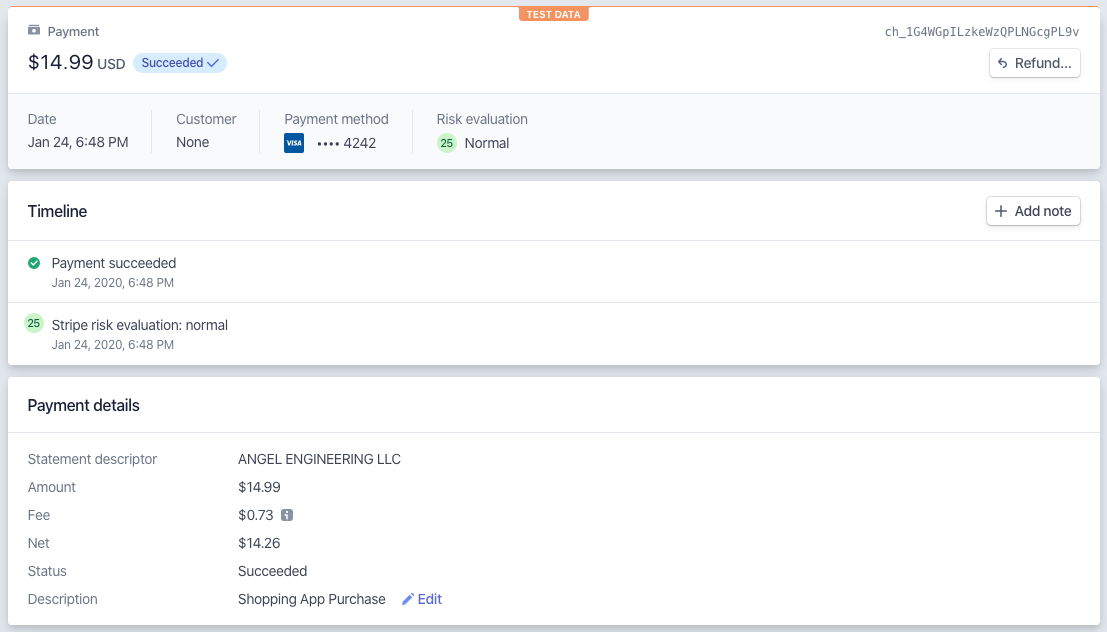
If this didn't work, you can check the Cloud Function logs to ensure that the server processing completed without errors. If there are no problems, check your Stripe Test Dashboard and you should see the payment.
Done!
That's it for this post. If you'd like to download the final source files, you can find them on Github.