
The vast majority of profitable apps are free to download and install, but offer a number of virtual products for sale. This can range from unlocking a new emoji to subscriptions for streaming media, and are referred to as In-App Purchases by mobile developers. If you've been curious about how to use these in a Nativescript Vue application, then this post is for you. I'll go over how to add support for purchasing software products via the Apple App Store and Google Play Store using Nativescript Vue, as well as how to detect these purchases to unlock features of your app.
To begin, we'll create a new Blank Vue app using the Nativescript CLI:
tns create ns6inappbuyTo support In-App Purchases (IAP), we'll use the Nativescript Purchase plugin (this is the last free release of the plugin and currently works with Nativescript 6), installed with:
tns plugin add nativescript-purchase
Before we can start making use of the app, we'll have to configure the virtual products to be sold in the App Store and Play Store. For the Android Play Store, we'll have to create and upload an application with the minimum store presence before we can test the purchase process. The iOS App Store only requires setting up a new app in the App Store Connect console without requiring a binary or store presence details, so we'll start with the iOS platform to ensure the purchase code is working properly.
Setting up IAP for the Apple App Store
First, you'll have to register a new App Identifier on the Apple Developer Console using the same app ID defined in your package.json.
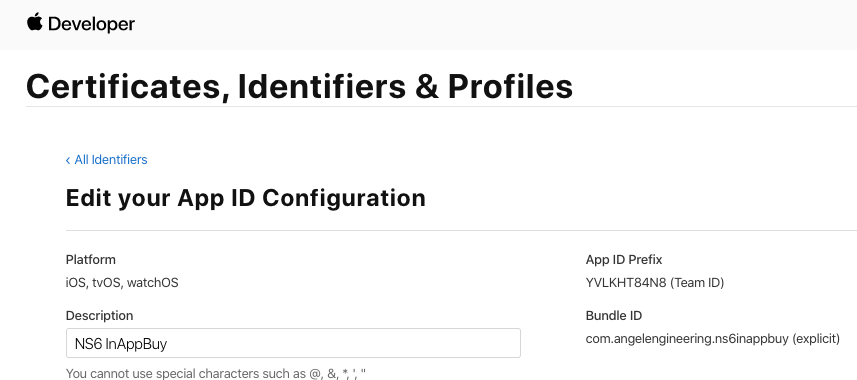
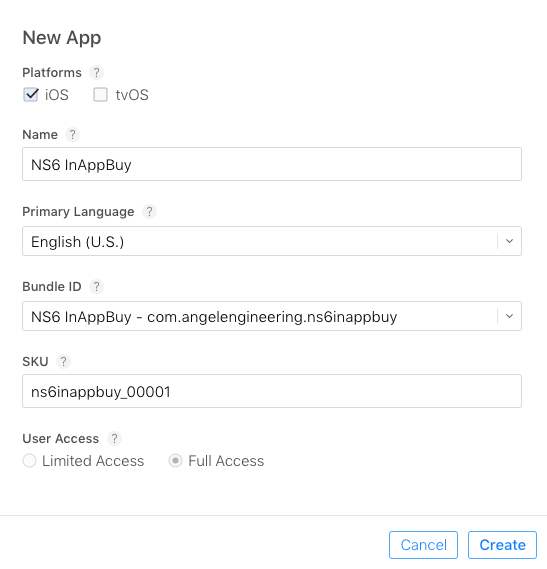
This will take a little while to process before we can make use of it on the App Store Connect Console. Once it's ready, you'll be able to select it as the Bundle ID for a new iOS app created in your App Store account.
With the app registered, we can now add an IAP product by going to the Features Tab for the new app in the App Store Connect Console. You can ignore the warning since we'll only be doing sandbox testing for this app, and you won't have to submit a complete app for approval in order to test the integration.
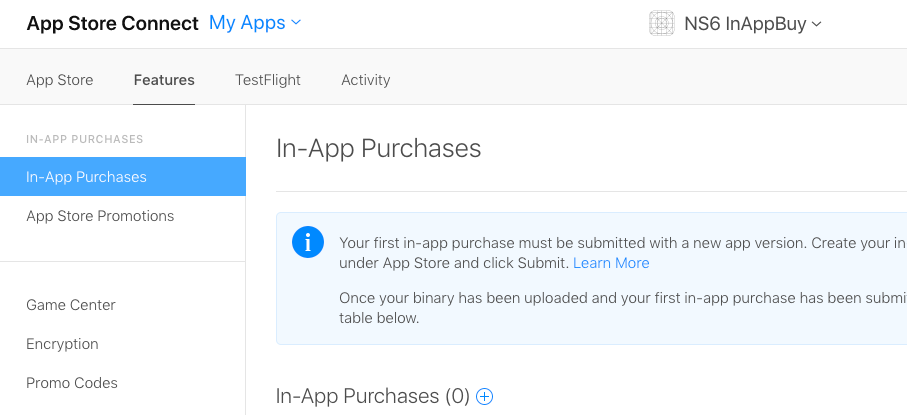
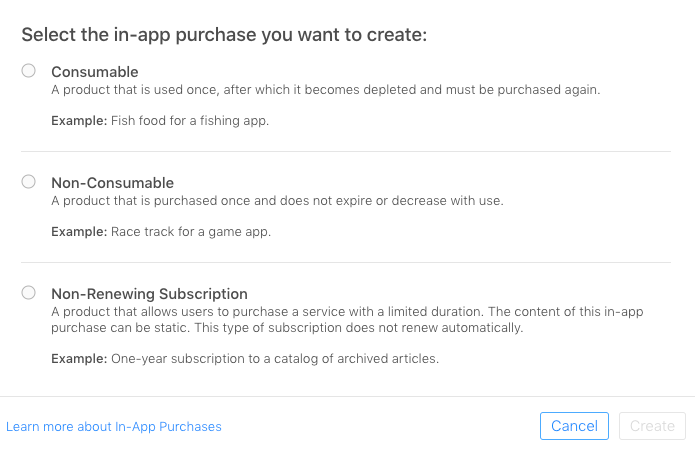
Let's add a subscription product first. When you tap the add icon, you'll be presented with a list of product choices. If you don't see a fourth option for Auto-Renewable Subscription, you'll need to take care of some financial and legal paperwork first.
To enable the auto renew subscription option, go to the Agreements, Tax and Banking section in App Store Connect:
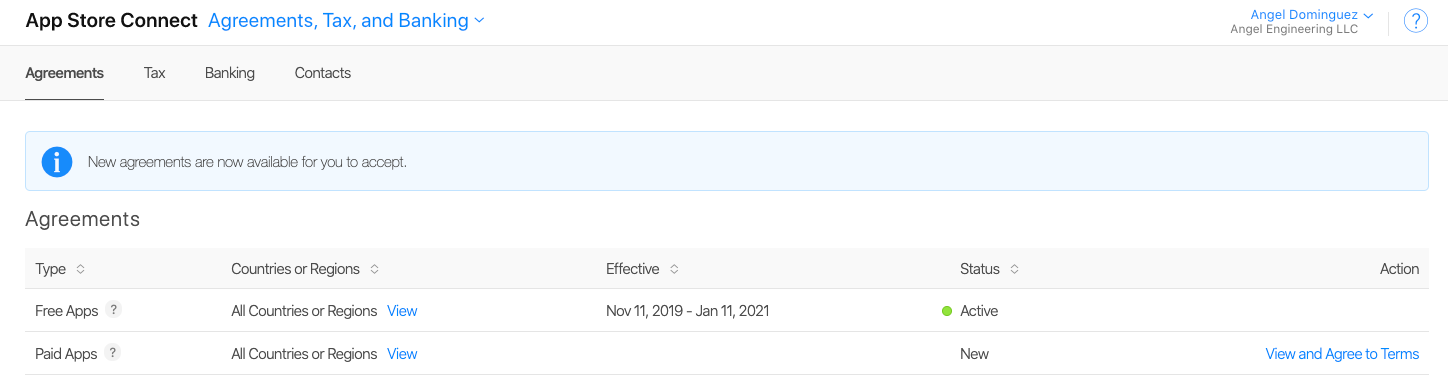
You'll see that the Paid Apps agreement has not been completed yet, tap on the View and Agree to Terms link, verify your address and agree to the terms. Once that's complete, you'll see a new link to follow for completing the required financial forms.

Tapping on that link will bring up a new page with various forms you'll need to fill out and submit.
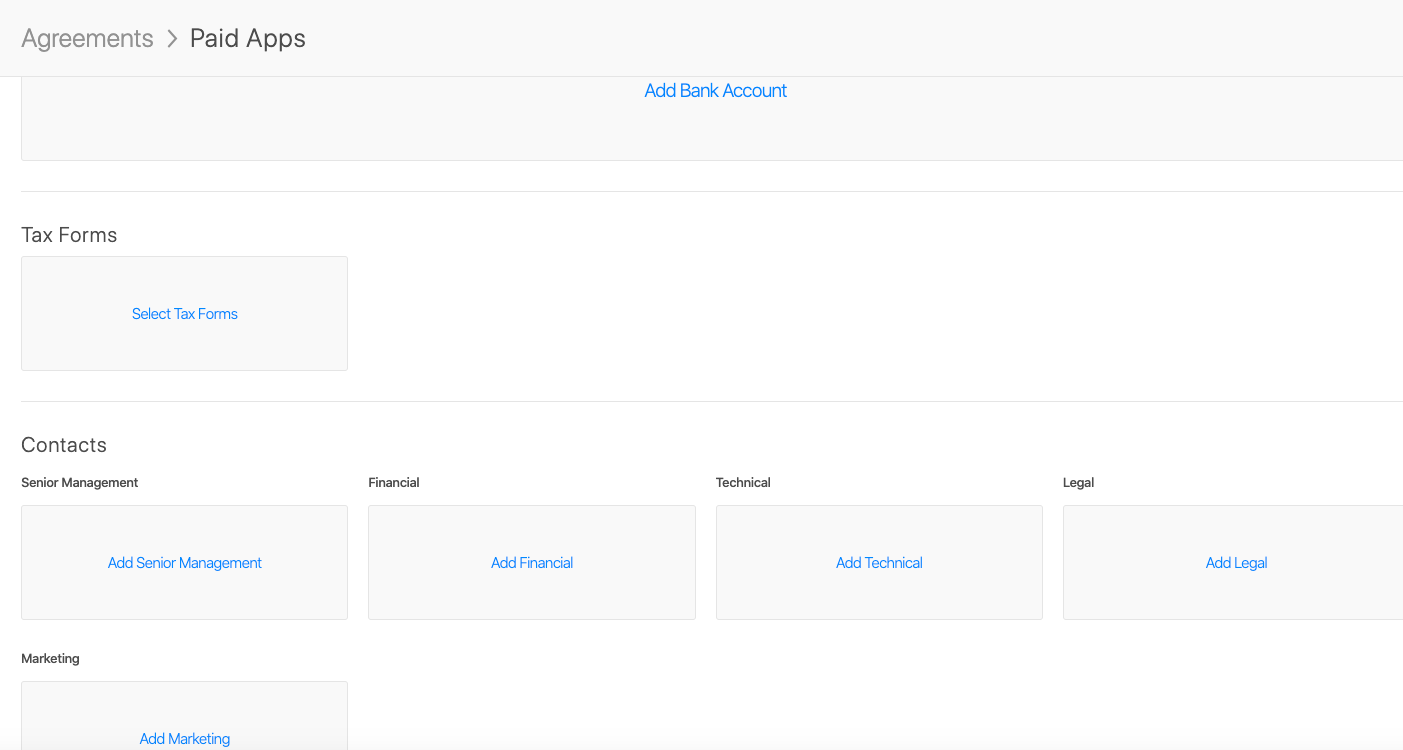
You'll need to fill out the Bank Account and Tax Forms forms. You can add the same Contact information for all of the Contacts sections. Once everything has been completed, it may take up to a day for the bank verification to process. Once the bank details and all other sections and forms have been completed and verified, the account will be marked active and allow sale of recurring subscriptions.
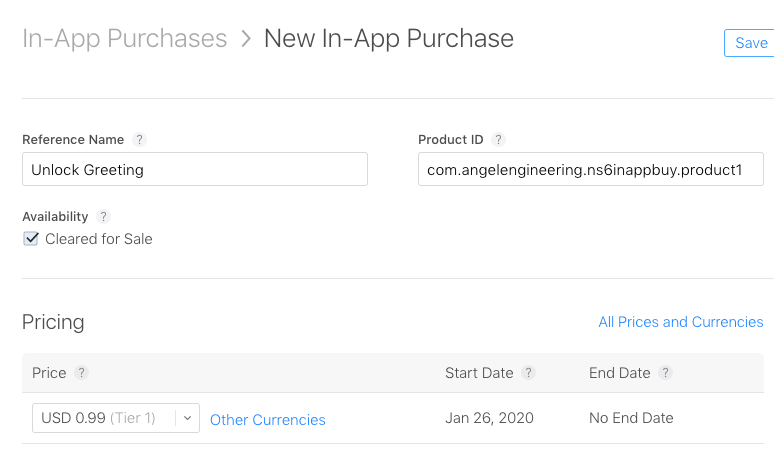
For this post, I'll create two products for IAP. These will be a monthly recurring subscription (to display a random image) and a one-time upgrade(non-consumable) product (to display welcome text). Let's start with the non-consumable product, which we will assign a Product ID of com.angelengineering.ns6inappbuy.product1. Fill out the rest of the details including the Reference Name, Pricing, Display Name and Description before saving the new product. You'll get a "Missing Metadata" warning until you add a screenshot to the screenshot section for the product (you can add any screenshot captured from an iOS simulator for now since this will never be sent for review).
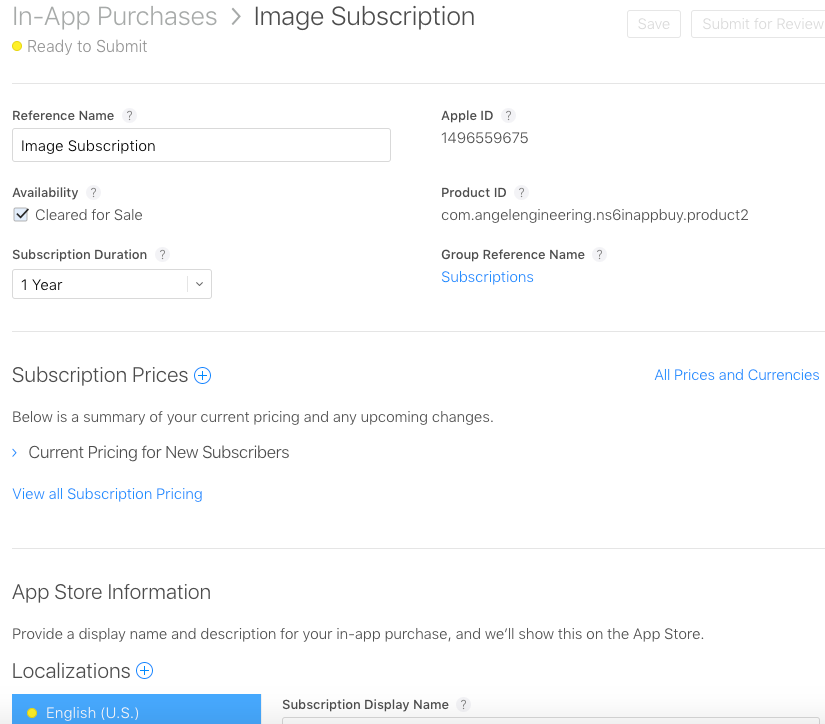
Once that's been accepted, add another product as an Auto-Renewable Subscription, enter a Name and the Product ID of com.angelengineering.ns6inappbuy.product2, and continue to fill out the rest of the information including the name for the group of subscription choices you'll be offering(along with 1 localization), the Reference Name, Subscription Duration, Subscription Price, App Store Information Localization and the same iOS screenshot under the Review Information section.
With these two products ready on the App Store, let's go back to the app and start using them. We'll start by importing the plugin library and adding some initialization code to app/app.js:
import Vue from "nativescript-vue";
import Home from "./components/Home";
import * as purchase from "nativescript-purchase";

Vue.config.silent = false;
global.purchaseInitPromise = purchase.init([
    "com.angelengineering.ns6inappbuy.product1",
    "com.angelengineering.ns6inappbuy.product2"
]);

new Vue({
    template: `
        <Frame>
            <Home />
        </Frame>`,
    components: {
        Home
    }
}).$start();
Because the plugin may take more time to initialize than the application, we wrap the init call as a Promise stored in the global object so we can access it on our main app page app/components/Home.vue. We must also supply the product IDs for the items which have to match the ones you've setup in App Store Connect. Let's edit app/components/Home.vue to be:
<template>
<Page>
<ActionBar title="In-App Purchase" class="action-bar">
<ActionItem ios.position="right" text="Restore" @tap="onRestoreTap" />
</ActionBar>
<StackLayout>
<StackLayout v-for="item in Items" :key="item.localizedTitle">
<GridLayout rows="auto, auto" columns="*, auto" padding="5" @tap="onProductTap(item)">
<Label row="0" col="0" :text="item.localizedTitle" textWrap="true" class="item-title" color="black" fontSize="18" />
<Label row="1" col="0" :text="item.localizedDescription" textWrap="true" color="rgb(75, 75, 75)" />
<Label row="0" rowSpan="2" col="1" :text="item.isPurchased?'Bought':item.priceFormatted" color="black" fontSize="24" />
</GridLayout>
</StackLayout>
<Label v-show="isLoading" text="Loading..." />
<ActivityIndicator :busy="isLoading" />
<Label v-show="showGreeting" text="HELLO USER!!" fontSize="40" color="blue" />
<Image v-show="showPicture" src="https://picsum.photos/300/200" />
</StackLayout>
</Page>
</template>
<script>
import * as purchase from "nativescript-purchase";
import * as applicationSettings from "application-settings";
import { Transaction, TransactionState } from "nativescript-purchase/transaction";
import { Product } from "nativescript-purchase/product";
import { ItemEventData } from "ui/list-view";
export default {
data() {
return {
Items: [],
isLoading: true,
showGreeting: false,
showPicture: false,
}
},
created() {
let that = this
global.purchaseInitPromise.then(() => {
purchase.getProducts().then((products) => {
products.forEach((product) => {
if (applicationSettings.getBoolean(product.productIdentifier)) {
console.log("product " + product.productIdentifier + " already purchased")
product.isPurchased = true
if (product.productIdentifier == 'com.angelengineering.ns6inappbuy.product1') that.showGreeting = true
if (product.productIdentifier == 'com.angelengineering.ns6inappbuy.product2') that.showPicture = true
}
});
that.Items = products
that.isLoading = false
})
.catch((e) => {
console.log(e)
that.isLoading = true
});
})
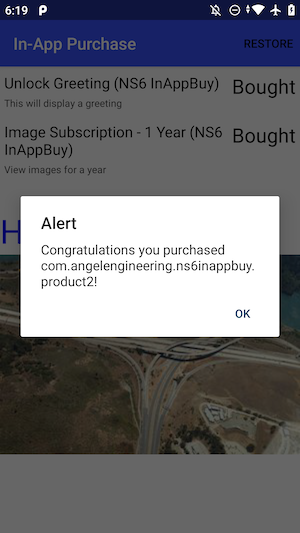
purchase.on(purchase.transactionUpdatedEvent, (transaction) => {
if (transaction.transactionState === TransactionState.Purchased) {
alert(`Congratulations you purchased ${transaction.productIdentifier}!`);
console.log(transaction.transactionDate);
console.log(transaction.transactionIdentifier);
applicationSettings.setBoolean(transaction.productIdentifier, true);
that.Items.forEach(item => { if (item.productIdentifier == transaction.productIdentifier) item.isPurchased = true })
if (transaction.productIdentifier == 'com.angelengineering.ns6inappbuy.product1') that.showGreeting = true
if (transaction.productIdentifier == 'com.angelengineering.ns6inappbuy.product2') that.showPicture = true
if (transaction.productIdentifier.indexOf(".consume") >= 0) {//Android only
purchase.consumePurchase(transaction.transactionReceipt)
.then((responseCode) => console.log(responseCode)) // If responseCode === 0 the purchase has been successfully consumed
.catch((e) => console.log(e));
}
} else if (transaction.transactionState === TransactionState.Restored) {
console.log(`Restored purchase of ${transaction.productIdentifier}.`);
console.log(transaction.transactionDate);
applicationSettings.setBoolean(transaction.productIdentifier, true);
that.Items.forEach(item => { if (item.productIdentifier == transaction.productIdentifier) item.isPurchased = true })
if (transaction.productIdentifier == 'com.angelengineering.ns6inappbuy.product1') that.showGreeting = true
if (transaction.productIdentifier == 'com.angelengineering.ns6inappbuy.product2') that.showPicture = true
} else if (transaction.transactionState === TransactionState.Failed) {
alert(`Purchase of ${transaction.productIdentifier} failed!`);
}
});
//uncomment to restore automatically on app load
// purchase.restorePurchases();
},
methods: {
onProductTap(data) {
if (data.isPurchased) {
console.log("This has already been purchased, ignoring")
return false
}
if (purchase.canMakePayments) {
console.log("Purchase allowed, purchasing product")
// NOTE: 'product' must be the same instance as the one returned from getProducts()
purchase.buyProduct(data);
} else {
alert("Sorry, your account is not eligible to make payments!");
}
},
onRestoreTap() {
console.log("Restoring purchases")
purchase.restorePurchases();
},
},
};
</script>
<style scoped lang="scss">
@import '~@nativescript/theme/scss/variables/blue';
</style>
Starting with the created() function, we call purchase.getProducts() to retrieve the product entries from the App/Play Store, and assign them to the local Items array. These are rendered at the top of the XML section once loaded. We also check if each product ID has an entry in ApplicationSettings, which is set when we detect a product purchase in the next section of code. This following section assigns an event handler that triggers whenever the purchase plugin detects a transaction from the App/Play Store. We check for the various event types possible, and when a purchase is detected, we set that ID in ApplicationSettings, and set the appropriate flag to display the purchase feature. For Android, there is an additional consumption of the purchase token needed to ensure it is registered properly in the Play Store as a sale.
In the case that the app has been installed on a new device and is missing these ApplicationSettings, the user can call the purchase.restorePurchases() function, which will send a restore event handled similarly to a purchase. There is a call for this at the end of created() that can be uncommented if you'd always like to check on app initialization, or use the button in the Action Bar at the top of the screen.
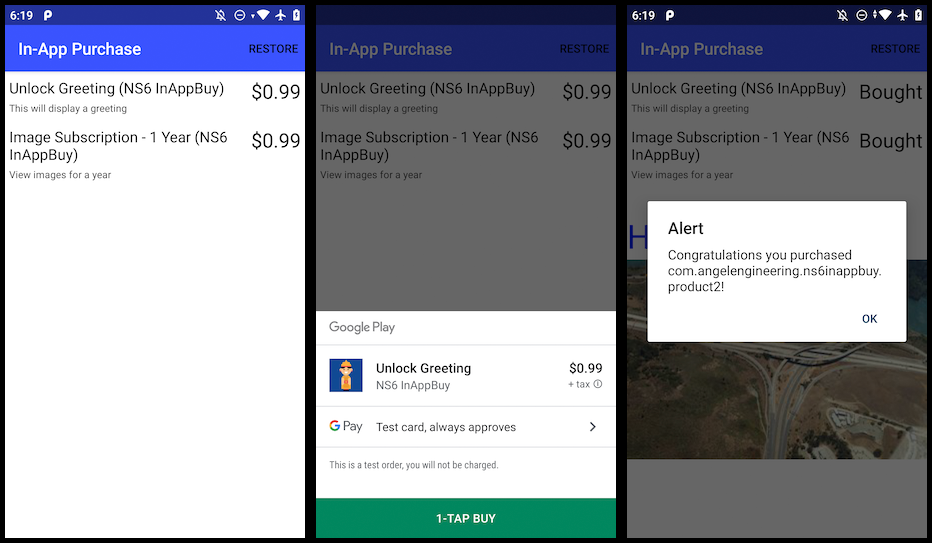
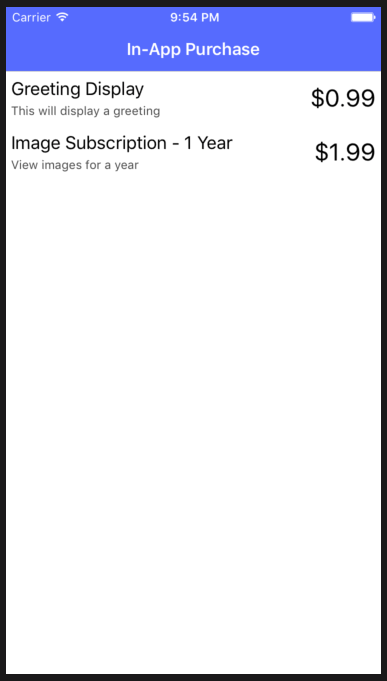
Run the app and you should now see the products from the App Store listed on the screen if everything is working properly.
Purchases on iOS
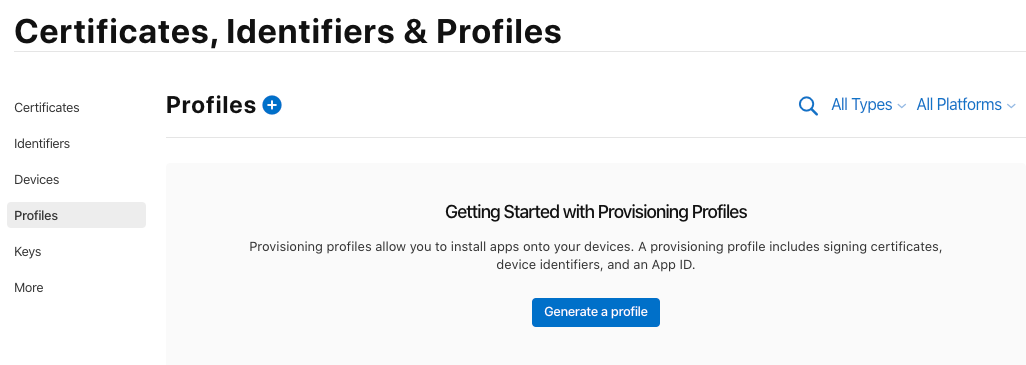
In order to actually test purchases for iOS, you must use a real device and a Sandbox Tester account to make test purchases. If you try and run this on an iOS simulator, you'll get an error when trying to make a purchase. Before we can install this app on a real device, we'll first need to setup a provisioning profile. Go back to the Apple Developer Account Console and tap on the plus sign to add a new profile.
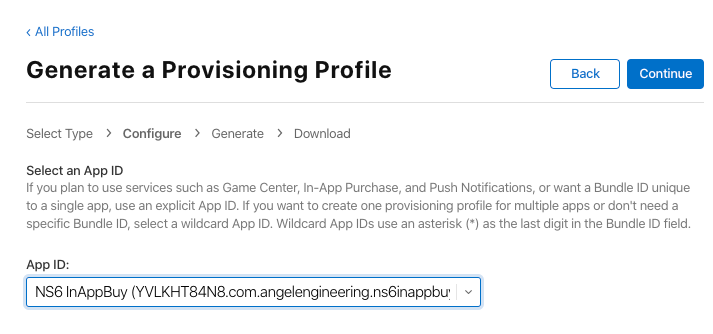
Select the option for 'iOS App Development', then continue to the next page and select the App ID for this app and download the provisioning file.
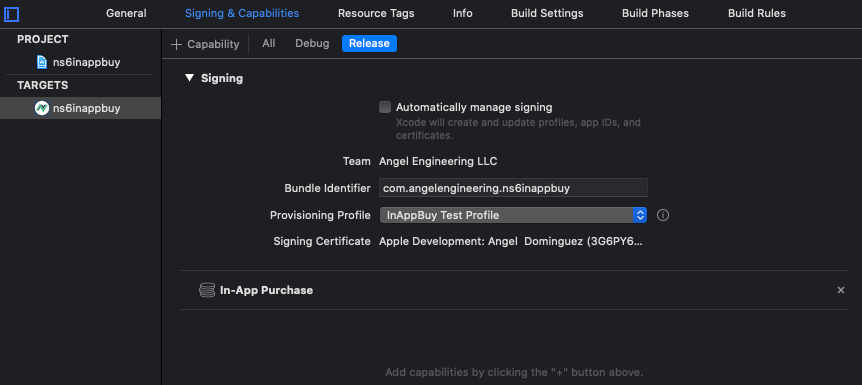
You can open this file to add it to your OSX Keychain and have it available for Xcode, or download the file and add it to Xcode later. Now we can prepare the Nativescript app bundle using tns build ios and open the project file /platforms/ios/ns6inappbuy.xcworkspace with Xcode. Go the the App Settings and uncheck "Automatically manage signing", then select the Provisioning Profile you just imported. Next, tap on the '+Capability' control and add the In-App Purchase capability to the application. You should now be able to build and deploy the app to your iOS device for testing.
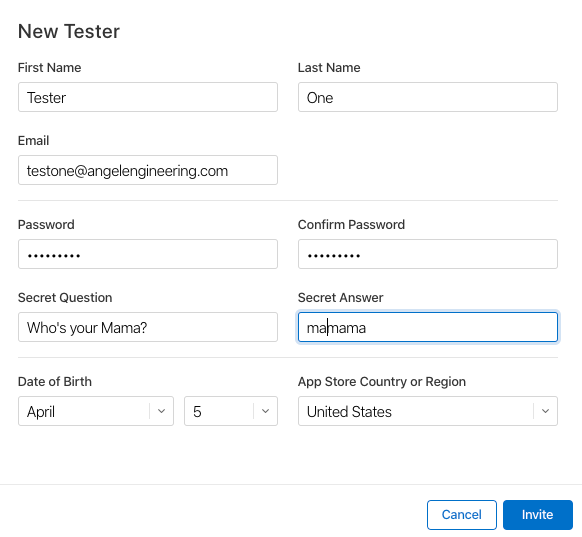
Before we can actually make a test purchase, we'll also need to create a Sandbox Tester account associated with your App Store Developer Account. Go back to your App Store Connect Console and go the the User and Access Section, then select Sandbox Testers to view your current test user accounts. Add a new one by tapping the plus icon and fill it out with anything for the name, but ensure you use a unique email account you haven't used as a test user before(preferably on a domain you control so you can confirm it). Also make sure the password is at least 8 characters and includes at least one uppercase letter.
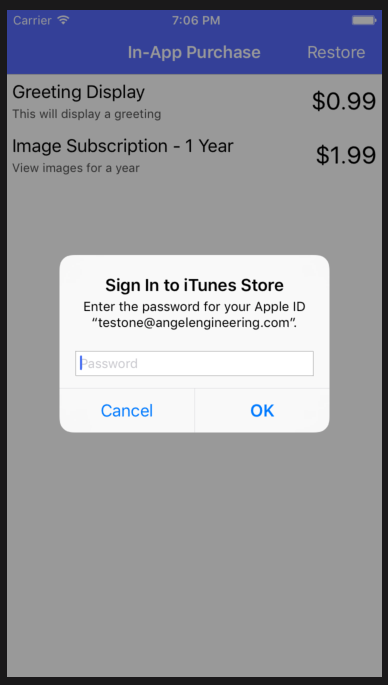
On the iOS device, go to the App Store, tap on your profile picture, and sign out of the App Store on the device. Then launch the app, and tap on a product to start the purchase process. When asked, choose to sign in with an existing account and enter the email and password for the test user you've created. If everything is ok, the purchase should work and register with the App Store Sandbox.
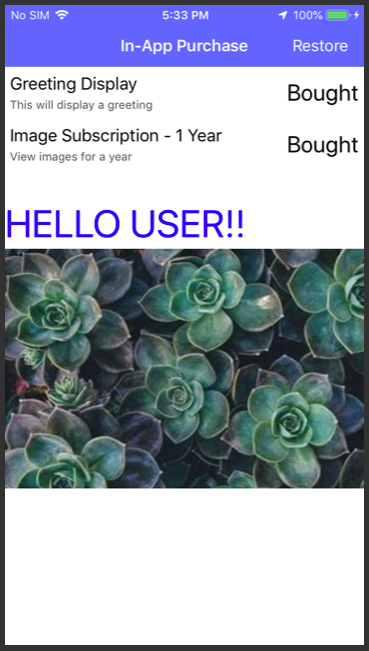
After purchasing both the non-consumable product(displaying a welcome message) and the subscription(display a random picture), you should now see the extra features unlocked on your screen.
Purchases on Android
For Android, this will not work in an emulator without fully installed and configured Google Play Store and Play Services, so we will develop and test this on a real device. Also, in order to test the purchase process with products, you'll need to publish the app to the Play Store and install it from there.
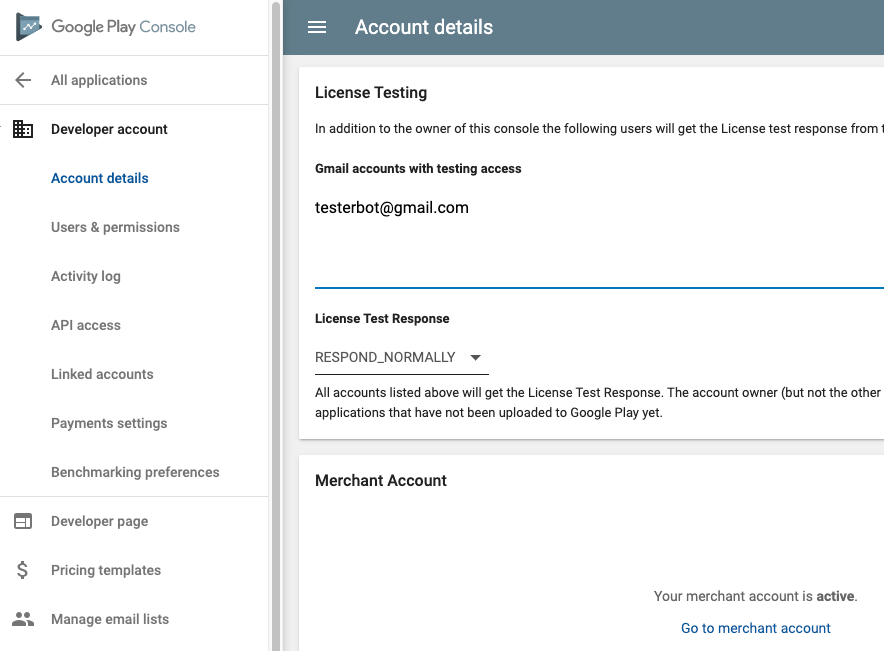
To get started, we'll add a test account using Google Play Console . Login, then go to Settings → Developer Account → Account Details, and scroll down to the License Testing section. Add the email address to a Google account you control that's different from your developer account. Any account added will be treated as a sandbox tester for this and any other Android app you have active in the Play Store. You should also verify your merchant account is active, or purchases will fail.
Now we'll go back to the main Application page on the Play Store Console, and create a new app with similar information used for the iOS App Store. Before we can add any IAP products, we'll need to upload the Android binary. You'll also need to add enough screenshots and other required data for a real app submission, but we'll only release it to the Internal Test track so it won't be shown on the Play Store. After you've uploaded a production signed binary to the app store and filled out all required information, we'll add our products.
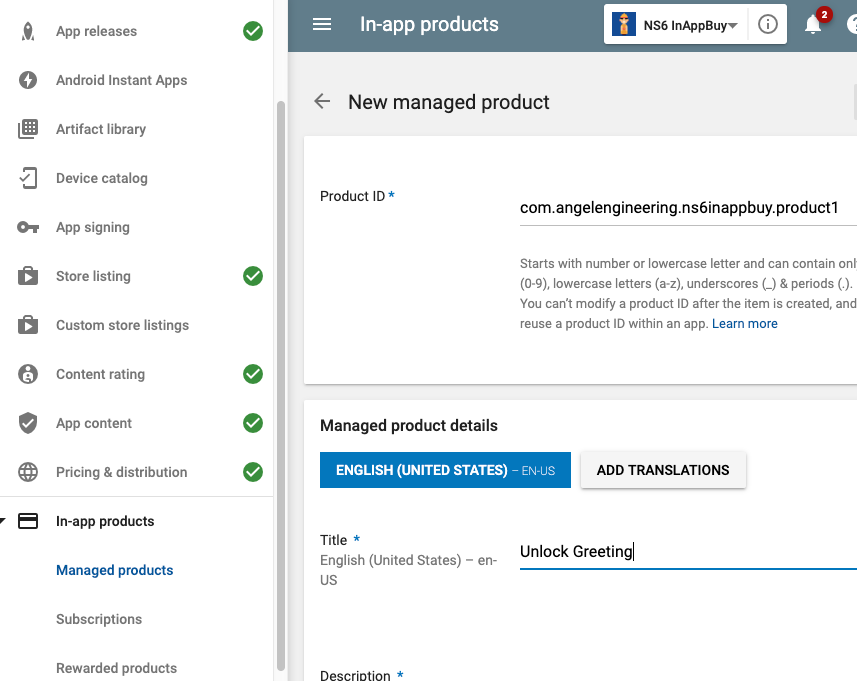
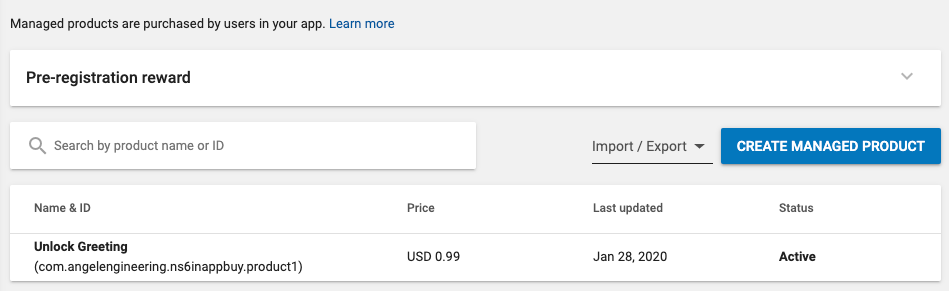
Go to the In-app Products section on the Play Store Console, and add a Managed Product, with the same ID, name, price and description we used in our iOS app for com.angelengineering.ns6inappbuy.product1.
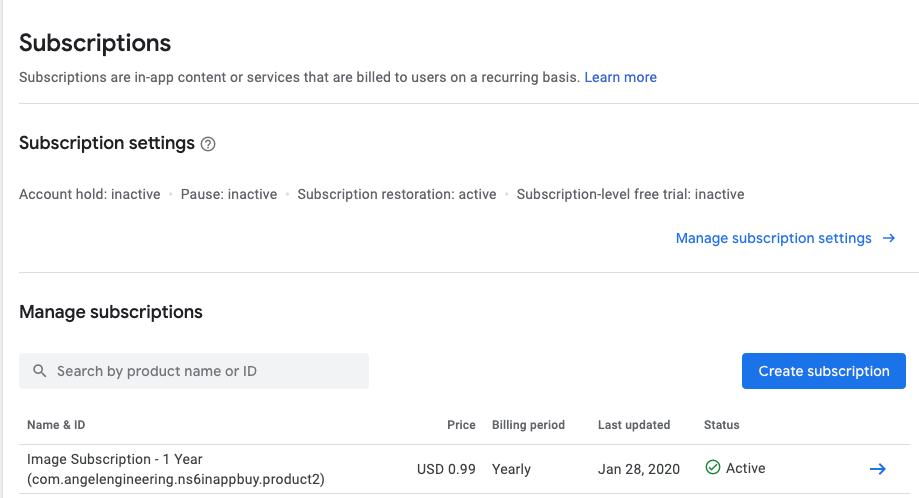
After that has been saved, go to the Subscriptions section and add a new subscription product with the same information as com.angelengineering.ns6inappbuy.product2 from the iOS version. Afterwards you should now have both products available for this app on the Play Store.
With everything in place, you should now be able to go to the Release Management section under App Releases and start the rollout to the Closed Alpha track. After you start this submission process, go back to the Release Management section and Manage the test release you just rolled out. Tap on the Manage Testers link, create a new email list of authorized testers and assign them to this app.
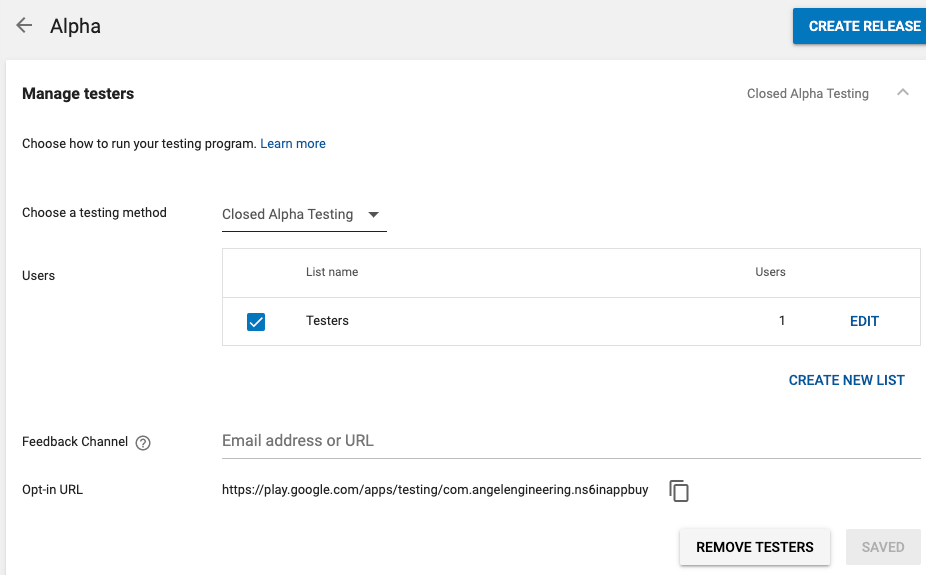
Check the Dashboard section to see when the app has completed processing and is in the Play Store. You should now see an Opt-in Url in the Manage Closed Alpha track section which will look something like https://play.google.com/apps/testing/com.angelengineering.ns6inappbuy. On your real Android device with your test user signed into the Play Store, open this link to register as a tester and install the app. Note that this link will not work until a few hours after the application has been released to the Alpha production track, so try it later if you get an error when following the link.
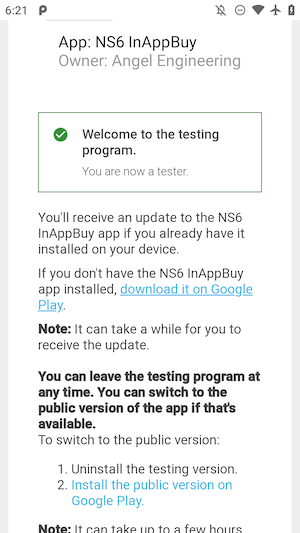
Once you've installed the app from this opt-in link, run it on your device and you should now see the products from the Play Store, and be able to purchase either product using the test account.
Done!
That's it for this post. If you'd like to download the final source files, you can find them on Github.