
After the success of the Pokemon Go mobile game, interest in Augmented Reality(AR) applications on mobile devices has steadily increased. Both Android and iOS have their own AR frameworks, but with Nativescript and the available AR plugin, you can start learning how to create your own cross-platform AR app with a lower learning curve. This post will show you the basics to develop a simple AR application using Nativescript Vue for placing, animating and interacting with 3D objects.
Setup a blank NS Vue app
To begin, let's scaffold a new Nativescript Vue application named ns6ar using the CLI (Nativescript v6.5.o for this post). When prompted, choose the Vue.js and Blank template to start with. Once that's complete, run the CLI diagnostic to ensure there are no issues with your NS environment. After that, add the Nativescript AR plugin(v1.1.0 for this post) to the blank app.
tns create ns6ar
cd ns6ar
tns doctor
tns plugin add nativescript-ar
Caveats
There are a few important things to keep in mind before we start creating an Augmented Reality application on Android and iOS. You can't use AR on an iOS simulator, so you'll need a real Apple device that supports ARkit. For iOS devices, this means you'll need an iPhone SE/6s and iPad Pro/2017 or newer models that are running at least iOS 11. If you want to support Face tracking, then you'll also need an iOS device with a front-facing TrueDepth camera which are only available on the iPhone X/XS/XS Max/XR, iPad Pro (11-inch) and iPad Pro (12.9-inch, 3rd generation) currently. Only ARkit v1 is supported by this plugin, so newer versions (which also require the absolute latest hardware) and their features are not available with the current version of the plugin.
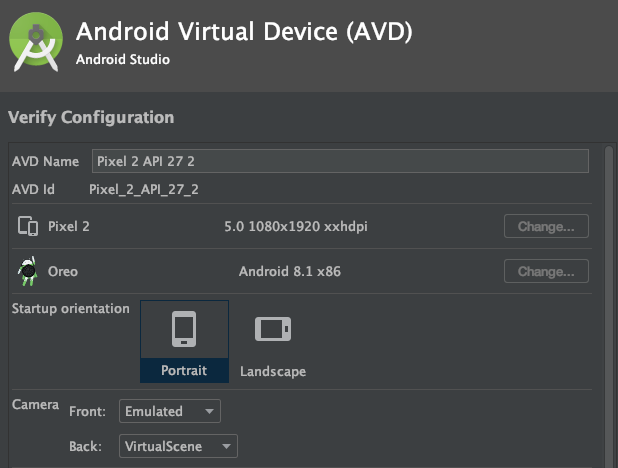
For Android, you can use AR on certain simulator configurations. To use a simulator for development, go into the AVD(Android Virtual Device) Manager in Android Studio and create a new virtual device using the Pixel 2 base configuration(which also includes support for Play Store since the Google Play Services for AR package is required). On the next screen select the Oreo API 27 or newer OS version, and on the final screen open the Advanced Settings and make sure the Back Camera is set to use VirtualScene as shown below.
Finally, go to the Android ARcore APK releases page, and download Google_Play_Services_for_AR_1.16.0_x86_for_emulator.apk. Start the simulator, and once it's loaded run the following command to install the library.
adb install -r Google_Play_Services_for_AR_1.16.0_x86_for_emulator.apk
You can check this page to find out if your device is supported or just try running one of the demo apps. In general though, it's best to develop an AR app using a real Android device instead of the simulator so you'll be able to test how well the app works in real world settings.
Finally, when developing and making changes to AR app code, make sure you disable Hot Module Reload, as this will generally crash the plugin (use tns run <platform> --no-hmr).
Setup the AR view
Let's start by modifying the blank template app so we can use the AR plugin to show an Augmented Reality view using the device camera. We'll first need to register the plugin by adding the following line to app/app.js after the import declarations:
Vue.registerElement("AR", () => require("nativescript-ar").AR);
We'll change the main app page by changing the contents of app/components/Home.vue to be:
<template>
    <Page>
        <ActionBar title="NS6Vue AR"></ActionBar>
        <GridLayout>
            <AR trackingMode="WORLD" debugLevel="FEATURE_POINTS" :planeMaterial="planeMaterial" planeOpacity="0.4" planeDetection="HORIZONTAL" showStatistics="false" @arLoaded="arLoaded" @sceneTapped="sceneTapped" @planeTapped="planeTapped" @planeDetected="planeDetected">
            </AR>
        </GridLayout>
    </Page>
</template>

<script>
import { Color } from "tns-core-modules/color";
import { isIOS, isAndroid } from "tns-core-modules/platform";
export default {
    data() {
        return {
            planeMaterial: new Color("white"),
        }
    },
    methods: {
        arLoaded(arLoadedEventData) {
            console.log(">> AR Loaded!");
            const arView = arLoadedEventData.object;
        },
        planeDetected(ARPlaneDetectedEventData) {
            console.log(">> plane Detected!")
        },
        planeTapped(arPlaneTappedEventData) {
            console.log(">> plane Tapped!")
            const arPlane = arPlaneTappedEventData.object;
            const position = arPlaneTappedEventData.position
            console.log(position)
        },
        sceneTapped(ARSceneTappedEventData) {
            console.log(">> scene Tapped!")
            const arScene = ARSceneTappedEventData.object;
            const position = ARSceneTappedEventData.position
            console.log(position)
        }
    },
};
</script>

<style scoped lang="scss">

</style>
The page consists of just the Action Bar and the AR view tag with some properties and event handlers configured, along with the corresponding handler methods defined in the script section. You should read up on these properties and events by looking at the plugin's documentation and the various AR app demos included with the plugin.
Let's go over the AR tag properties and events we'll be using for this post in more detail.
AR View Properties
- trackingMode - "WORLD" tracking is the default mode, and is the one most popularly used in AR apps. This mode scans the area seen by the camera to detect flat surfaces(planes) to be interacted with by AR objects. For this post we'll use the World Tracking mode to demonstrate most of the features supported on both platforms by this plugin. Another option is "FACE" tracking which tries to find faces in the AR view, and a nice example app can be found in the demo-glasses directory included with the plugin. "IMAGE" tracking attempts to find pre-defined 2D images while scanning (such as a checker board pattern) to interact with, and an example can be found in the demo-pokemon directory.
- planeDetection - Tells the plugin if it should try and detect flat surfaces(plane) and the type of surface (HORIZONTAL or VERTICAL). Vertical plane detection is IOS only, so you should only design apps based on horizontal surfaces when making a cross-platform app with this plugin.
- debugLevel (iOS only) - This specifies what kind of additional debug-related visual information will be shown by the plugin. "FEATURE_POINTS" will be the most useful and shows you a visual representation of the scan results as you pan the camera around while trying to detect surfaces to interact with.
- showStatistics (iOS only) - shows a few stats like FPS at the bottom of the AR window, although this is generally not that useful for initial development so you can just leave it disabled unless you're dealing with more complex scenes and models.
- planeMaterial (iOS only) - This lets you specify either a NS Color or an ARMaterial object to apply to planes when they are detected by the plugin when using an iOS device. For Android devices, only the default white polkadot pattern will be shown when panning the camera around to find a plane. In the code above, you'll see we've chosen a white NS Color for detected planes on iOS devices. If you don't specify a color or material, then nothing will be shown for detected planes, which makes development a bit harder visually.
- planeOpacity (iOS only) - Specifies how opaque the detected plane material/color will be displayed with 0 being invisible and 1 being solid.
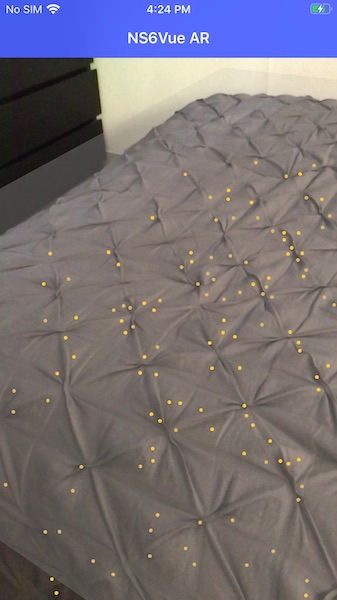
If you run the app now on an iOS device, pan it around a flat area and you should see something similar to the screenshot above. The feature points will appear while scanning the area for 3D information, and disappear when you hold the camera steady. When a flat area is detected, it will shade it as a translucent white plane to give you an idea of what the AR plugin has found during its scan.
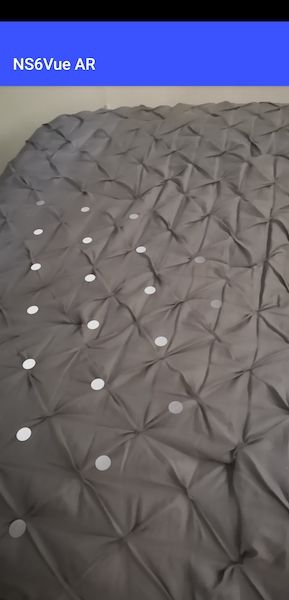
If you run the app on an Android device and pan it around a flat area, you should see white polka dots overlaid on detected planes similar to the screenshot below. The material and opacity properties have no effect on what's displayed.
AR View Events
- arLoaded - Sent when the AR view is loaded and ready to interact with. If you're using a slower device or have long running initialization code for your app, use this event to prevent any AR related functions from running until the AR view is ready.
- planeDetected - Similar to the arLoaded event, you can set a flag here to prevent any interactions with the view until a plane has been detected if you'll be using a plane as a reference point for objects in your AR scene.
- planeTapped - This is the one of the two main events used to interact with the AR view for most applications. If you'll be designing an app that relies on AR objects being anchored to a plane, then this will be what you use to add them to the view in a controlled manner. For example, you can add an object to the current view so that it looks like it's resting on top of the flat area detected in the view when the user taps it.
- sceneTapped - This is the other main event used to interact with an AR view. For those cases where you don't care if the added object needs an anchor point corresponding to a flat surface, then this allows you to add an object wherever the user taps the view. For example, you can use this if you want to add a 3D model floating in empty space where the user taps the screen, such as with the solar system demo included with the app.
Placing a model
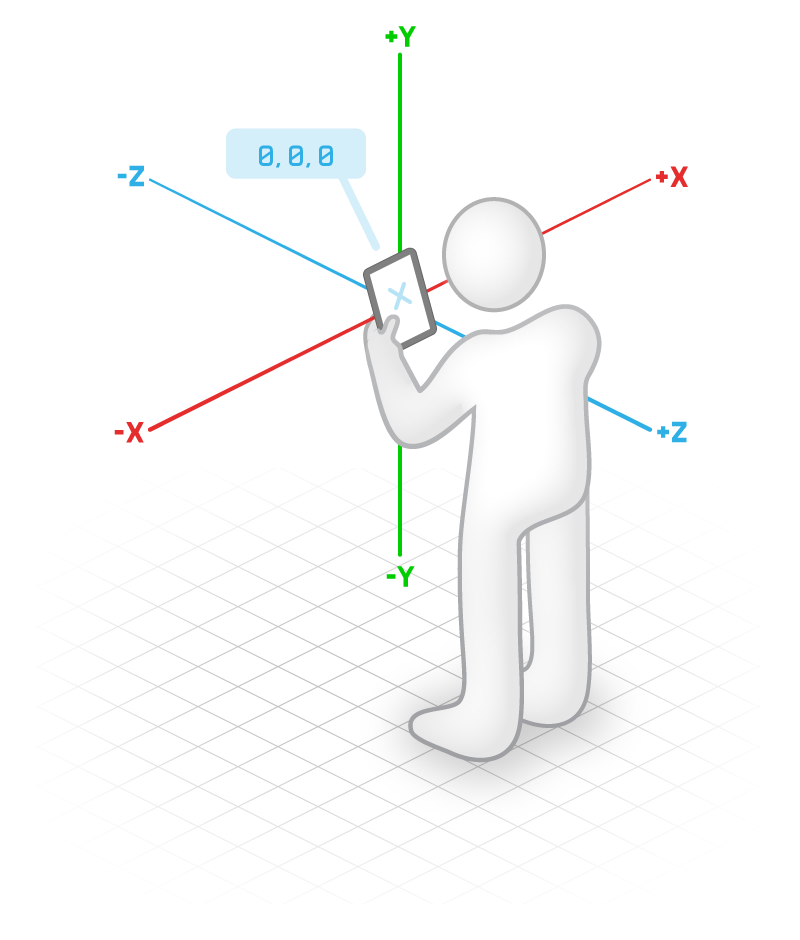
Run the app, pan the camera around a flat area until a plane is detected, tap somewhere on the plane, and you'll see a console message letting you know the coordinates for the location tapped on that plane. The illustration above shows the coordinate system used by the AR plugin, with each unit in the system corresponding to approximately 1 meter in real life. The plugin has built-in sphere, box and tube 3D models, as well as some other 2D constructs including Image, Video, UIView and Plane objects. It can also load more complex 3D models in DAE, USDZ and GLB formats, although I've had little success so far with any 3D models except for those included with the demos. With this in mind, let's start by adding a sphere to the detected plane where it's tapped.
Replace the planeTapped function in app/components/Home.vue with:
		planeTapped(ARPlaneTappedEventData) {
            console.log(">> plane Tapped!")
            const arPlane = ARPlaneTappedEventData.object;
            const position = ARPlaneTappedEventData.position
            console.log(position)
            const sphereRadius = 0.1
            arPlane.addSphere({
                radius: sphereRadius,
                position: {
                    x: position.x,
                    y: position.y + sphereRadius,
                    z: position.z - 0.5
                },
                materials: [new Color("blue")],
                onLongPress: interaction => {
                    console.log("Sphere was longpressed");
                },
                onTap: interaction => {
                    console.log("Sphere was tapped at coordinates " + interaction.touchPosition.x + " x " + interaction.touchPosition.y);
                },
                segmentCount: 100,
                draggingEnabled: false, //Android only
                rotatingEnabled: false, //Android only
                scalingEnabled: false, //Android only
                mass: 0, //iOS only
            }).then(arNode => {
                console.log("Sphere successfully added");
            })
        },
Using the arPlane object as the reference to the AR scene, we call the addSphere function with a few parameters and event handlers to add a model of a sphere. The sphere is given a radius of 0.1 meters. Its position is set to the coordinates where the plane was tapped, except we shift the sphere upwards (y-axis) by it's radius so that it lies just above the plane instead of intersecting it, and we also set it a bit further away (z-axis) from the current view. We'll color the sphere blue by assigning it a material using a Color. Every AR model supports two event handlers, onTap and onLongPress when someone taps or long-presses on an AR model, which we'll make use of later. segmentCount is used to define the detail level for the sphere model, and you should set this lower for smaller spheres or in more complex scenes to maintain a high render rate. The next three properties used in this example draggingEnabled, rotatingEnabled and scalingEnabled are only applicable on Android, so these should just be left disabled since they won't affect model interactions on iOS devices. If you run this on Android and set them to true, you can drag the sphere around, pinch to shrink, expand to enlarge and rotate it with two-finger interactions. The mass attribute is iOS only, and you can assign this a positive value to have it "fall" downwards. Be careful though, if there's no plane or it falls past the plane edge then it will fall out of view.
Applying materials to models
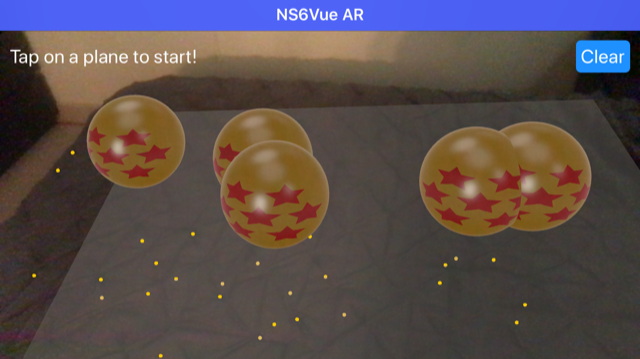
While colors work for simple objects and scenes, it's more interesting to be able to apply images as materials to AR objects. In order for the AR plugin to be able to use these images, you'll have to place them under the app\App_Resources folder for each platform. I've created a simple image with a yellow background and 7 red stars similar to a Dragon Ball from the popular anime series. For Android, I've placed a copy in app/App_Resources/Android/src/main/assets/SevenStar.fw.png. For iOS, I've also added a copy to app/App_Resources/iOS/SevenStar.fw.png. Now we can change the materials assignment to be:
{
diffuse: { contents: "SevenStar.fw.png", wrapMode: "Clamp" },
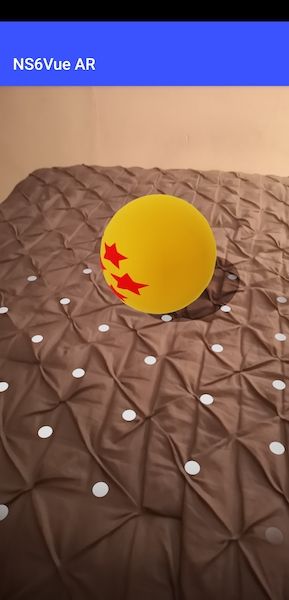
}If you run the app now on Android, you should see something similar to the following:
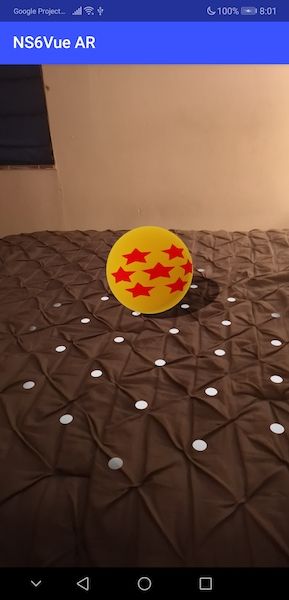
It looks better, but the model and material orientation is not quite aligned with our current view. To adjust this, we can add a rotation property to the addSphere function.
rotation:isIOS ? { x: -20, y: 0, z: 0 } : { x: 0, y: 100, z: -20 },On Android, this should now add a sphere that looks like:
And on iOS it should look like:
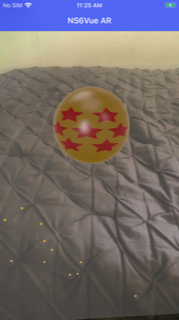
Keep in mind that iOS and Android will render objects and materials differently in terms of position, orientation, scale and rotation, so you'll need to fine-tune your code for each platform. There are also a number of other materials properties that can be applied, although these are also platform-dependent and don't always work as expected. You'll notice that Android objects will have a flat matte material look and cast a shadow by default. iOS objects will have a glossy metallic material look and not cast a shadow. You can look through the documentation and the plugin demos to see the different material properties, and then test them against iOS and Android to see which are supported and work according to each platform's AR SDK and the plugin's source code bridges. You can also use native code to achieve better results in some cases.
Interacting with a model
Every AR object supports two event handlers as well as a number of function calls as can be seen in the plugin documentation. Using the two event handlers we've stubbed in for our sphere, let's use some transformation functions when the user taps and long-presses on a sphere. Modify those functions to look like:
				onLongPress: interaction => {
                    console.log("Sphere was longpressed");
                    interaction.node.remove()
                },
                onTap: interaction => {
                    console.log("Sphere was tapped at coordinates " + interaction.touchPosition.x + " x " + interaction.touchPosition.y);
                    const scale = 1
                    interaction.node.scaleBy(scale)
                    setTimeout(() => {
                        interaction.node.scaleBy(-scale)
                    },1000)
                },
Now if you long-press on a sphere, it will be removed from the scene. Tapping on a sphere will cause it to double in size and then go back to the original size after a second. Similarly, we can also apply a number of other transformation functions besides these two such as moveTo, moveBy, scaleBy, rotateBy, and setVisible.
Animating models
If you test the app as it is now, you'll see that using the scaleBy function will cause an abrupt scale change instead of a gradual one. This can be smoothed out in two ways. For iOS, we can set an AR scene flag with if (isIOS) SCNTransaction.animationDuration = .5; which will interpolate the scale change animation to smooth it out. For Android, we'll have to rely on using a timer to approximate the interpolation steps instead. An example of using many small steps to animate an object transformation can be see in the solar system demo.
For this post, let's add the following code to change the onTap function to start the model rotating and moving smoothly in a circular pattern when tapped:
onTap: interaction => {
                    console.log("Sphere was tapped at coordinates " + interaction.touchPosition.x + " x " + interaction.touchPosition.y);
                    if (!interaction.node.animTimer) { //start the timer
                        let walkDegrees = 1;
                        const radius = 1;
                        const fps = 120;
                        interaction.node.animTimer = setInterval(() => {
                            walkDegrees += 1 / fps
                            let newX, newY, newZ
                            newX = interaction.node.position.x - Math.cos(walkDegrees) * radius
                            newY = interaction.node.position.y
                            newZ = interaction.node.position.z - Math.sin(walkDegrees) * radius
                            interaction.node.moveTo({ x: newX, y: newY, z: newZ });
                            interaction.node.rotateBy({
                                x: 0,
                                y: walkDegrees,
                                z: 0
                            });
                        },1000 / fps);
                    } else {
                        clearInterval(interaction.node.animTimer)
                        interaction.node.animTimer = null
                    }
                },
If you run the code now, tap on the plane to add a sphere and then tap the sphere, it will start spinning and moving in a circular path. Looking at the code, we check if there's a Timer id already attached to the tapped object, and if not then we start a new timer that will change the position slightly every time it's run. We run the timer every few hundredths of a second to move the object by a small amount using the sine and cosine relationship to describe a circle, as well as rotating it by a degree to achieve a smooth animation appearance overall. This works ok, but you'll notice that it tends to jump from its starting placement to the right before starting to move in a circle since the sin/cosine calculation will move it to a perimeter position abruptly. Also, if you tap it again to stop and start the animation, you'll see that it tends to jump in position since we're not maintaining the last degree value in state. Let's improve this by storing the current displacement variable walkDegree inside the object by initializing it after it's created in a then => statement. We'll also use a constant rotateDegree to maintain a constant rotation speed to keep it from accelerating constantly. Finally, for the first few hundred frames of the animation we'll slowly scale the movement translations up to avoid a jump from the center of the circular path to the perimeter
arPlane.addSphere({
                radius: sphereRadius,
                position: {
                    x: position.x,
                    y: position.y + sphereRadius,
                    z: position.z - 0.5 //show it further away from camera
                },
                rotation: isIOS ? { x: -20, y: 0, z: 0 } : { x: 0, y: 100, z: -20 },
                materials: [{
                    diffuse: { contents: "SevenStar.fw.png", wrapMode: "Clamp" },
                }],
                onLongPress: interaction => {
                    console.log("Sphere was longpressed");
                    interaction.node.remove()
                },
                onTap: interaction => {
                    console.log("Sphere was tapped at coordinates " + interaction.touchPosition.x + " x " + interaction.touchPosition.y);
                    const rotateDegree = 1;
                    const radius = 1;
                    const fps = 120;
                    if (!interaction.node.animTimer) { //start the animation
                        interaction.node.animTimer = setInterval(() => {
                            interaction.node.walkDegrees += 1 / fps
                            if (interaction.node.walkDegrees <= 10) {
                                interaction.node.newX = interaction.node.position.x - Math.cos(interaction.node.walkDegrees) * radius * interaction.node.walkDegrees / 10
                                interaction.node.newY = interaction.node.position.y
                                interaction.node.newZ = interaction.node.position.z - Math.sin(interaction.node.walkDegrees) * radius * interaction.node.walkDegrees / 10
                            } else {
                                interaction.node.newX = interaction.node.position.x - Math.cos(interaction.node.walkDegrees) * radius
                                interaction.node.newY = interaction.node.position.y
                                interaction.node.newZ = interaction.node.position.z - Math.sin(interaction.node.walkDegrees) * radius
                            }
                            interaction.node.moveTo({ x: interaction.node.newX, y: interaction.node.newY, z: interaction.node.newZ });
                            interaction.node.rotateBy({
                                x: 0,
                                y: rotateDegree,
                                z: 0
                            });
                        }, 1000 / fps);
                    } else { //stop the animation
                        clearInterval(interaction.node.animTimer)
                        interaction.node.animTimer = null
                    }
                },
                draggingEnabled: false, //Android only
                rotatingEnabled: false, //Android only
                scalingEnabled: false, //Android only
                segmentCount: 100,
                mass: 0, //iOS only
            }).then(arNode => {
                console.log("Sphere successfully added");
                arNode.walkDegrees = 0;
            })
Adding a user interface
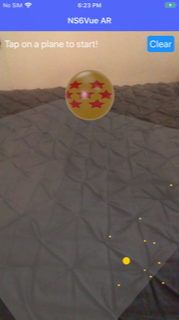
Our current AR view is shown full screen, but we can also overlay some UI elements on top of it to allow the user to interact with the scene in other ways or present information without taking up layout space on the device. For this post, we'll add some text at the top letting the user know that they should tap a flat surface to add a sphere. We'll also add a button to remove all the objects from the scene so they can start over with an empty AR scene. To do this, we'll have the GridLayout declarations ordered with the AR tag first, and then any additional UI tags afterwards so that Nativescript will display these over (higher z-index) than the AR view.
Add the following after the AR tag in the XML section of the file:
			<GridLayout rows="auto" columns="*, auto" verticalAlignment="top">
                <Label row="0" col="0" text="Tap on a plane to start!" class="ar-text" textWrap="true" />
                <Label row="0" col="1" text="Clear" class="ar-button" @tap="clearModels()" />
            </GridLayout>
The new Label button will call a new function clearModels to remove all the current models from the scene. To do this, we'll need to start storing references for every model added to the scene by adding a new array variable to the page's data declaration so it looks like:
	data() {
        return {
            planeMaterial: new Color("white"),
            objects: [],
        }
    },
In the then section of code after adding a new sphere, we'll push the new object reference to this array using this.objects.push(arNode). We'll modify the long-press handler to remove the object reference from this array whenever the user removes an individual sphere from the scene by using the following before removing the modelthis.objects.splice(this.objects.indexOf(interaction.node), 1). Finally, we'll add the function definition for clearModels called by the button:
		clearModels() {
            this.objects.forEach(model => {
                model.remove()
            })
        },
Run the app with these changes on an iOS device, and you'll now see something like:
Done!
That's it for this post. If you'd like to download the final source files, you can find them on Github.