

Note: There is an updated version of this post showing the creation of a login screen for Nativescript 6
 Tips, Tech & Tidbits
I recently experimented with React Native and enjoyed some features of React but was left with mixed feelings about using React Native for complex apps. I appreciated many of the UI features in React Native along with its development toolset, but was underwhelmed by its native integration as compared to Nativescript. When I read about the release of Nativescript 4.2 and then the 2.0 version release of the Nativescript-Vue plugin, I thought it would be interesting to create a simple app with Vue.js and Nativescript with a login screen that uses Firebase Authentication and Font Awesome Icons, on both the iOS and Android platforms.
This post will need a working Nativescript 4.2.4 install so if you're on an older version of Nativescript like I was (4.0), upgrade to 4.2(latest version as of this post) using the following command:
npm install -g nativescript
After an upgrade I always run a diagnostic check, create a test app with the Nativescript CLI and then run the Hello World app in the iOS simulator to make sure the Nativescript install is working:
tns doctor
tns create testapp
cd testapp
tns run ios
Nativescript Vue 2.0.0 uses a new Vue-CLI template that has been streamlined with a directory structure that conforms closely to that of a standard NativeScript mobile app. Setting up a new Nativescript Vue app (which will be named "nsvfblogin" for this post) is easily done using the Vue CLI and the newly released 2.0.0 template with the following commands:
npm install -g @vue/cli @vue/cli-init
vue init nativescript-vue/vue-cli-template nsvfblogin
The CLI will ask a few questions when creating your app. Enter a Project Name using lowercase letters (nsvfblogin for this post), Application name (nsvfblogin for this post) and a Unique Application Identifier(or bundle id) for the app (com.angelengineering.nsvfblogin for this post). You can select default choices or enter real information for the next few choices. When asked about which preset application template, select Simple. We won't use VueX for state management with this app, so you can say no to this. When asked, you should install the Vue-devtools library for debugging. Let's run the app after the CLI finishes:
cd nsvfblogin
npm install
tns run ios --bundle
Note: The bundle flag must always be used since Nativescript Vue uses webpack to prepare the app for compilation.
If you don't have the Vue-devtools client application installed on your system, you can install it globally and run it using:
npm install -g @vue/devtools@beta
vue-devtools&
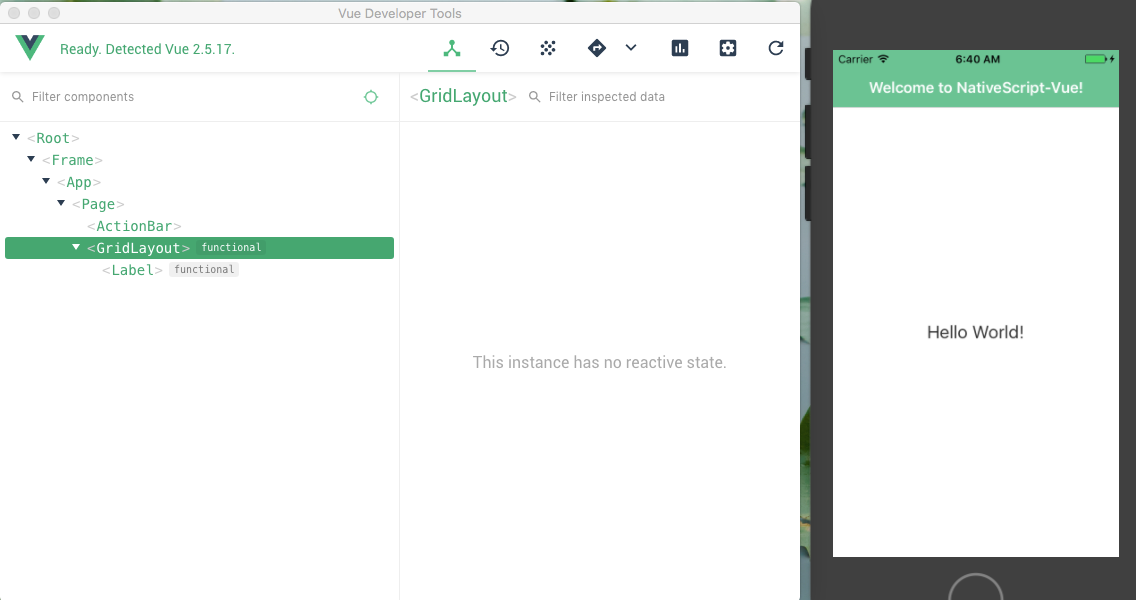
Now if you re-run your app from the CLI, Vue Devtools should display a few components in the component tree from the simple Hello World Nativescript Vue app.
Since I'm new to Vue, I read through some posts on Nativescript Vue development I found online and looked at some sample Nativescript Vue code on the Nativescript Marketplace. The marketplace collection includes a login screen written in Nativescript Vue, which makes it a great starting point for this post. You can look at the code from the Nativescript Playground and then start modifying your app files as follows.
First, we'll create a new file named LoginPage.vue under /app/components that contains the following:
<template>
	<Page>
		<FlexboxLayout class="page">
			<StackLayout class="form">
				<Image class="logo" src="~/images/logo.png" />
				<Label class="header" text="APP NAME" />

				<StackLayout class="input-field" marginBottom="25">
					<TextField class="input" hint="Email" keyboardType="email" autocorrect="false" autocapitalizationType="none" v-model="user.email"
					 returnKeyType="next" @returnPress="focusPassword" fontSize="18" />
					<StackLayout class="hr-light" />
				</StackLayout>

				<StackLayout class="input-field" marginBottom="25">
					<TextField ref="password" class="input" hint="Password" secure="true" v-model="user.password" :returnKeyType="isLoggingIn ? 'done' : 'next'"
					 @returnPress="focusConfirmPassword" fontSize="18" />
					<StackLayout class="hr-light" />
				</StackLayout>

				<StackLayout v-show="!isLoggingIn" class="input-field">
					<TextField ref="confirmPassword" class="input" hint="Confirm password" secure="true" v-model="user.confirmPassword" returnKeyType="done"
					 fontSize="18" />
					<StackLayout class="hr-light" />
				</StackLayout>

				<Button :text="isLoggingIn ? 'Log In' : 'Sign Up'" @tap="submit" class="btn btn-primary m-t-20" />
				<Label v-show="isLoggingIn" text="Forgot your password?" class="login-label" @tap="forgotPassword" />
			</StackLayout>

			<Label class="login-label sign-up-label" @tap="toggleForm">
	          <FormattedString>
	            <Span :text="isLoggingIn ? 'Don’t have an account? ' : 'Back to Login'" />
	            <Span :text="isLoggingIn ? 'Sign up' : ''" class="bold" />
	          </FormattedString>
	        </Label>
		</FlexboxLayout>
	</Page>
</template>
<script>
// A stub for a service that authenticates users.
const userService = {
  register(user) {
    return Promise.resolve(user);
  },
  login(user) {
    return Promise.resolve(user);
  },
  resetPassword(email) {
    return Promise.resolve(email);
  }
};
// A stub for the main page of your app. In a real app you’d put this page in its own .vue file.
const HomePage = {
  template: `
	<Page>
        <Label class="m-20" textWrap="true" text="You have successfully authenticated. This is where you build your core application functionality."></Label>
	</Page>
	`
};
export default {
  data() {
    return {
      isLoggingIn: true,
      user: {
        email: "[email protected]",
        password: "foo",
        confirmPassword: "foo"
      }
    };
  },
  methods: {
    toggleForm() {
      this.isLoggingIn = !this.isLoggingIn;
    },
    submit() {
      if (!this.user.email || !this.user.password) {
        this.alert("Please provide both an email address and password.");
        return;
      }
      if (this.isLoggingIn) {
        this.login();
      } else {
        this.register();
      }
    },
    login() {
      userService
        .login(this.user)
        .then(() => {
          this.$navigateTo(HomePage);
        })
        .catch(() => {
          this.alert("Unfortunately we could not find your account.");
        });
    },
    register() {
      if (this.user.password != this.user.confirmPassword) {
        this.alert("Your passwords do not match.");
        return;
      }
      userService
        .register(this.user)
        .then(() => {
          this.alert("Your account was successfully created.");
          this.isLoggingIn = true;
        })
        .catch(() => {
          this.alert("Unfortunately we were unable to create your account.");
        });
    },
    forgotPassword() {
      prompt({
        title: "Forgot Password",
        message:
          "Enter the email address you used to register for APP NAME to reset your password.",
        inputType: "email",
        defaultText: "",
        okButtonText: "Ok",
        cancelButtonText: "Cancel"
      }).then(data => {
        if (data.result) {
          userService
            .resetPassword(data.text.trim())
            .then(() => {
              this.alert(
                "Your password was successfully reset. Please check your email for instructions on choosing a new password."
              );
            })
            .catch(() => {
              this.alert(
                "Unfortunately, an error occurred resetting your password."
              );
            });
        }
      });
    },
    focusPassword() {
      this.$refs.password.nativeView.focus();
    },
    focusConfirmPassword() {
      if (!this.isLoggingIn) {
        this.$refs.confirmPassword.nativeView.focus();
      }
    },
    alert(message) {
      return alert({
        title: "APP NAME",
        okButtonText: "OK",
        message: message
      });
    }
  }
};
</script>

<style scoped>
	.page {
		align-items: center;
		flex-direction: column;
	}

	.form {
		margin-left: 30;
		margin-right: 30;
		flex-grow: 2;
		vertical-align: middle;
	}

	.logo {
		margin-bottom: 12;
		height: 90;
		font-weight: bold;
	}

	.header {
		horizontal-align: center;
		font-size: 25;
		font-weight: 600;
		margin-bottom: 70;
		text-align: center;
		color: #D51A1A;
	}

	.input-field {
		margin-bottom: 25;
	}

	.input {
		font-size: 18;
		placeholder-color: #A8A8A8;
	}

	.input-field .input {
		font-size: 54;
	}

	.btn-primary {
		height: 50;
		margin: 30 5 15 5;
		background-color: #D51A1A;
		border-radius: 5;
		font-size: 20;
		font-weight: 600;
	}

	.login-label {
		horizontal-align: center;
		color: #A8A8A8;
		font-size: 16;
	}

	.sign-up-label {
		margin-bottom: 20;
	}

	.bold {
		color: #000000;
	}
</style>
Next, edit the /app/main.js file and modify it so it looks like:
import Vue from 'nativescript-vue'
import VueDevtools from 'nativescript-vue-devtools'
import LoginPage from './components/LoginPage'

if(TNS_ENV !== 'production') {
  Vue.use(VueDevtools)
}
// Prints Vue logs when --env.production is *NOT* set while building
Vue.config.silent = (TNS_ENV === 'production')

new Vue({
  render: h => h('frame', [h(LoginPage)])
}).$start()
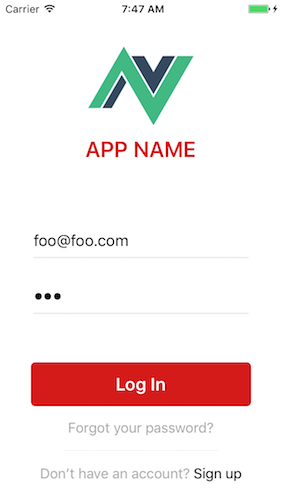
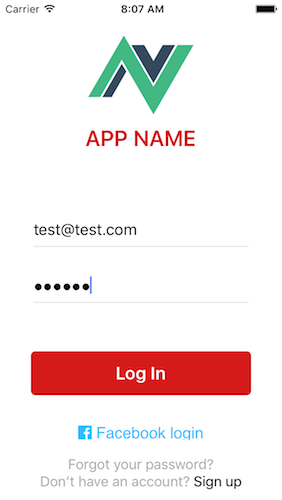
If you run your app, you should now have a semi-functional login page displayed. Nativescript will use /app/main.js as the entry point to the app, and then we ask the Vue plugin to render the newly created LoginPage.vue once the app is loaded and running. This login page has functional switching between login and signup views, as well as a hooks for those actions and for a password reset request. You can enter an email and password and tap the Login button to simulate a successful login and show a simple stub page. Tapping the Sign Up link will show an extra field for confirming your password as well as change the button to now simulate a successful signup with an alert message confirmation. Finally, tapping the Forgot your Password link will popup a dialog requesting your email address and simulate successfully sending a reset request. Our simple login front-end is ready, and now we'll work on installing and configuring Firebase to provide real authentication.
Firebase
Firebase is a popular service from Google that offers back-end APIs for everything from Authentication to Analytics, and speeds up development time for a mobile app by not having to build out your own back-end. They offer a free tier of accounts that are perfect for small mobile applications while offering paid tiers for complex apps with more traffic. Nativescript has a great plugin for Firebase integration which we'll use to connect the login page to a working back-end. Make sure to look over the plugin's github page to read the documentation and in case of any problems you may run into.
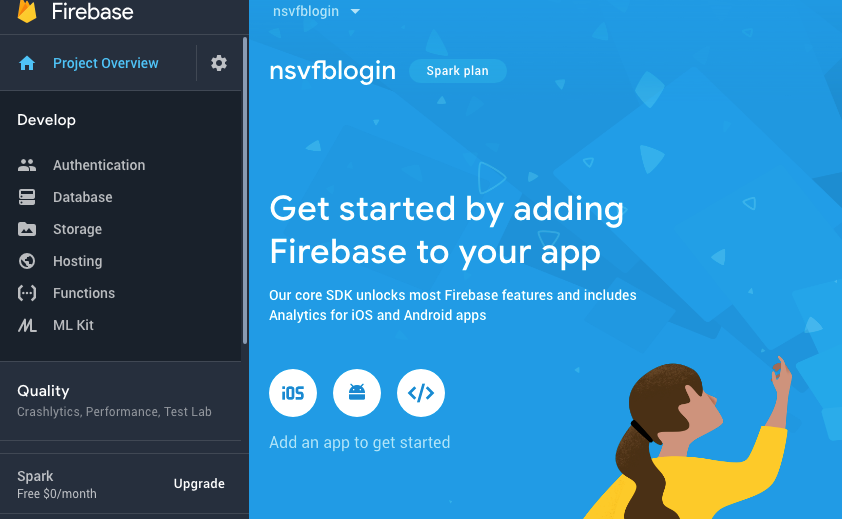
First we'll need to setup a Firebase project for this app by logging into the FireBase Console with your Google account and selecting "Add project" from the console main page at https://console.firebase.google.com/. For this post, I created a project named nsvfblogin.
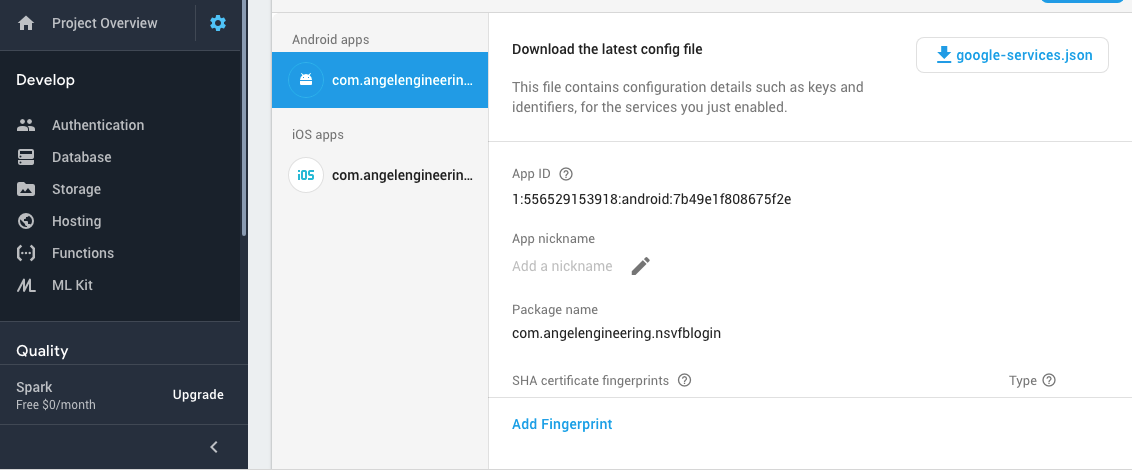
Let's start by adding the iOS platform to this project by tapping the iOS icon. On the configuration page, enter your Unique Application Identifier(or bundle id) you chose for the app (com.angelengineering.nsvfblogin for this post). Tap next, and download the GoogleService-Info.plist file and place it in /app/App_Resources/iOS. Now let's add the Android platform by using Add app on the main Firebase console page. Use the same Unique Application Identifier(or bundle id) you chose for the app (com.angelengineering.nsvfblogin for this post) and tap next. We'll enter the SHA1 fingerprints later. Download google-services.json and put it in the /app/App_Resources/Android directory.
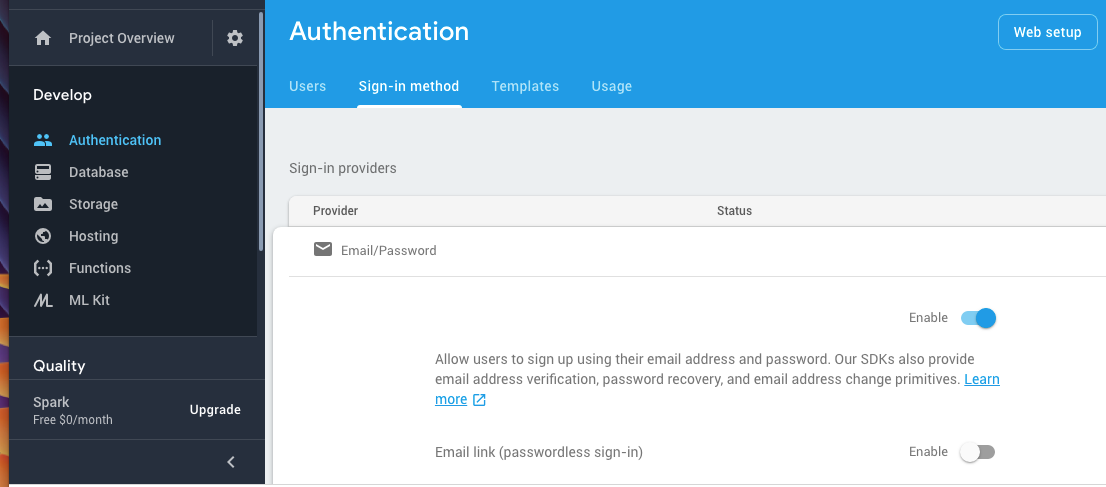
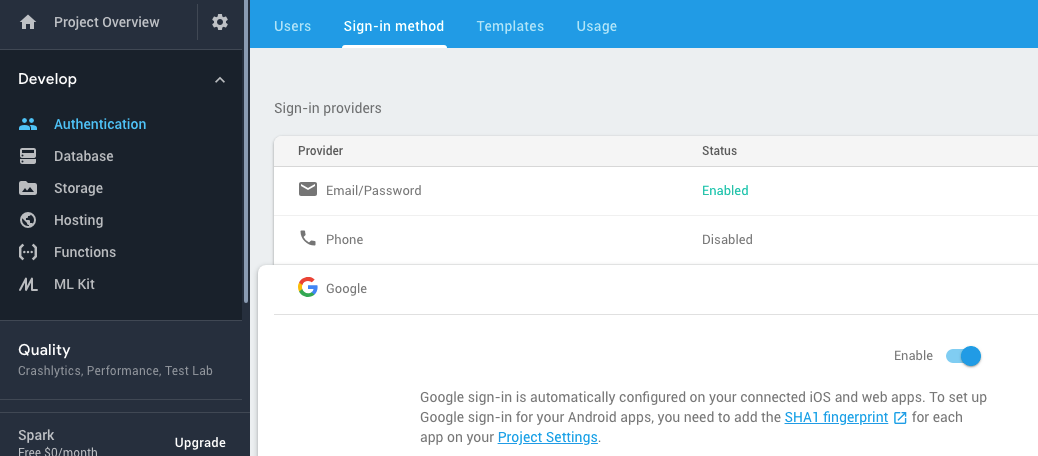
You'll need to enable authentication service for email/password in the Firebase Console under Authentication -> Sign-in Method by tapping the pencil icon next to the Email/Password from the list of Sign-in Providers. Enable the first toggle to allow email authentication and leave the second one for Email link disabled.
Next we'll need to install the Nativescript plugin for Firebase by typing:
tns plugin add nativescript-plugin-firebase
While installing, the plugin will ask you some basic information and which services you wish to enable. You should select all those services you wish to use for your app although for this tutorial we will require iOS, Android, Firebase Authentication, Firebase Facebook Authentication and Firebase Google Authentication.
Just in case, let's update the cocoapod repository info by running:
pod repo update
We should be ready to test the Firebase integration, so let's add some code to app/main.js so it looks like:
import Vue from 'nativescript-vue'
import VueDevtools from 'nativescript-vue-devtools'
import LoginPage from './components/LoginPage'

if(TNS_ENV !== 'production') {
  Vue.use(VueDevtools)
}
// Prints Vue logs when --env.production is *NOT* set while building
Vue.config.silent = (TNS_ENV === 'production')

var firebase = require("nativescript-plugin-firebase");
firebase
  .init({
    // Optionally pass in properties for database, authentication and cloud messaging,
    // see their respective docs.
  })
  .then(
    function(instance) {
      console.log("firebase.init done");
    },
    function(error) {
      console.log("firebase.init error: " + error);
    }
  );

new Vue({
  render: h => h('frame', [h(LoginPage)])
}).$start()
Let's test the app on iOS by running:
tns run ios --bundle
and you should see the following message in your console log: CONSOLE LOG file:///app/bundle.js:682:14: 'firebase.init done'.
Note: If you try to run the Android version now, you'll currently get an error about a missing Facebook ID which we will add in the section for Facebook Login.
Now that our Firebase connection is working, let's change our login page's authentication stubs to now use Firebase API calls. Modify the userService object variable inside /app/components/LoginPage.vue to look like:
import firebase from "nativescript-plugin-firebase";
const userService = {
  async register(user) {
    return await firebase.createUser({
      email: user.email,
      password: user.password
    });
  },
  async login(user) {
    return await firebase.login({
      type: firebase.LoginType.PASSWORD,
      passwordOptions: {
        email: user.email,
        password: user.password
      }
    });
  },
  async resetPassword(email) {
    return await firebase.resetPassword({
      email: email
    });
  }
};
If you run the app now, you should be able to register, login and send password reset requests with Firebase. You can verify users registered via the app on the Firebase Console.
Next, let's add an indicator display while waiting for Firebase calls to complete. Nativescript comes with a default ActivityIndicator object, but I prefer using the Nativescript Loading Indicator plugin to also prevent the user from tapping anywhere. Let's install it with:
tns plugin install nativescript-loading-indicator
We will replace the exports default object inside /app/components/LoginPage.vue with:
var LoadingIndicator = require("nativescript-loading-indicator")
  .LoadingIndicator;
var loader = new LoadingIndicator();
export default {
  data() {
    return {
      isLoggingIn: true,
      user: {
        email: "[email protected]",
        password: "tester",
        confirmPassword: "tester"
      }
    };
  },
  methods: {
    toggleForm() {
      this.isLoggingIn = !this.isLoggingIn;
    },
    submit() {
      if (!this.user.email || !this.user.password) {
        this.alert("Please provide both an email address and password.");
        return;
      }
      loader.show();
      if (this.isLoggingIn) {
        this.login();
      } else {
        this.register();
      }
    },
    login() {
      userService
        .login(this.user)
        .then(() => {
		  loader.hide();
		  this.$navigateTo(HomePage);
        })
        .catch(err => {
          console.error(err);
          loader.hide();
          this.alert(err);
        });
    },
    register() {
      if (this.user.password != this.user.confirmPassword) {
        loader.hide();
		this.alert("Your passwords do not match.");
        return;
      }
      if (this.user.password.length < 6) {
        loader.hide();
		this.alert("Your password must at least 6 characters.");
        return;
      }
      userService
        .register(this.user)
        .then(() => {
          loader.hide();
		  this.alert("Your account was successfully created.");
          this.isLoggingIn = true;
        })
        .catch(err => {
          console.error(err);
          loader.hide();
          this.alert(err);
        });
    },
    forgotPassword() {
      prompt({
        title: "Forgot Password",
        message:
          "Enter the email address you used to register for APP NAME to reset your password.",
        inputType: "email",
        defaultText: "",
        okButtonText: "Ok",
        cancelButtonText: "Cancel"
      }).then(data => {
        if (data.result) {
          loader.show();
          userService
            .resetPassword(data.text.trim())
            .then(() => {
              loader.hide();
              this.alert(
                "Your password was successfully reset. Please check your email for instructions on choosing a new password."
              );
            })
            .catch(() => {
              loader.hide();
              this.alert(err);
            });
        }
      });
    },
    focusPassword() {
      this.$refs.password.nativeView.focus();
    },
    focusConfirmPassword() {
      if (!this.isLoggingIn) {
        this.$refs.confirmPassword.nativeView.focus();
      }
    },
    alert(message) {
      return alert({
        title: "APP NAME",
        okButtonText: "OK",
        message: message
      });
    }
  }
};
Since Firebase requires that passwords be at least 6 characters in length, we added a check inside the register function. Let's also add email validation in case the user makes a typo when registering:
npm install email-validator
And add a new section of code to the top of the register() function so it looks like:
register() {
      var validator = require("email-validator");
      if (!validator.validate(this.user.email)) {
        loader.hide();
        this.alert("Please enter a valid email address.");
        return;
      }
You can also take a look at the original article on making this login screen in Angular for some other ideas on improving your login screen.
Facebook Login
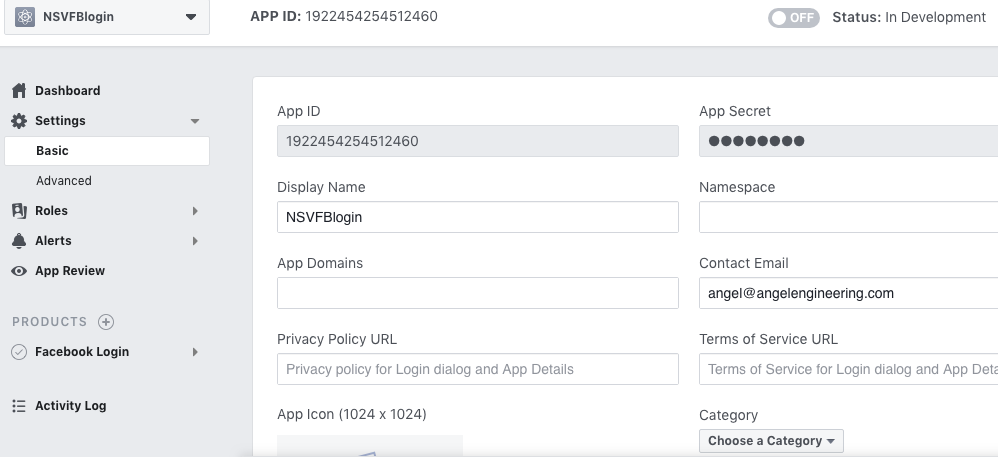
The Firebase service supports a number of other login methods besides email/password authentication. On mobile apps, Facebook and Google logins are popular since they allow users to quickly register and avoid filling out forms. To get started with Facebook Login on Firebase, we'll go to https://developers.facebook.com/apps/and create a new app. For this post I'll create a new Facebook App ID with a display name of "NSVFBlogin".
From the dashboard for your new Facebook app, go to Settings -> Basic, and take note of your Facebook App ID and App Secret, we will need to add these to Firebase later. Scroll to the bottom of the page to add the Android and iOS platforms to this app.
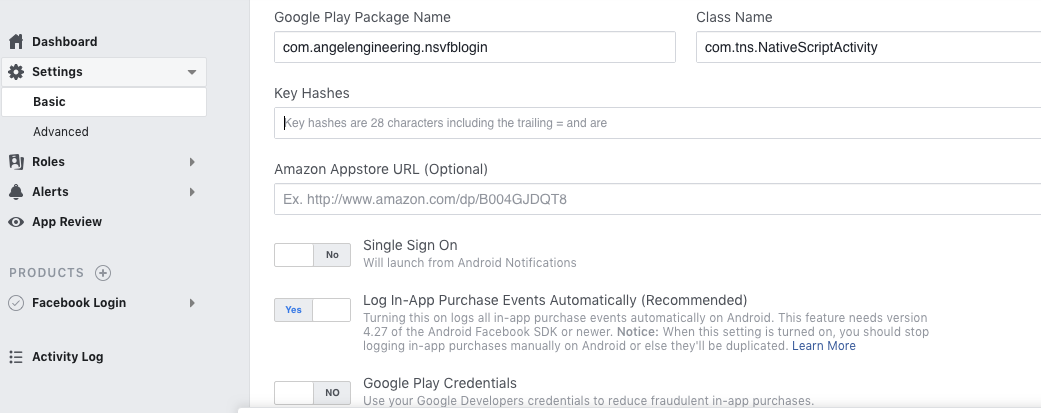
First, add the Android Platform, and enter the package name for your app from your package.json file as the Google Play Package Name (com.angelengineering.nsvfblogin for this post), and for Class Name use com.tns.NativeScriptActivity. We will add key hashes for the Android platform later.
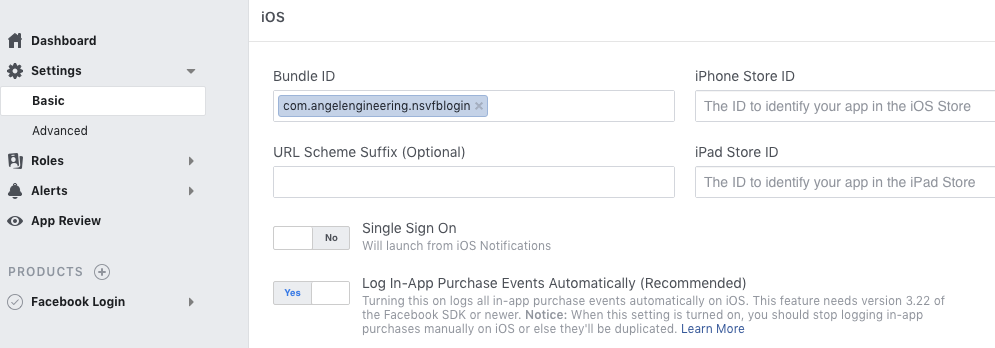
Now add the iOS platform to the Facebook app. Enter your app ID from your package.json file as the iOS Bundle ID (com.angelengineering.nsvfblogin for this post) and hit save.
Let's configure Firebase to allow Facebook Login. Go to the Firebase Console under Authorization -> Sign-in Method and enable the Facebook method. Add your Facebook App ID and App Secret here and save your settings.
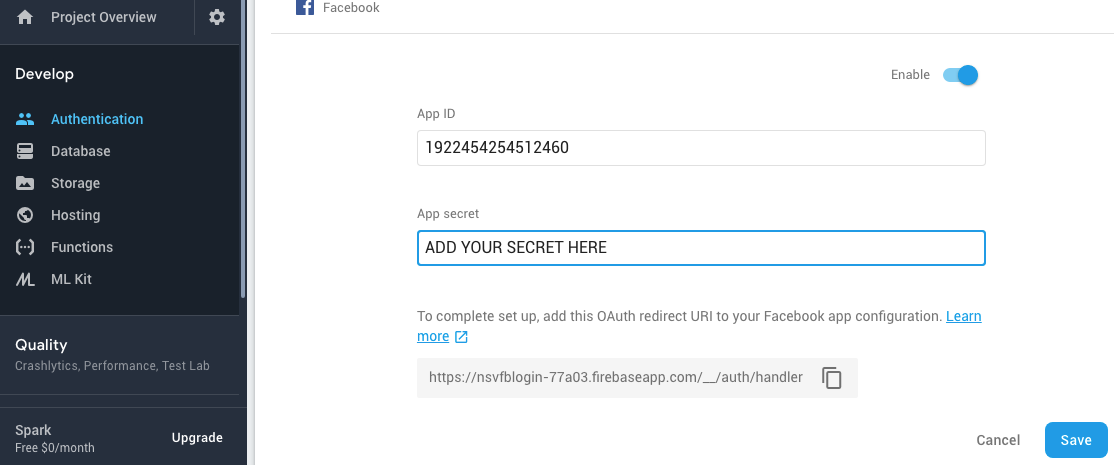
In the Firebase console, go to Settings->Project Settings and re-download the settings to their appropriate locations now that Facebook Login has been enabled in Firebase. For Android, download the file named google-services.json and put it in the /app/App_Resources/Android directory. For iOS, download the GoogleService-Info.plist file and place it in /app/App_Resources/iOS.
Now we need to add the rest of the integration code and settings to our app, including a new button to login using a Facebook account.
For iOS, edit /app/App_Resources/iOS/Info.plist and add the following XML:
<key>CFBundleURLTypes</key>
<array>
    <dict>
        <key>CFBundleTypeRole</key>
		<string>Editor</string>
        <key>CFBundleURLSchemes</key>
        <array>
            <string>fb{your-app-id}</string>
        </array>
    </dict>
</array>
<key>FacebookAppID</key>
<string>{your-app-id}</string>
<key>FacebookDisplayName</key>
<string>{your-app-name}</string>
<key>LSApplicationQueriesSchemes</key>
<array>
	<string>fbapi</string>
	<string>fb-messenger-api</string>
	<string>fbauth2</string>
	<string>fbshareextension</string>
</array>
Replace {your-app-id}, and {your-app-name} with your app's App's ID and Display Name from the Facebook App settings page.
For Android, add <meta-data android:name="com.facebook.sdk.ApplicationId" android:value="@string/facebook_app_id"/> to the manifest/application tag in /app/App_Resources/Android/src/main/AndroidManifest.xml so it looks like
<application android:name="com.tns.NativeScriptApplication" android:allowBackup="true" android:icon="@drawable/icon" android:label="@string/app_name" android:theme="@style/AppTheme">
        <meta-data android:name="com.facebook.sdk.ApplicationId" android:value="@string/facebook_app_id"/>
        <activity android:name="com.tns.NativeScriptActivity" android:label="@string/title_activity_kimera" android:configChanges="keyboardHidden|orientation|screenSize" android:theme="@style/LaunchScreenTheme">
In the /app/App_Resources/Android/src/main/res/values folder create a file named facebooklogin.xml that contains:
<?xml version='1.0' encoding='utf-8'?>
<resources>
    <string name="facebook_app_id">{your-app-id}</string>
</resources>
Replace the {your-app-id} string with your own Facebook App ID.
Let's add some code to our app that will show a button to sign-in via facebook. We'll start by adding a button below the current button by editing the XML in LoginPage.vue so it looks like:
<Button :text="isLoggingIn ? 'Log In' : 'Sign Up'" @tap="submit" class="btn btn-primary m-t-20" />
<Button text="Login with Facebook" @tap="loginFacebook" class="btn btn-primary m-t-20" />
<Label v-show="isLoggingIn" text="Forgot your password?" class="login-label" @tap="forgotPassword" />
This button will call loginFacebook so let's add that function inside the export default {methods{object:
loginFacebook() {
      //loader.show();//Don't use this for facebook logins, as the indicator covers the UI on IOS
      userService
        .loginFacebook(this.user)
        .then(() => {
          //loader.hide();
          this.$navigateTo(HomePage);
        })
        .catch((err) => {
          //loader.hide();
          console.error(err);
          this.alert(err)
        });
    },
This function will require adding a new loginFacebook function inside the userService object:
async loginFacebook(user) {
    await firebase
      .login({
        type: firebase.LoginType.FACEBOOK,
        facebookOptions: {
          // full list: https://developers.facebook.com/docs/facebook-login/permissions/
          scope: ["public_profile", "email"] // optional: defaults to ['public_profile', 'email']
        }
      })
      .then(result => {
        //console.log("Returned from firebase with result");
        //console.dir(result);
        return Promise.resolve(JSON.stringify(result));
      })
      .catch(error => {
        console.error(error);
        return Promise.reject(error);
      });
  },
I commented out the Activity Indicator here, as the spinner will cover the Facebook popup on iOS while entering your Facebook information to login. You should now be able to the app on iOS to ensure Firebase login is working:
tns run ios --bundle
If you run into problems on the iOS simulator, take a look here for possible solutions. For example, I ran into a problem when I was testing the app on the iOS 10.0 simulator:
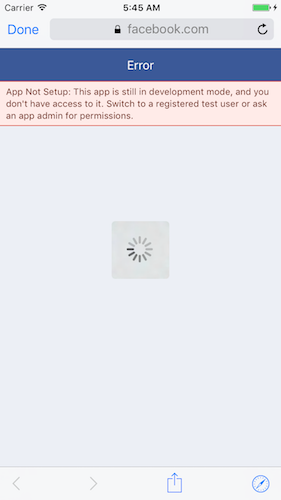
There are known issues with the Firebase SDK on iOS 10.0 simulators, so I changed my simulated device to 9.0 and ran the following commands to clean and re-build the app:
tns platform remove ios
tns run ios --bundle
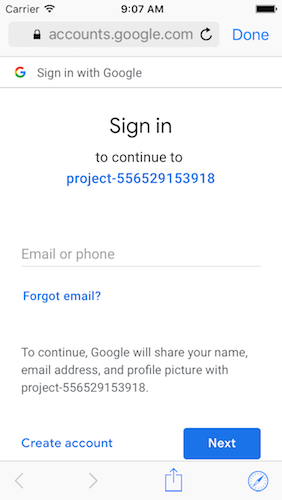
Once it's working you should see the following dialog on your iOS device after tapping the new button:
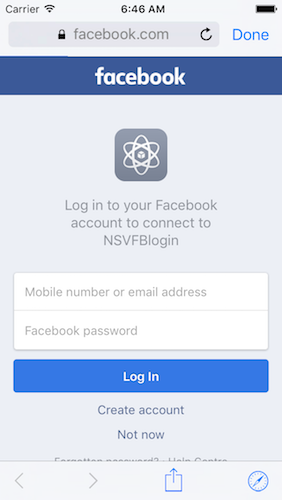
In order to actually login with Facebook on this app, you'll have to use the same Facebook account the Facebook app was created by (at least while the app is still in development mode on Facebook). You can also create a test user by going to your Facebook Developer console for the app, under Roles->Test Users, and add a new test user and enable access by this test user. You can choose Edit->Change to modify the name or password for this test user. Once you've noted the email and assigned a password, you'll be able to login with Facebook using this test user.
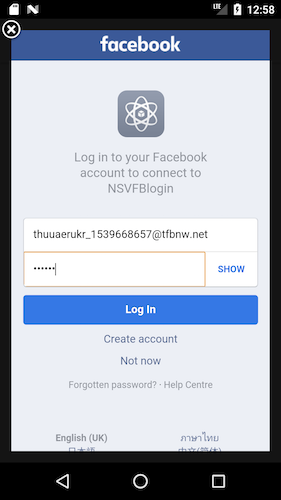
Test the app on Android:
tns run android --bundle
Tapping the login with facebook should now show the dialog to login
Finally, let's find the Key Hash requested in the general Android settings for the Facebook App. This can be obtained when you first try to use Facebook login by checking the logcat messages from your running app. Open /platforms/android in Android Studio and build/run the app, and you should see something "Key hash <......> does not match any stored key hashes." and enter that hash in the FB console. NOTE: While I was running and developing this app, I never saw the hash error and Facebook never required the hash, so this may not be needed until your FB app is set to production mode.
Font Awesome
The Font Awesome fonts can be used to inject scalable icons in your Nativescript app, saving you the headache of designing your own images and the multiple resolution versions needed for all possible screen sizes on Android and iOS. They're also easily usable in Nativescript Vue apps, although I had some trouble using the suggested approach in the Nativescript Vue docs online. While I was able to get the nativescript-fonticon plugin working with both v4.7 and v5.31 Font Awesome fonts, I found that the fonts wouldn't always display until a screen redraw happened. Instead, I used a variation of the manual method I discussed in a previous blog post.
First you'll need to download the latest fonts (For the Web) from the Font Awesome website. As of this post, the latest version if 5.3.1 and includes 1341 free icons. The Font Awesome icon library is divided into solid, regular, light and brand versions. You can use their website to look at the free icons available.
After downloading and extracting the archive, you'll end up with a number of directories and files comprising the font set for different environments. Nativescript can make use of the TTF font format, so we'll look at the directory named fontawesome-free-5.3.1/webfonts/. This contains the different icon families. Copy all the free TTF files (fa-solid-900.ttf, fa-regular-400.ttf and fa-brands-400.ttf) into /app/fonts so that Nativescript will find the font files and make them available to your app.
We'll add some new classes to /app/app.scss that will allow us to use Font Awesome fonts inside the app:
.far {
  font-family: Font Awesome 5 Free, fa-regular-400;
  font-weight: 400;
}
.fab {
  font-family: Font Awesome 5 Brands, fa-brands-400;
  font-weight: 400;
}
.fas {
  font-family: Font Awesome 5 Free, fa-solid-900;
  font-weight: 900;
}
When you wish to use a particular icon, you'll have to first lookup the unicode value for the icon. For this app, I'll use the Facebook icon https://fontawesome.com/icons/facebook?style=brands. On the bottom of the info page, you'll see the unicode for this particular icon, which is f09a. This is also in the "brands" family of fonts, so we will use the corresponding "fab" class. Whenever you wish to use an icon in your app, make note of the code and family, and then use the unicode formatted as '\uf09a' for the text of the label.
Let's update the Facebook Login button so it now looks like:
<Button v-show="isLoggingIn" :text="'\uf09a' +' Facebook login'" @tap="loginFacebook" class="fab btn btn-active" />
Google Login
To get started with Google Login on Firebase, we'll go to the Firebase Console https://console.firebase.google.com and enable Google Authentication under Authentication -> Sign-In Method.
Then go to Overview >> Project Settings so we can add a SHA1 certificate under the Android platform settings. If you're not sure how to generate a certificate for use with Android, you can read the Android docs or follow the steps below to create a new certificate and keystore for your new app.
For development, you'll only need the debug key certificate, which you can get using the following command keytool -exportcert -list -v -alias<your-key-name> -keystore <path-to-production-keystore>. For this app, I ran the following:
keytool -exportcert -list -v -alias androiddebugkey -keystore ~/.android/debug.keystore
Note, the default debug keystore password is android . Running this will give you information about the certificate, including fingerprints like:
Certificate fingerprints:
	 MD5:  83:CF:6A:AA:73:05:AD:7C:2F:25:55:EC:AB:38:38:9D
	 SHA1: 90:ED:70:91:E3:63:50:8B:9D:13:93:67:88:8B:05:0E:B6:45:FE:CF
	 SHA256: B6:72:BD:DA:88:0B:B9:36:60:BB:89:7C:E1:56:91:FE:92:78:C8:B4:02:CE:F8:16:CD:92:94:21:95:60:46:16
	 Signature algorithm name: SHA1withRSA
	 Version: 1
Add the SHA1 string as a SHA certificate fingerprints in the Firebase console settings for the Android app.
You will also need to add your production key certificate fingerprint for whenever your app is built and released on the app stores. If you don't already have a production keystore setup for your development process, you can set one up for this app by doing the following:
mkdir keystore
cd keystore
keytool -genkey -v -keystore nsvfblogin.jks -keyalg RSA -keysize 2048 -validity 10000 -alias nsvfblogin
This will ask you for a keystore pass, and also for another password for the key being generated and stored inside this keystore(you can use the same password if you wish). You can leave all the other questions as default or fill them in with real information if you plan on using this keystore for a production release. Then run keytool -exportcert -list -v -alias nsvfblogin -keystore nsvfblogin.jks, enter your keystore password and add the SHA1 string as a SHA fingerprint in the Firebase console settings for the Android app.
Once you've entered the SHA1 fingerprints, go to Settings->Project Settings and re-download the settings to appropriate locations now that it's been enabled. For Android, download google-services.json and put it in /app/App_Resources/Android. For iOS, download GoogleService-Info.plist and place it in /app/App_Resources/iOS.
Let's make sure everything is working on Android. We'll start by adding another button below the Facebook button by editing the XML in LoginPage.vue so it looks like:
<Button :text="isLoggingIn ? 'Log In' : 'Sign Up'" @tap="submit" class="btn btn-primary m-t-20" />
<Button v-show="isLoggingIn" :text="'\uf09a' +' Facebook login'" @tap="loginFacebook" class="fab btn btn-active" />
<Button v-show="isLoggingIn" :text="'\uf1a0' +' Google login' " @tap="loginGoogle" class="fab btn btn-active" />
<Label v-show="isLoggingIn" text="Forgot your password?" class="login-label" @tap="forgotPassword" />
This button will call loginGoogle so let's add that function inside the export default {methods{object:
 loginGoogle(){
        //loader.show();//Don't use this for google logins, as the indicator covers the UI on IOS
        userService
        .loginGoogle(this.user)
        .then((result) => {
          //loader.hide();
          this.$navigateTo(HomePage);
        })
        .catch((error) => {
          //loader.hide();
          console.error(err);
          this.alert(error)
        });
    },
This function will require adding a new loginFacebook function inside the userService object:
async loginGoogle(user) {
     await firebase
      .login({
        type: firebase.LoginType.GOOGLE
      })
      .then(result => {
        return Promise.resolve(JSON.stringify(result));
      })
      .catch(error => {
        console.error(error);
        return Promise.reject(error);
      });
  },
Run the app with tns run android --bundle and tap on the Google Login button, and you should now be able to login with a valid Google account. Unlike Facebook, there are no test accounts you can create/setup to use with Google Login. You can either use your own account, or create another one for use in testing this and other Google products.
Now let's test this on iOS by running tns run ios --bundle. When I was testing the iOS version, my app would die silently shortly after tapping the Google Login button to issue the Firebase request. This is a known issue with the plugin and can be fixed by adding the following to your app/App_Resources/iOS/Info.plist
<key>CFBundleURLTypes</key>
	<array>
		<dict>
			<key>CFBundleTypeRole</key>
			<string>Editor</string>
			<key>CFBundleURLName</key>
			<string>REVERSED_CLIENT_ID</string>
			<key>CFBundleURLSchemes</key>
			<array>
				<string>{YOUR-REVERSED-CLIENT-ID}</string>
			</array>
		</dict>
	</array>
Make sure to change the REVERSED_CLIENT_ID string value to match the REVERSED_CLIENT_ID string from /app/App_Resources/iOS/GoogleService-Info.plist.
This crash will also happen if there is a problem with the CFBundleURLTypes key values for Google and Facebook logins added toInfo.plist for iOS. For this post, the full set of additions to my app's Info.plist is:
<key>CFBundleURLTypes</key>
	<array>
		<dict>
			<key>CFBundleTypeRole</key>
			<string>Editor</string>
			<key>CFBundleURLSchemes</key>
			<array>
				<string>fb1922454254512460</string>
			</array>
		</dict>
		<dict>
			<key>CFBundleTypeRole</key>
			<string>Editor</string>
			<key>CFBundleURLName</key>
			<string>REVERSED_CLIENT_ID</string>
			<key>CFBundleURLSchemes</key>
			<array>
				<string>com.googleusercontent.apps.556529153918-lubs50qtonbkqp8sti101r33snhmsd3b</string>
			</array>
		</dict>
	</array>
	<key>FacebookAppID</key>
	<string>1922454254512460</string>
	<key>FacebookDisplayName</key>
	<string>NSVFBlogin</string>
	<key>LSApplicationQueriesSchemes</key>
	<array>
		<string>fbapi</string>
		<string>fb-messenger-api</string>
		<string>fbauth2</string>
		<string>fbshareextension</string>
	</array>
Once that has been added, re-run the app on iOS and you should be able to login with Google via Firebase.
Summary
You should now have a fully working login screen tied to Firebase that allows login via email, Facebook and Google, with Font Awesome fonts available to use in other pages of your app. At this point you can improve the UI and personalize your app by changing the logo, name both in the app as well as the display names shown by Facebook, Google and Firebase when using their login methods. In another post, I'll show you how to add a profile page tied to Firebase and these login methods. I'll also discuss storing login tokens locally after login, how to automatically route to the profile page if you're logged in from before, and how to add logout functionality to the app.
If you'd like to download the final source files for a quick start, you can find them on Github.