
In a previous post I described how to create a Nativescript Vue v2 app with a login screen and Firebase for authentication. This post will show how to extend it into a more realistic Nativescript Vue app that uses various Firebase services. We'll start by adding common app pages, and focus on a functional profile page and login/logout routing. The application will use VueX for local app state and routing, Firebase Firestore as a remote database, and Firebase Storage for profile picture storage.
Start from the basic login app in the previous post. Clone it using:
git clone https://github.com/drangelod/nsvfblogin nsvfbprofile
cd nsvfbprofile
npm i
tns run ios --bundle
Authentication and routing
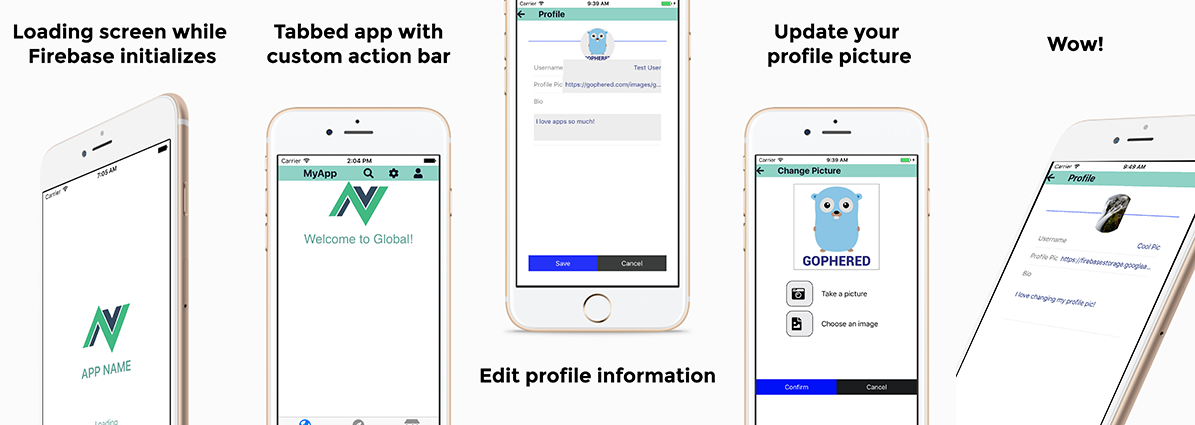
Apps relying on Firebase for authentication and data will need to initialize the Firebase SDK first and then check to see if the user if already logged in on the current app/device. Until then, the app can display a loading screen while Firebase initialization and authentication checks are performed, and then decide if the user should be routed to the home page as an authenticated user or to the login page for authentication. If a user is already logged in with Firebase, any further calls necessary should be made before routing to the home page of the app. Whenever the user is logged out from Firebase, the app should to route to the login page. I'll modify the nsvfblogin app into a usable skeleton app with a personalized home page and working profile page using various Firebase services.
The VueX state management library will be used to manage state across different Vue pages. The application can then trigger actions when there are changes in state, such as when logged in or out of the application. Let's install the VueX library:
npm i vuex --save
Now, let's get the loading page ready. The current login page will be changed to show just the app logo, some text and a spinner until Firebase initialization completes. I'll add a new local state variable isInitialized with an initial value of false, and then add v-show directives based on this flag to hide all login page elements except for the logo, app title and the new loader text Label and ActivityIndicator spinner.
Edit LoginPage.vue so the template XML now contains:
<Page actionBarHidden="true" backgroundSpanUnderStatusBar="true">
    <ScrollView>
		<FlexboxLayout class="page">
			<StackLayout class="form">
				<Image class="logo" src="~/assets/images/NativeScript-Vue.png" />
				<Label class="header" text="APP NAME" />
        <StackLayout v-show="!isInitialized">
          <Label text="Loading" class="loading-label"/>
          <ActivityIndicator  busy="true" class="activity-indicator"/>
        </StackLayout>
				<StackLayout v-show="isInitialized" class="input-field" marginBottom="25">
					<TextField class="input" hint="Email" keyboardType="email" autocorrect="false" autocapitalizationType="none" v-model="user.email"
					 returnKeyType="next" @returnPress="focusPassword" fontSize="18" />
					<StackLayout class="hr-light" />
				</StackLayout>

				<StackLayout v-show="isInitialized" class="input-field" marginBottom="25">
					<TextField ref="password" class="input" hint="Password" secure="true" v-model="user.password" :returnKeyType="isLoggingIn ? 'done' : 'next'"
					 @returnPress="focusConfirmPassword" fontSize="18" />
					<StackLayout class="hr-light" />
				</StackLayout>

				<StackLayout v-show="(isInitialized && !isLoggingIn)"  class="input-field">
					<TextField ref="confirmPassword" class="input" hint="Confirm password" secure="true" v-model="user.confirmPassword" returnKeyType="done"
					 fontSize="18" />
					<StackLayout class="hr-light" />
				</StackLayout>

				<Button v-show="(isLoggingIn && isInitialized)" :text="isLoggingIn ? 'Log In' : 'Sign Up'" @tap="submit" class="btn btn-primary m-t-20" />
        <Button v-show="(isLoggingIn && isInitialized)" :text="'\uf09a' +' Facebook login'" @tap="loginFacebook" class="fab btn btn-active" />
        <Button v-show="(isLoggingIn && isInitialized)" :text="'\uf1a0' +' Google login' " @tap="loginGoogle" class="fab btn btn-active" />
				<Label v-show="(isLoggingIn && isInitialized)" text="Forgot your password?" class="login-label" @tap="forgotPassword" />
			</StackLayout>

			<Label v-show="isInitialized" class="login-label sign-up-label" @tap="toggleForm">
	          <FormattedString>
	            <Span :text="isLoggingIn ? 'Don’t have an account? ' : 'Back to Login'" />
	            <Span :text="isLoggingIn ? 'Sign up' : ''" class="bold" />
	          </FormattedString>
	        </Label>
		</FlexboxLayout>
    </ScrollView>
</Page>
Then edit export default { data() to add the new flag:
export default {
  data() {
    return {
      isLoggingIn: true,
      isInitialized: false,
      user: {
        email: "[email protected]",
        password: "tester",
        confirmPassword: "tester"
      }
    };
  },
After these changes, the app should now look like:

Now let's start adding the shared components to be used in different app pages. First remove the userServicestub method in LoginPage.vue. While you're editing this page, remove the alert() after successful registration from the register() function to avoid display issues later on.
The authentication functionality will be kept in /app/services/AuthService.js :
import firebase from "nativescript-plugin-firebase";
import BackendService from "./BackendService";
import { backendService } from "../main";

export default class AuthService extends BackendService {
  async register(user) {
    return await firebase.createUser({
      email: user.email,
      password: user.password
    });
  }

  async login(user) {
    await firebase
      .login({
        type: firebase.LoginType.PASSWORD,
        passwordOptions: {
          email: user.email,
          password: user.password
        }
      })
      .then(async firebaseUser => {
        backendService.token = firebaseUser.uid;
        return firebaseUser
      })
  }

 async loginFacebook(user) {
    await firebase
      .login({
        type: firebase.LoginType.FACEBOOK,
        facebookOptions: {
          scope: ["public_profile", "email"]
        }
      })
      .then(result => {
        return Promise.resolve(JSON.stringify(result));
      })
      .catch(error => {
        console.log("Error logging in with Facebook")
        console.error(error);
        return Promise.reject(error);
      });
  }

  async loginGoogle(user) {
     await firebase
      .login({
        type: firebase.LoginType.GOOGLE
      })
      .then(result => {
        return Promise.resolve(JSON.stringify(result));
      })
      .catch(error => {
        console.log("Error logging in with Facebook")
        console.error(error);
        return Promise.reject(error);
      });
  }

  async resetPassword(email) {
    return await firebase.resetPassword({
      email: email
    })
  }

  async logout() {
    backendService.token = "";
    return await firebase.logout();
  }
}
Also add /app/services/BackendService.js from which AuthService extends:
import { getString, setString } from 'tns-core-modules/application-settings'

const tokenKey = "token";

export default class BackendService {

  isLoggedIn() {
    return !!getString(tokenKey);
  }

  get token() {
    return getString(tokenKey);
  }

  set token(newToken) {
    setString(tokenKey, newToken);
  }
}
Now change /app/main.js so that the AuthService class can be accessed anywhere in the app.
import Vue from 'nativescript-vue'
import VueDevtools from 'nativescript-vue-devtools'
import firebase from "nativescript-plugin-firebase"
import BackendService from './services/BackendService'
import AuthService from './services/AuthService'
import LoginPage from './components/LoginPage'

//shared among components
export const backendService = new BackendService()
export const authService = new AuthService()

Vue.prototype.$authService = authService
Vue.prototype.$backendService = backendService

if(TNS_ENV !== 'production') {
  Vue.use(VueDevtools)
}
Vue.config.silent = (TNS_ENV === 'production')


firebase
  .init({
    onAuthStateChanged: data => {
    console.log((data.loggedIn ? "Logged in to firebase" : "Logged out from firebase") + " (firebase.init() onAuthStateChanged callback)");
    if (data.loggedIn) {
      backendService.token = data.user.uid
      console.log("uID: " + data.user.uid)
    }
    else {
    }
  }
  })
  .then(
    function(instance) {
      console.log("firebase.init done");
    },
    function(error) {
      console.log("firebase.init error: " + error);
    }
  );

new Vue({
  render: h => h('frame', [h(LoginPage)])
}).$start()
The isInitialized flag will be toggled once firebase is initialized and ready for the app to login with. If you run the app now, you'll see the Firebase user ID in the console log after a login, which will be used later to index profile data in Firestore.
Adding some animation will smooth out the transitions between the login page states. Modify the template slightly to enclose everything in the <FlexboxLayout class="page"> with the new tag <StackLayout v-bind:class="getClass()" > so it looks like:
<Page actionBarHidden="true" backgroundSpanUnderStatusBar="true">
    <ScrollView>
	  <FlexboxLayout class="page">
        <StackLayout v-bind:class="getClass()" >
          <StackLayout class="form">
            <Image class="logo" src="~/assets/images/NativeScript-Vue.png" />
              ........
This was done to dynamically assign a class to all the page elements depending on the result of the getClass() function. Add it to the methods: { object:
getClass() {
   return {
      "container-loading": this.isInitialized,
      "container-loaded": !this.isInitialized
   };
},
Add these two classes and their animations to the LoginPage CSS style section:
.container-loading {
  animation-name: loading;
  animation-fill-mode: forwards;
  animation-duration: 0.6;
  animation-iteration-count: 1;
}
@keyframes loading {
  0% {
    transform: translate(0, 200);
  }
  100% {
    transform: translate(0, 0);
  }
}
.container-loaded {
  animation-name: loaded;
  animation-fill-mode: forwards;
  animation-duration: 0.6;
  animation-iteration-count: 1;
}

@keyframes loaded {
  0% {
    transform: translate(0, 0);
  }
  100% {
    transform: translate(0, 200);
  }
}
As there isn't any way to toggle the isInitialized flag yet, let's add some debug code to see what's happening so far. Add const timerModule = require("tns-core-modules/timer") near the other imports, and now a timer can be set to toggle the flag and use the login screen. The created() method hook provided by Vue can be used to set the timer once the page is created. Add the following to the export default { object:
created() {
    setTimeout(() => {
      this.isInitialized = true;
    }, 1500);
  },
Running the app should show the loading page for 1.5 seconds and then page components moving up before showing the rest of the login form. The login, register and forgotten password calls on the login page need to be updated to use the new AuthService object. Change the following functions inside the export default { methods{ object:
login() {
      this.$authService
        .login(this.user)
        .then(() => {
          loader.hide();
          this.$navigateTo(DashboardPage);
        })
        .catch(err => {
          console.error(err);
          loader.hide();
          this.alert(err);
        });
    },
    loginFacebook() {
      //loader.show();//Don't use this for facebook logins, as the popup covers the UI on IOS
      if (isIOS) this.isInitialized = false;
      if(isAndroid) loader.show();
      this.$authService
        .loginFacebook(this.user)
        .then(() => {
          //if (isIOS) this.isInitialized = true; //leave this up to avoid weird animation
          if(isAndroid) loader.hide();
          this.$navigateTo(DashboardPage);
        })
        .catch(err => {
          if (isIOS) this.isInitialized = true;
          else loader.hide();
          console.error(err);
          this.alert(err);
        });
    },
    loginGoogle() {
      if (isIOS) this.isInitialized = false;
      else loader.show();

      this.$authService
        .loginGoogle(this.user)
        .then(result => {
          //if (isIOS) this.isInitialized = true;
          if(isAndroid) loader.hide();
          this.$navigateTo(DashboardPage);
        })
        .catch(error => {
          if (isIOS) this.isInitialized = true;
          else loader.hide();
          console.error(err);
          this.alert(error);
        });
    },
    register() {
      if (this.user.password != this.user.confirmPassword) {
        loader.hide();
        this.alert("Your passwords do not match.");
        return;
      }
      if (this.user.password.length < 6) {
        loader.hide();
        this.alert("Your password must at least 6 characters.");
        return;
      }
      var validator = require("email-validator");
      if (!validator.validate(this.user.email)) {
        loader.hide();
        this.alert("Please enter a valid email address.");
        return;
      }
      this.$authService
        .register(this.user)
        .then(() => {
          loader.hide();
          this.alert("Your account was successfully created.");
          this.isLoggingIn = true;
        })
        .catch(err => {
          console.error(err);
          loader.hide();
          this.alert(err);
        });
    },
    forgotPassword() {
      prompt({
        title: "Forgot Password",
        message:
          "Enter the email address you used to register for APP NAME to reset your password.",
        inputType: "email",
        defaultText: "",
        okButtonText: "Ok",
        cancelButtonText: "Cancel"
      }).then(data => {
        if (data.result) {
          loader.show();
          this.$authService
            .resetPassword(data.text.trim())
            .then(() => {
              loader.hide();
              this.alert(
                "Your password was successfully reset. Please check your email for instructions on choosing a new password."
              );
            })
            .catch(err => {
              loader.hide();
              this.alert(err);
            });
        }
      });
    },
One change is the use of the isIOS and isAndroid utility functions to use the LoadingIndicator component for Android, and to rely on the isInitialized flag on iOS since that component covers the Facebook and Google login flow on iOS. To use these functions, add import { isAndroid, isIOS } from "tns-core-modules/platform"; to any page needing custom platform logic.
Adding a profile page
The other important change is that the app now routes to a new DashboardPage.vue page upon successful login instead of the fragment used before. This page will use the Nativescript TabView component with 3 tabs, each with a custom action bar on top. The action bar will have a link to a new profile page, as well as to a new settings page that will contain a logout button.
Add import DashboardPage from "./DashboardPage.vue"; and then create /app/components/DashboardPage.vue with the following content:
<template>
    <Page class="page">
        <TabView androidTabsPosition="bottom" selectedTabTextColor="blue" androidSelectedTabHighlightColor="blue" :selectedIndex="selectedIndex" class="fas tab-title">
            <TabViewItem :title="'\uf57d'">
                <tab-global></tab-global>
            </TabViewItem>
            <TabViewItem :title="'\uf14e'"  >
                <tab-local></tab-local>
            </TabViewItem>
            <TabViewItem :title="'\uf54f'">
                <tab-store></tab-store>
            </TabViewItem>
        </TabView>
	</Page>
</template>

<script>
import GlobalTab from "@/components/GlobalTab";
import LocalTab from "@/components/LocalTab";
import StoreTab from "@/components/StoreTab";
export default {
  name: "dashboard-page",
  components: {
    "tab-global": GlobalTab,
    "tab-local": LocalTab,
    "tab-store": StoreTab
  },
  computed: {
  },
  methods: {
    init() {
      console.log("DashboardPage method init():");
    },
  },
  watch: {
  }
};
</script>
<style scoped>
</style>
This page doesn't have any real content, and will control the pages displayed as tabs in the application. Create three new pages named GlobalTab.vue, LocalTab.vue and StoreTab.vue inside /app/components. Each of these will have similar initial content:
<template>
    <StackLayout>
        <ActionBar text="MyApp" :back="false"/>
        <StackLayout class="form">
            <Image class="logo" src="~/assets/images/NativeScript-Vue.png" />
            <Label class="header">Welcome to Global!</Label>
        </StackLayout>
    </StackLayout>
</template>

<script>
import ActionBar from "./ActionBar";
export default {
  name: "local-tab",
  components: {ActionBar},
};
</script>
<style scoped>
.logo {
  margin-bottom: 12;
  height: 90;
  font-weight: bold;
  horizontal-align: center;
}
.header {
  horizontal-align: center;
  font-size: 25;
  font-weight: 600;
  margin-bottom: 70;
  text-align: center;
  color: #66a59a;
}
</style>
The same ActionBar component is used on each page, which will display a custom action bar at the top. Create /app/components/ActionBar.vue and add:
<template>
<StackLayout>
    <GridLayout class="action-bar" rows="*" columns="50,2*,50,50,50">
        <Label v-if="back" col="0" row="0" class="fas" @tap="$navigateBack()" :text="'\uf060'"/>
        <Label col="1" row="0" class="header" :text="text"/>
        <Label col="2" row="0" class="fas" @tap="toggleSearch()" :text="'\uf002'"/>
        <Label col="3" row="0" class="fas" @tap="goSettings()" :text="'\uf013'"/>
        <Label col="4" row="0" class="fas" @tap="goProfile()" :text="'\uf007'"/>
    </GridLayout>
     <SearchBar v-if="searchbar"  hint="Search for.." [text]="searchPhrase" (textChange)="onTextChanged($event)" (submit)="onSubmit($event)"
                color="grey" textFieldBackgroundColor="lightgrey" textFieldHintColor="darkgrey"></SearchBar>
</StackLayout>
</template>

<script>
import SettingsPage from "@/components/SettingsPage";
import ProfilePage from "@/components/ProfilePage";
export default {
  name: "actionbar-component",
  props: {
    text: {},
    back: {
      type: Boolean,
      default: true
    }
  },
  data() {
    return {
      searchbar: false
    };
  },
  methods: {
    goSettings() {
      this.$navigateTo(SettingsPage);
    },
    goProfile() {
      this.$navigateTo(ProfilePage);
    },
    toggleSearch() {
      this.searchbar = !this.searchbar;
    }
  }
};
</script>
<style>
.action-bar {
  background-color: #90D2C5;
  color: #131426;
  font-weight: bold;
  font-size: 20;
  font-family: "Quicksand";
  height: 30;
}
</style>
Now if you login to the app you should see the Global Tab selected, and the action bar on top of each tab page.
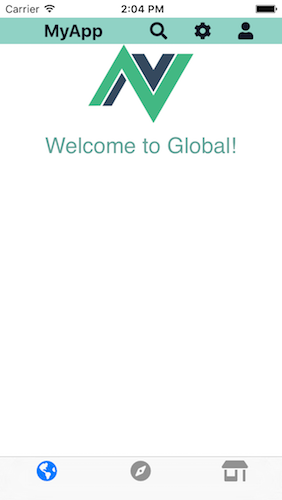
The ActionBar has 3 main items. The first is the magnifying glass icon which will toggle the display of a SearchBar component, which you can use later to add search functionality to any tab page(and integrate with VueX for filtered state data). The cog icon will route to a settings page, and the person icon to a profile page. Let's add the settings page as /app/components/SettingsPage.vue:
<template>
   <Page ref="page" actionBarHidden="true" backgroundSpanUnderStatusBar="true">
        <StackLayout class="container">
            <GridLayout class="action-bar" rows="*" columns="50,2*,50">
                <Label col="0" row="0" class="fas" @tap="$navigateBack()" :text="'\uf060'"/>
                <Label col="1" row="0" class="header" text="Settings"/>
            </GridLayout>
            <Button  text="Logout" class="logout" @tap="logoutApp()" />
        </StackLayout>
    </Page>
</template>
<script>
import LoginPage from "./LoginPage.vue";
export default {
  name: "settings-page",
  components: {},
  computed: {},
  created() {},
  methods: {
    logoutApp() {
      this.$authService.logout().then(() => {
        this.$navigateTo(LoginPage, { clearHistory: true });
      });
    }
  }
};
</script>
<style scoped>
.logout {
  horizontal-align: stretch;
  text-align: center;
  color: white;
  background-color: #1b1c1d;
  height: 36;
}
</style>
On this page, there's a button that allows the user to logout of Firebase and then routes the app to the LoginPage while clearing the navigation history. You should be able to login and log out now, and then be taken back to the login screen.
Now, if a user is already logged in with Firebase when the app is run, it should route the user to the Dashboard page and not require them to log in again . This can be done using the onAuthStateChanged event hook added to the firebase.init() call. At first I tried using $navigateTo from there to load the Dashboard Page once initialization completes, but unlike some other example Nativescript Vue apps I looked at, I couldn't get it to work. Instead, I will set watches on changes in data managed by VueX to route to the appropriate page on a change in login state.
The VueX store will start with a flag variable to track when the app is logged into Firebase. A watchcan then be set on this variable to route logged-in users to the Dashboard page from the Login page. If the user isn't logged into Firebase yet, the isInitialized flag on the LoginPage can be set to show the rest of the login screen. Logouts will be handled similarly later in the post.
Let's start with a simple store by creating a new file as /app/store/index.jswith the following content:
import Vue from 'nativescript-vue';
import Vuex from 'vuex';
import firebase from 'nativescript-plugin-firebase'
Vue.use(Vuex);
const state = {
  isLoggedIn:null
}
const getters = {
  isLoggedIn: state =>{
    return state.isLoggedIn
  },
}
const mutations = {
  setIsLoggedIn: (state, value) => {
    state.isLoggedIn = value;
  }
}
const actions = {
}
const storeConf = {
  state,
  getters,
  mutations,
  actions
}
export default new Vuex.Store(storeConf)
This store currently only has a single variable named isLoggedIn with an initial value of null and define getter and a mutator functions to access that variable. The VueX mapState functionality will be used to track changes to this variable and trigger actions. This requires adding a new import on LoginPage.vue:
import { mapState } from "vuex";
VueX will synchronize the state of this variable to the page by adding this in the export default { object :
computed: {
    ...mapState(["isLoggedIn"])
},
Vue will now be able to see changes to this variable with a watcher action added to the export default { object:
watch: {
    isLoggedIn(val) {
      if (!val) {
        this.isInitialized = true;
      }else{
        this.$navigateTo(DashboardPage, { clearHistory: true });
      }
    }
  },
Whenever there is a change in the value of the isInitialized variable, the login form controls will be enabled if the value has changed to false, and route to the Dashboard if true. Modify all the login methods to stop using this.$navigateTo(DashboardPage); and start using this.$store.commit('setIsLoggedIn', true) after a successful login. Now modify the firebase.init() call in /app/main.js so it looks like:
onAuthStateChanged: data => {
    console.log((data.loggedIn ? "Logged in to firebase" : "Logged out from firebase") + " (firebase.init() onAuthStateChanged callback)");
    if (data.loggedIn) {
      backendService.token = data.user.uid
      console.log("uID: " + data.user.uid)
      store.commit('setIsLoggedIn', true)
    }
    else {
      store.commit('setIsLoggedIn', false)
    }
}
Now if you run the app and login, then kill it and restart the app, you should still be logged into Firebase and the app will route you to the Dashboard page automatically. Similarly, after a successful account registration with Firebase, the user will be automatically logged in and routed to the Dashboard page.
Logouts can be handled by watching state change once the app has passed the Login page. Remove the navigateTo() call inside the logoutApp function in SettingsPage.vue so the function will now just be:
logoutApp() {
    this.$authService.logout()
}
To have the app route the user automatically to the login page after logging out, a watch can be set on the setIsLoggedIn variable on the Dashboard page. Add the following to the export default { object:
watch: {
    isLoggedIn(val) {
      if (!val) {
        this.$navigateTo(LoginPage, { clearHistory: true });
      }
    }
  }
Finally, remove the timer added earlier to enable the login controls in the export default {object from LoginPage.vue and replace it with :
created() {
    if(this.$store.state.isLoggedIn!=null){
      this.isInitialized = true;
    }
}
This was added to display the login controls again after being routed back to the Login page after a logout.
Firestore database integration
For most apps you'd also want to load some basic user information at login, so now it's time add some state management and data storage/retrieval with Firestore. For this post, I'll configure the app to manage user profile information on Firestore, and load it after login but before loading the Dashboard page so a customized welcome message can be shown using that profile information.
First let's setup Firestore by going to the Firebase Console and selecting Database on the main menu:

Create a Firestore Database for the application. When asked about security rules, select "test mode" to allow read and write access without worrying about restrictions for now. The profile information will be stored in a collection named /users/ . Each user will have their profile data stored in a document as /users/<UID>, with entries indexed by the Firebase user ID. You should be able to see this ID in the console log after logging in to the app. Click on "Add Collection" in the Firebase Console to create the /users/ collection in Firestore for the app.
On the first page of the modal, set the collection ID as "users". On the second page, add the document with an ID of the Firebase user ID you saw after logging in with the app. Add fields for id, name, bio, profile_pic and fill in appropriate values for each one. ID will be the same Firebase user ID, and profile_pic should be a URL to an image file.

Firestore support will need to be enabled in the Nativescript Firebase plugin, so set "firestore": true, inside /firebase.nativescript.json. Then run the following commands to rebuild the app with Firestore support:
	rm -rf platforms && rm -rf node_modules && npm i
	tns run ios --bundle
When registering an account, an empty Firebase document needs to be created in the users collection. Modify the register() function in /app/services/AuthService.js to be:
async register(user) {
    const createdUser = await firebase.createUser({
      email: user.email,
      password: user.password
    })
    return await firebase.firestore.set("users", createdUser.uid, {});
}
Let's add support for a new profile object in the VueX store. Edit /app/store/index.js and change it to:
import Vue from 'nativescript-vue';
import Vuex from 'vuex';
import firebase from 'nativescript-plugin-firebase'
import ProfileService from '../services/ProfileService'
Vue.use(Vuex);
const state = {
  isLoggedIn:null,
  profile:null,
}
const getters = {
  isLoggedIn: state =>{
    return state.isLoggedIn
  },
  profile: state =>{
    return state.profile
  },
}
const mutations = {
  setIsLoggedIn: (state, value) => {
    state.isLoggedIn = value;
  },
  setProfile: (state, profile) => {
    state.profile = profile;
  },
}
const actions = {
  fetchProfile() {
    ProfileService.getCurrentUser()
  },
}
const storeConf = {
  state,
  getters,
  mutations,
  actions
}
export default new Vuex.Store(storeConf)
The same getters and mutators as for the isLoggedIn flag were added, as well as an action to fetch the current profile data for the logged in user.
Create a new file for this under /app/services/ProfileService.js with the contents:
import firebase from "nativescript-plugin-firebase";
import store from "../store";

export default {
  getProfile() {
    firebase.getCurrentUser().then(function(currentuser) {
      firebase.firestore.getDocument("users", currentuser.uid).then(docdata => {
        var userdata = {};
        userdata.id = currentuser.uid;
        if (docdata.exists) {
          var fbdata = docdata.data();
          userdata.name = fbdata.name;
          userdata.bio = fbdata.bio;
          userdata.profile_pic = fbdata.profile_pic;
        } else {
          firebase.firestore.set("users", currentuser.uid, {});
        }
        store.commit("setProfile", userdata);
      });
    });
  }
};
If there isn't a profile document in Firebase yet (Facebook or Google logins), the ProfileService will create an empty document with just the user ID.
The login process will be changed to request the profile data from Firestore after being authenticated, but before routing to the Dashboard page. The watch on the isLoggedIn variable will now trigger a request for the profile data from Firebase. A new watch on the profile store will be used to route to the dashboard. Change the computed and watch objects in LoginPage.vue with these new code segments:
computed: {
    ...mapState(["isLoggedIn","profile"])
},
watch: {
    isLoggedIn(val) {
      if (!val) {
        this.isInitialized = true;
      }else{
        this.$store.dispatch("fetchProfile");
      }
    },
    profile(val) {
      if (!val) {
      }else{
        this.$navigateTo(DashboardPage, { clearHistory: true });
      }
    }
  },
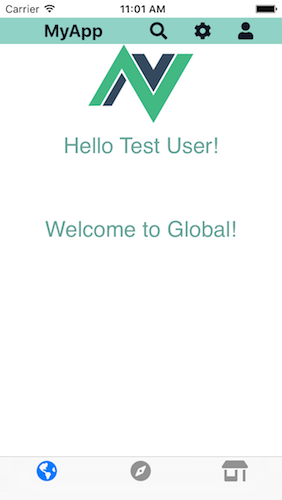
Now let's customize the GlobalTab.vue page a bit to make use of the loaded profile data. Add import { mapState, mapGetters } from "vuex"; to the imports and computed: {...mapGetters(["profile"])}, to the export default { object. mapState allows us to read the profile data loaded into the store from firebase. Add <Label class="header">Hello {{profile.name}}!</Label> under the logo in the XML section. If you run the app, you should now see the test user's name on the page:
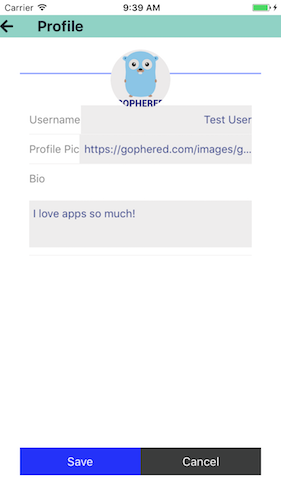
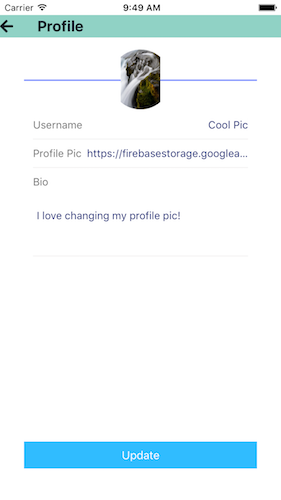
With data available, the next step is to create a profile page that allows a user to make update their profile information(especially since there isn't any for new users with the current app registration process). This profile page design comes from the Nativescript Marketplace Demo app, which you can download to see how different plugins and designs can be used in a Nativescript app. Edit /app/component/ProfilePage.vue and change it to:
<template>
   <Page ref="page" actionBarHidden="true" backgroundSpanUnderStatusBar="true">
        <StackLayout class="container">
            <GridLayout class="action-bar" rows="*" columns="50,2*,50">
                <Label col="0" row="0" class="fas" @tap="$navigateBack()" :text="'\uf060'"/>
                <Label col="1" row="0" class="header" text="Profile"/>
            </GridLayout>
            <GridLayout>
              <GridLayout class="form-content" rows="auto,*,auto,auto" >
                  <StackLayout class="top-border" row="0"/>
                  <ScrollView row="1" class="fields-section">
                      <StackLayout>
                          <!-- Username -->
                          <GridLayout  ios:columns="auto,*" android:rows="auto, auto" verticalAlignment="top">
                              <Label text="Username" class="field-title" />
                              <TextField v-bind:class="{ editable: editable }" id="username" :editable="editable" v-model="origprofile.name" class="field" ios:col="1" android:row="1" tap="onTextInputTapped" />
                          </GridLayout>
                          <StackLayout class="line"/>
                          <!-- Profile Pic -->
                          <GridLayout  ios:columns="auto,*" android:rows="auto, auto" verticalAlignment="top">
                              <Label text="Profile Pic" class="field-title" />
                              <TextField v-bind:class="{ editable: editable }" id="profile_pic" :editable="editable" v-model="origprofile.profile_pic" class="field" ios:col="1" android:row="1" tap="onTextInputTapped" />
                          </GridLayout>
                          <StackLayout class="line"/>
                          <!-- Bio -->
                          <StackLayout >
                              <Label text="Bio" class="field-title" />
                              <TextView v-bind:class="{ editable: editable }" id="bio" :editable="editable" v-model="origprofile.bio" android:hint="Add bio" ios:hint="Bio" class="field-multiline" tap="onTextInputTapped"/>
                          </StackLayout>
                          <StackLayout class="line"/>
                      </StackLayout>
                  </ScrollView>
                  <Button row="2" v-show="!editable" text="Update" class="update" @tap="toggleForm" col="0" colspan="2"/>
                  <GridLayout row="3" columns="*,*"  >
                    <Button v-show="editable" text="Save" class="save" @tap="saveProfile" col="0"/>
                   <Button v-show="editable" text="Cancel" class="cancel" @tap="saveCancel" col="1"/>
                  </GridLayout>
             </GridLayout>
             <!-- Picture -->
             <Image id="image" :src="origprofile.profile_pic" class="profile-picture" v-bind:class="{'editable': editable }" @tap="onProfilePictureTapped"/>
            </GridLayout>
        </StackLayout>
    </Page>
</template>
<script>
import { mapState, mapGetters } from "vuex";
import firebase from "nativescript-plugin-firebase";
var LoadingIndicator = require("nativescript-loading-indicator")
  .LoadingIndicator;
var loader = new LoadingIndicator();
export default {
  name: "profile-page",
  data() {
    return {
      editable: false,
      origprofile: {}
    };
  },
  components: {},
  computed: {
  },
  created() {
    this.origprofile = Object.assign({}, this.$store.state.profile);
  },
  methods: {
    toggleForm() {
      this.editable = !this.editable;
    },
    onProfilePictureTapped() {
      console.log("profilepic tapped");
    },
    saveCancel() {
      this.origprofile = Object.assign({}, this.$store.state.profile);
      this.editable = false;
    },
    saveProfile() {
      //in case we updated profile pic and returned to this page
      this.origprofile.profile_pic = this.$store.state.profile.profile_pic
      loader.show();
      const profDoc = firebase.firestore
        .collection("users")
        .doc(this.origprofile.id);
      profDoc
        .set(this.origprofile, { merge: true })
        .then(
          res => {
            this.$store.commit("setProfile", this.origprofile);
            this.editable = false;
            loader.hide();
            return res;
          },
          err => {
            console.error(err);
            loader.hide();
            alert("Unable to save profile, try again later!");
          }
        )
        .catch(function(error) {
          alert("Unable to save profile, try again later!");
          loader.hide();
          console.error("Error writing firestore document: ", error);
        });
    }
  }
};
</script>

<style scoped>
.profile-picture {
  width: 80;
  height: 80;
  border-radius: 40;
  margin-top: 16;
  vertical-align: top;
  horizontal-align: center;
}

@keyframes picture {
  from {
    opacity: 0;
    transform: scale(2, 2);
    animation-timing-function: ease-in;
  }
  to {
    opacity: 1;
    transform: scale(1, 1);
  }
}

.top-border {
  height: 2;
  background-color: #899bfe;
  margin-bottom: 40;
}

@keyframes play {
  from {
    opacity: 0.3;
    transform: scale(0.6, 0.6);
  }
  60% {
    opacity: 0.6;
    transform: scale(1.1, 1.1);
    animation-timing-function: ease-in;
  }
  to {
    opacity: 1;
    transform: scale(1, 1);
  }
}

.form-content {
  background-color: white;
  margin-top: 56;
  margin-left: 32;
  margin-right: 32;
  margin-bottom: 42;
  opacity: 0.6;
  transform: scale(0.8, 0.8);
  animation-name: play;
  animation-fill-mode: forwards;
  animation-duration: 0.6;
}

.fields-section {
  margin-left: 12;
  margin-right: 12;
}

.field-title,
.field-switch-title {
  horizontal-align: left;
  font-size: 14;
  color: #737373;
  padding: 10 0;
}

.field {
  horizontal-align: stretch;
  text-align: right;
  font-size: 14;
  color: #1e2d7e;
  padding: 10 0;
}

.field-multiline {
  min-height: 60;
  font-size: 14;
  color: #1e2d7e;
  margin: 10 0;
}

.field-switch {
  vertical-align: center;
  horizontal-align: right;
  margin: 10 0;
}
.editable {
  background-color: #eceaea;
}
.edit-picture {
  width: 80;
  height: 80;
  border-radius: 40;
  margin-top: 16;
  vertical-align: top;
  horizontal-align: center;
  background-color: #faf9f9;
}

.line {
  background-color: #f1f0f0;
  height: 1;
  margin: 0;
}

.checkbox {
  width: 18;
  height: 18;
  margin: 10 10 10 0;
}

.update {
  horizontal-align: stretch;
  text-align: center;
  color: white;
  background-color: #30bcff;
  height: 36;
}
.save {
  horizontal-align: stretch;
  text-align: center;
  color: white;
  background-color: #0011f8;
  height: 36;
}

.cancel {
  horizontal-align: stretch;
  text-align: center;
  color: white;
  background-color: #1b1c1d;
  height: 36;
}
</style>
There's a few things to notice here. A copy of the profile from state is made and bound to the page to make modifications on that copy. This lets us avoid binding the form elements directly to the state variable, and any changes made won't be final until the save button is tapped. This one of two popular methods used for pages like these in Vue. When it comes to changing the profile picture, the other approach will be used by routing to a new page with a copy of the picture data to be updated. The other notable section of code deals with storing the document back to Firestore. Finally, changes are committed to the VueX store for other pages using that data for rendering.
Firebase Storage for updated profile pictures
It's now possible to edit all the text in the user profile collection, but it would be much nicer to be able to upload a new profile picture via the app instead of updating a URL manually. Let's configure the app to use a few new plugins which will allow the user to take a picture or choose an image. Then some integration with Firebase Storage will be needed to upload the chosen image and return a URL for the profile document. (Note: the platform declarations package is used to save local image files properly with the image-picker plugin due to some issues on iOS for the current version of the plugin. )
Type the following commands:
tns plugin add nativescript-camera
tns plugin add nativescript-imagepicker
npm i tns-platform-declarations --save
Edit /firebase.nativescript.jsonand change: "firestore": true. Then run
rm -rf platforms && rm -rf node_modules && npm i
tns run ios --bundle
While this recompiles, go to your Firebase Console under Storage, and create a new folder /uploads/profile_pic/:
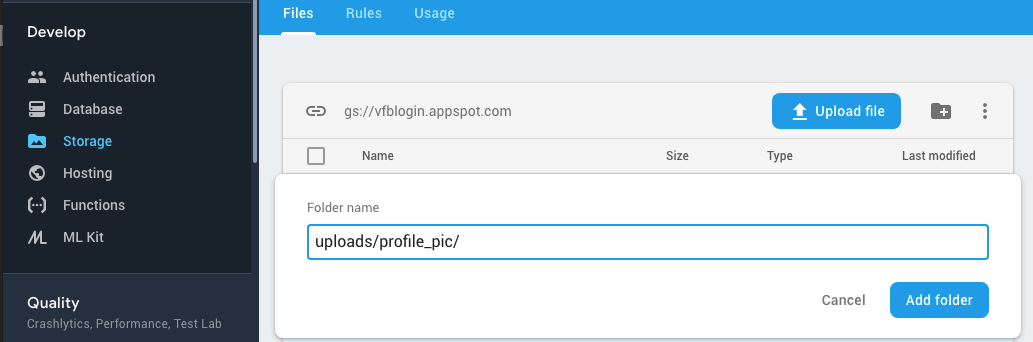
This is the directory location where pictures will be uploaded for the user's profile. Add the following import to ProfilePage.vue: import ProfilePicture from "./ProfilePicture.vue"; Then modify the onProfilePictureTapped() function to look like:
    onProfilePictureTapped() {
      if (this.editable) {
        this.$navigateTo(ProfilePicture);
      }
    },
Finally, create /app/components/ProfilePicture.vue and add:
<template>
    <Page actionBarHidden="true" backgroundSpanUnderStatusBar="true">
        <StackLayout>
            <GridLayout class="action-bar" rows="*" columns="50,2*,50">
                <Label col="0" row="0" class="fas" @tap="$navigateBack()" :text="'\uf060'"/>
                <Label col="1" row="0" class="header" text="Change Picture"/>
            </GridLayout>
            <Image id="image" :src="pictureSource" class="profile-picture-edit"/>
            <GridLayout columns="60,52,*" rows="50,10,50">
                <Label row="0" col="1" id="buttonCamera" :text="'\uf083'" @tap="takePicture" class="fas take-picture-icon "></Label>
                <Label row="0" col="2" text="Take a picture" class="desc-text"/>
                <Label row="2" col="1" id="buttonImage" :text="'\uf1c5'" @tap="chooseImage" class="fas take-picture-icon "></Label>
                <Label row="2" col="2" text="Choose an image" class="desc-text"/>
            </GridLayout>
            <GridLayout  columns="*,*"  >
                <Button text="Confirm" class="save" @tap="saveProfilePic" col="0"/>
                <Button text="Cancel" class="cancel" @tap="saveCancelPic" col="1"/>
            </GridLayout>
        </StackLayout>
    </Page>
</template>
<script>
import { mapState, mapGetters } from "vuex";
const cameraModule = require("nativescript-camera");
const imagepicker = require("nativescript-imagepicker");
const imageSourceModule = require("tns-core-modules/image-source");
import { isAndroid, isIOS } from "tns-core-modules/platform";
import firebase from "nativescript-plugin-firebase";
import { path, knownFolders } from "tns-core-modules/file-system";
var LoadingIndicator = require("nativescript-loading-indicator")
  .LoadingIndicator;
var loader = new LoadingIndicator();
const utilsModule = require("utils/utils");
var context = imagepicker.create({ mode: "single" }); // use "multiple" for multiple selection
export default {
  name: "picture-modal",
  data() {
    return {
      pictureSource: "",
      origSource: "",
      newFilename: ""
    };
  },
  components: {},
  computed: {
  },
  mounted() {
    this.pictureSource = this.$store.state.profile.profile_pic;
    this.origSource = this.$store.state.profile.profile_pic;
    if (cameraModule.isAvailable()) {
      //checks to make sure device has a camera
    } else {
      //ignore this on simulators for now
    }
    cameraModule.requestPermissions().then(
      //request permissions for camera
      success => {
        //have permissions
      },
      failure => {
        //no permissions for camera,disable picture button?
      }
    );
  },
  methods: {
    takePicture() {
      cameraModule
        .takePicture({
          width: 300, //these are in device independent pixels
          height: 300, //only one will be respected depending on os/device if
          keepAspectRatio: true, //    keepAspectRatio is enabled.
          saveToGallery: false //Don't save a copy in local gallery, ignored by some Android devices
        })
        .then(picture => {
          //save to file
          imageSourceModule.fromAsset(picture).then(
            savedImage => {
              console.log("saving to file");
              let filename =
                this.$store.state.profile.id +
                "-" +
                new Date().getTime() +
                ".jpg";
              let folder = knownFolders.documents();
              let fullpath = path.join(folder.path, filename);
              savedImage.saveToFile(fullpath, "jpeg");
              //set the picture from the currently saved image path
              this.pictureSource = fullpath;
              this.newFilename = filename;
              if (isAndroid) {
                let tmpfolder = fsModule.Folder.fromPath(
                  utilsModule.ad
                    .getApplicationContext()
                    .getExternalFilesDir(null)
                    .getAbsolutePath()
                );
                tmpfolder.getEntities().then(
                  function(entities) {
                    entities.forEach(function(entity) {
                      if (entity.name.substr(0, 5) == "NSIMG") {
                        var tmpfile = tmpfolder.getFile(entity.name);
                        tmpfile.remove();
                      }
                    });
                  },
                  function(error) {
                    console.log(error.message);
                  }
                );
                utilsModule.GC(); //trigger garbage collection for android
              }
            },
            err => {
              console.log("Failed to load from asset");
            }
          );
        })
        .catch(err => {
          console.error(err);
        });
    },
    chooseImage() {
      try {
        context
          .authorize()
          .then(() => {
            return context.present();
          })
          .then(selection => {
            loader.show();
            const imageAsset = selection.length > 0 ? selection[0] : null;
            imageAsset.options = {
              width: 400,
              height: 400,
              keepAspectRatio: true
            };
            imageSourceModule
              .fromAsset(imageAsset)
              .then(imageSource => {
                let saved = false;
                let localPath = "";
                let filePath = "";
                let image = {};
                const folderPath = knownFolders.documents().path;
                let fileName =
                  this.$store.state.profile.id +
                  "-" +
                  new Date().getTime() +
                  ".jpg";
                if (imageAsset.android) {
                  localPath = imageAsset.android.toString().split("/");
                  fileName =
                    fileName +
                    "_" +
                    localPath[localPath.length - 1].split(".")[0] +
                    ".jpg";
                  filePath = path.join(folderPath, fileName);
                  saved = imageSource.saveToFile(filePath, "jpeg");
                  if (saved) {
                    this.pictureSource = imageAsset.android.toString();
                  } else {
                    console.log(
                      "Error! Unable to save pic to local file for saving"
                    );
                  }
                  loader.hide();
                } else {
                  const ios = imageAsset.ios;
                  if (ios.mediaType === PHAssetMediaType.Image) {
                    const opt = PHImageRequestOptions.new();
                    opt.version = PHImageRequestOptionsVersion.Current;
                    PHImageManager.defaultManager().requestImageDataForAssetOptionsResultHandler(
                      ios,
                      opt,
                      (imageData, dataUTI, orientation, info) => {
                        image.src = info
                          .objectForKey("PHImageFileURLKey")
                          .toString();
                        localPath = image.src.toString().split("/");
                        fileName =
                          fileName +
                          "_" +
                          localPath[localPath.length - 1].split(".")[0] +
                          ".jpeg";
                        filePath = path.join(folderPath, fileName);
                        saved = imageSource.saveToFile(filePath, "jpeg");

                        if (saved) {
                          console.log("saved picture to " + filePath);
                          this.pictureSource = filePath;
                        } else {
                          console.log(
                            "Error! Unable to save pic to local file for saving"
                          );
                        }
                        loader.hide();
                      }
                    );
                  }
                }
              })
              .catch(err => {
                console.log(err);
                loader.hide();
              });
          })
          .catch(err => {
            console.log(err);
            loader.hide();
          });
      } catch (err) {
        alert("Please select a valid image.");
        console.log(err)
        loader.hide();
      }
    },
    saveCancelPic() {
      this.pictureSource = this.origSource;
      this.$navigateBack();
    },
    saveProfilePic() {
      loader.show();
      if (this.pictureSource != this.origSource) {
        //upload this picture choice to firebase storage and get url
        //use this url for profile pic and save to firebase
        var filename = this.newFilename;
        firebase.storage
          .uploadFile({
            // the full path of the file in your Firebase storage (folders will be created)
            remoteFullPath: "uploads/profile_pic/" + filename,
            // option 2: a full file path (ignored if 'localFile' is set)
            localFullPath: this.pictureSource,
            // get notified of file upload progress
            onProgress: function(status) {
              console.log("Uploaded fraction: " + status.fractionCompleted);
              console.log("Percentage complete: " + status.percentageCompleted);
            }
          })
          .then(
            uploadedFile => {
              firebase.storage
                .getDownloadUrl({
                  // the full path of an existing file in your Firebase storage
                  remoteFullPath: "uploads/profile_pic/" + filename
                })
                .then(
                  url => {
                    this.pictureSource = url;
                    this.$store.commit("setProfilePicture", url);
                    loader.hide();
                    this.$navigateBack();
                  },
                  function(error) {
                    console.log("Error: " + error);
                    alert("Unable to update profile pic!");
                    loader.hide();
                  }
                )
                .catch(err => {
                  console.error(err);
                  alert("Unable to update profile pic!");
                  loader.hide();
                });
            },
            function(error) {
              alert("Unable to update profile pic!");
              console.log("File upload error: " + error);
              loader.hide();
            }
          )
          .catch(err => {
            alert("Unable to update profile pic!");
            console.error(err);
            loader.hide();
          });
      } else {
        console.log("No change in pic to save");
      }
    }
  }
};
</script>
<style scoped>
.take-picture-icon {
  horizontal-align: center;
  background-color: rgb(234, 234, 236);
  padding: 12;
  border-width: 1.2;
  border-color: black;
  border-radius: 14;
  margin-top: 20;
  color: black;
  font-size: 30;
  height:80;
  width:80;
}
.close-button {
  horizontal-align: stretch;
  text-align: center;
  color: white;
  background-color: #1b1c1d;
  height: 36;
}
.profile-picture-edit {
  width: 200;
  height: 200;
  border-width: 0.6;
  border-color: black;
  margin-top: 16;
  margin-bottom: 16;
  vertical-align: top;
  horizontal-align: center;
}
.save {
  horizontal-align: stretch;
  text-align: center;
  color: white;
  background-color: #0011f8;
  height: 36;
}

.cancel {
  horizontal-align: stretch;
  text-align: center;
  color: white;
  background-color: #1b1c1d;
  height: 36;
}
.desc-text{
  horizontal-align: left;
  vertical-align: center;
  margin-left:20;
  margin-top:20;
}
</style>
This uses a new mutator to only modify the profile_pic entry in the profile data store by adding the following to the mutations object in /app/store/index.js:
  setProfilePicture: (state, profilepicture) => {
    state.profile.profile_pic = profilepicture;
  },
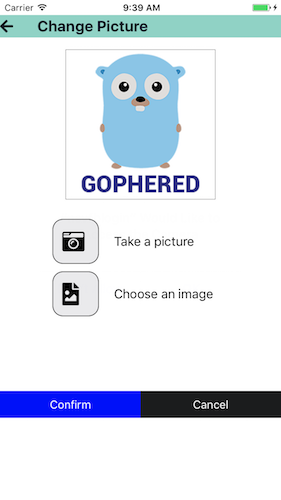
Now you should be able to tap on the profile picture to navigate to a new page where you can either use the camera or select an image from the device, and upload it to Firebase for storage and display in the app. This page need improvement and I plan on moving the profile picture update process into the main profile page.
Done!
That's it for this post. I'm still learning Vue (and Nativescript) so if anyone reading this has suggestions, please leave a comment. Also, if you download and improve this demo project, leave me a link so I can check it out and learn from you!
If you'd like to download the updated source files for a quick start, you can find them on Github.