
As mobile devices and communication networks have evolved, one of their most popular uses has been for location-based applications. Nativescript offers a few plugins that provide both the maps and the location discovery tools needed to create a modern map-based application. For this post, I'll discuss how to use maps, location services and API calls to create a Nativescript Vue application that will display a map of the current user's location and allow the user to search for places nearby.
Getting Started
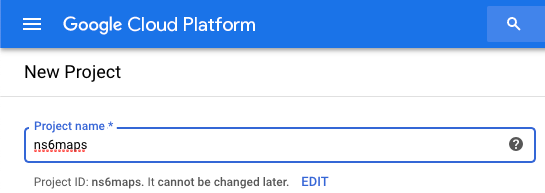
To begin, we'll create a new app named ns6maps using the CLI. When asked, choose a Vue.JS Blank app template to start coding from. Once that's complete, we'll add the Google Maps plugin and run it in the simulator to ensure everything is working.
tns create ns6maps
cd ns6maps
tns doctor
tns plugin add nativescript-google-maps-sdk
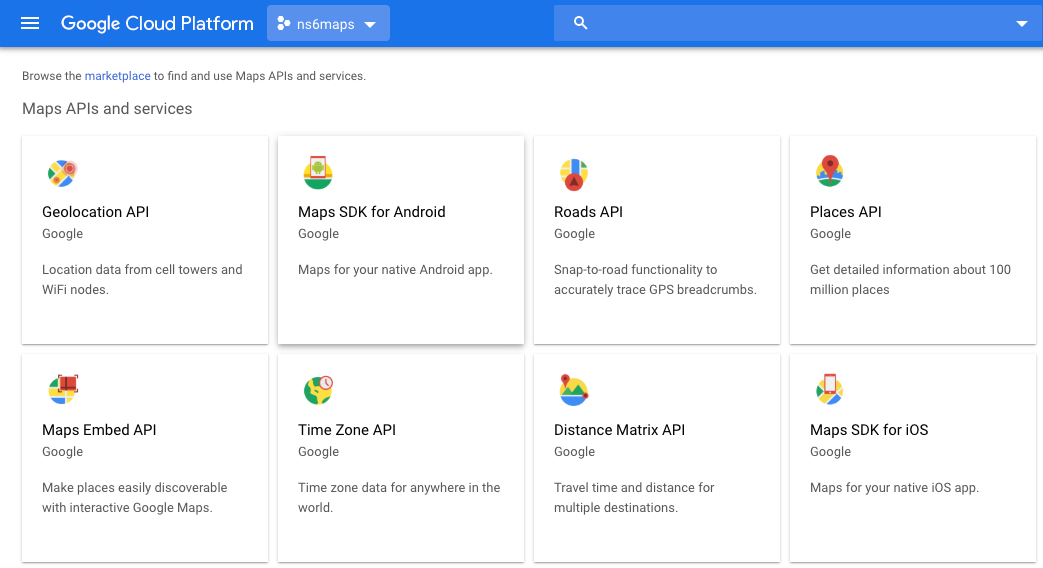
tns run iosWe'll need some API keys to use Google Maps on iOS and Android, so sign into the Google Cloud Platform site and create a new Project for your app.
Select that project at the top of the page and you'll see a screen with all the APIs available for use with your project
Enable the Maps SDK for iOS first by tapping on that box, it will bring you to an overview of that API. Tap on Credentials, then the link at the top to go to the main Google APIs & Services Credentials area and then click on the button to create credentials and select an API key. You'll get a popup showing the newly created key, and a link to restrict that key.
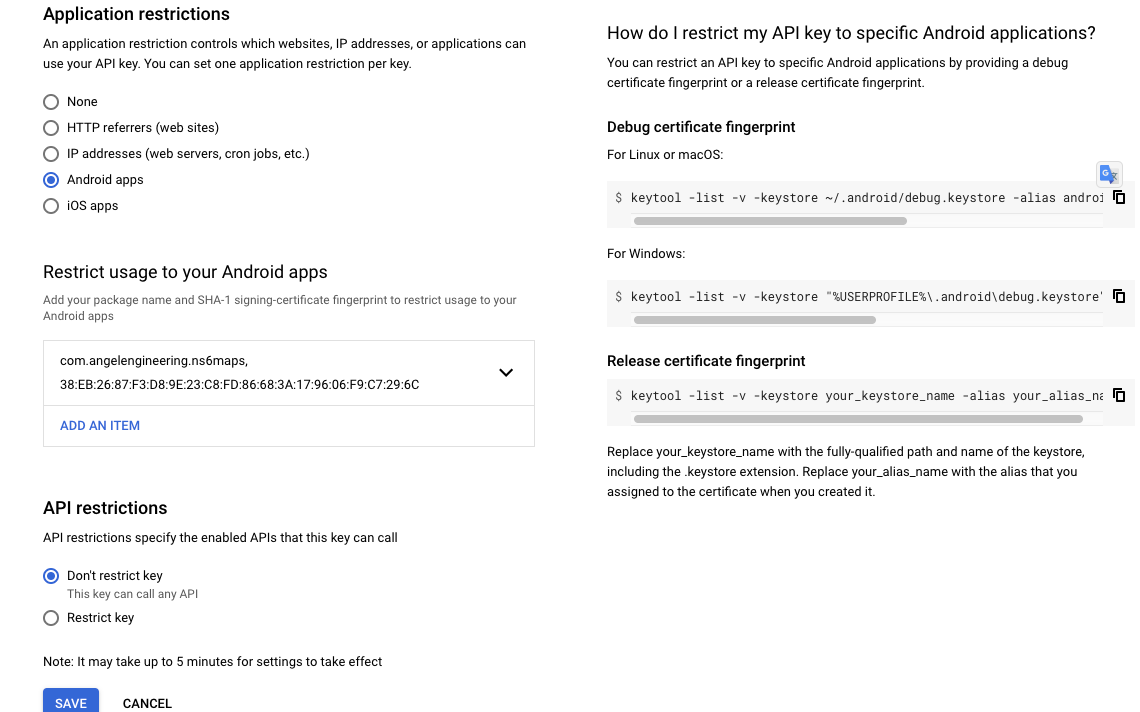
Follow the Restrict Key link and select iOS apps under Application Restrictions.
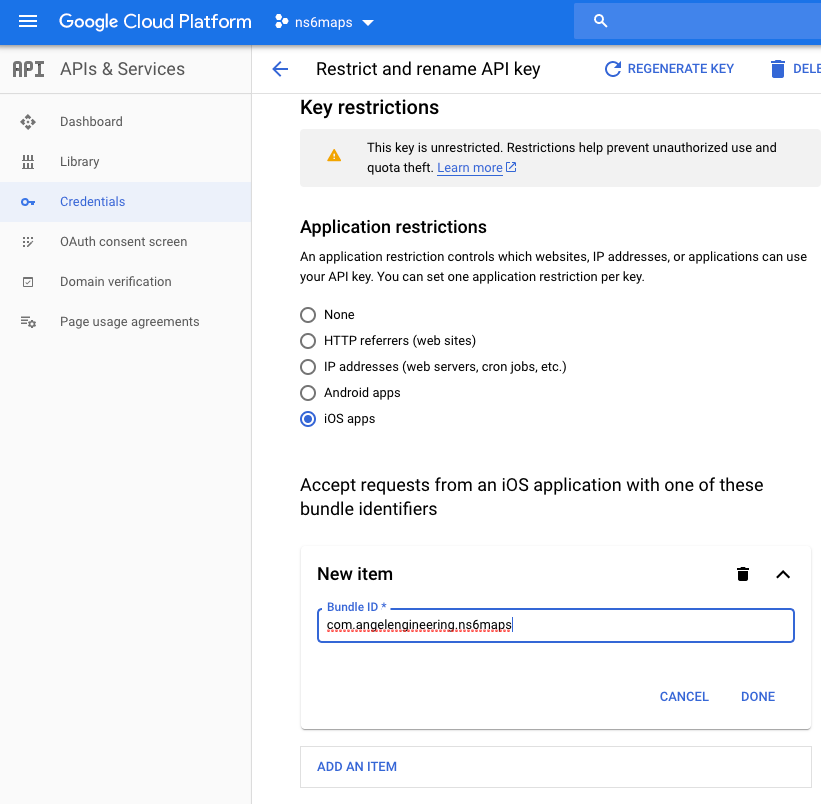
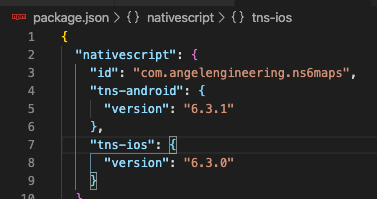
This will require your app bundle identifier, so let's ensure it matches the one in your package.json .
Save the settings, and make note of the iOS key for later. Now, create another api key, follow the restrict link and restrict this one to Android apps. For Android, you'll need to add SHA1 fingerprints for both your debug key and production keys used to develop the app. If you don't have a production keystore yet, create one by following the Google documentation. The debug fingerprint can be obtained by using keytool -list -v -keystore ~/.android/debug.keystore -alias androiddebugkey -storepass android -keypass android for Linux/OSX systems, and instructions are shown on the right side of the key restriction screen showing how to obtain the fingerprints for both debug and production versions of the app.
Now that we have api keys, let's add them to our app. For Android, we'll start by copying the template config file using:
cp -r node_modules/nativescript-google-maps-sdk/platforms/android/res/values app/App_Resources/Android/src/main/resThen edit app/App_Resources/Android/src/main/res/values/nativescript_google_maps_api.xml and uncomment the string after replacing the placeholder with your Android Google Maps API key. Finally, edit app/App_Resources/Android/src/main/AndroidManifest.xml and add the following to the application tag:
<meta-data
    android:name="com.google.android.geo.API_KEY"
    android:value="@string/nativescript_google_maps_api_key" />
For iOS, we'll edit /app/app.js and add the following code to the top of the page after the other imports, using the iOS Google Maps API key generated earlier. We'll also add code to register the plugin for use with Nativescript Vue, and load the plugin as MapView for use in this app.
import { isAndroid, isIOS } from "tns-core-modules/platform";
if (isIOS) {
    GMSServices.provideAPIKey('REPLACE_WITH_IOS_KEY');
}
Vue.registerElement('MapView', () => require('nativescript-google-maps-sdk').MapView);
Edit Home.vue and replace the contents with:
<template>
    <Page actionBarHidden="true" backgroundSpanUnderStatusBar="false">
        <StackLayout height="100%" width="100%" >
            <MapView iosOverflowSafeArea="true" :latitude="latitude" :longitude="longitude" :zoom="zoom" :bearing="bearing" :tilt="tilt" height="100%" @mapReady="onMapReady" @markerSelect="onMarkerSelect" @markerInfoWindowTapped="onMarkerInfoWindowTapped"></MapView>
        </StackLayout>
    </Page>
</template>

<script>
export default {};
</script>

<style scoped>
</style>
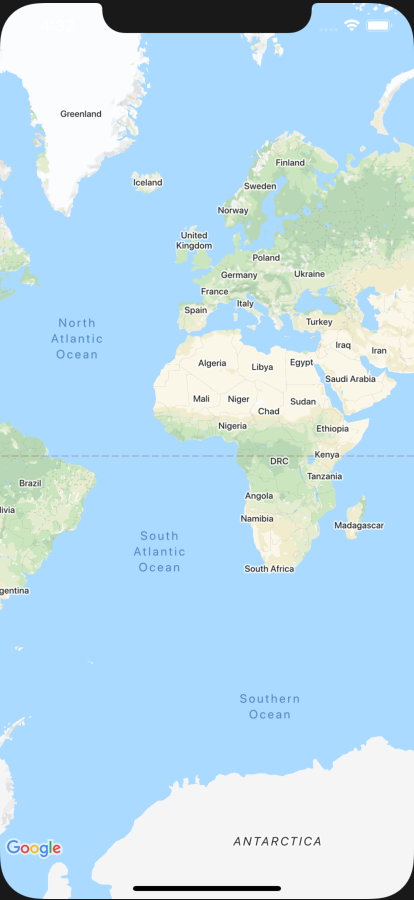
Note that we've enclosed the Map component inside a StackLayout with both width and height set to 100%. This is done to avoid a potential problem when the map is part of a more complicated page layout, and to ensure the map component is shown full screen. We've also set the component's iosOverflowSafeArea property to true, so that the map will completely fill the screen on larger notched devices instead of being restricted to the safe rectangular screen area. Run the app with tns run ios and you should see a full page map if everything worked properly:
Geolocation with Nativescript
If you look at the MapView component, you'll see that we have parameters defined that we'll use to configure the map's location and display. We'll now add another plugin that will allow Nativescript to request the current device location, then set those as the coordinates to center the map on. We'll also display the current user's location on the map for reference. Start by installing the geolocation plugin:
tns plugin add nativescript-geolocation
We'll need extra permissions in order to access the device location, so let's take care of those first. Since we'll be working with a map, we'll want to request precise location permissions for this application. Edit app/App_Resources/Android/src/main/AndroidManifest.xml and add the following permissions;
<uses-permission android:name="android.permission.ACCESS_COARSE_LOCATION"/>
<uses-permission android:name="android.permission.ACCESS_FINE_LOCATION"/>
Edit app/App_Resources/iOS/Info.plist and add the following strings to be shown to the user when requesting location permission:
<key>NSLocationWhenInUseUsageDescription</key>
	<string>Find your current location to see places nearby.</string>
<key>NSLocationUsageDescription</key>
	<string>Find your current location to see places nearby.</string>
Next we will fill in the exports default data section with variables used by the map component. We'll also add the mounted() section where we will request location permissions, and then request the current location if we have them. If a location is returned by the device, we'll update the data variables with the user's current coordinates, which will also re-center the map on that location. Modify the script section to be:
const geolocation = require("nativescript-geolocation");
export default {
data() {
return {
latitude: '',
longitude: '',
zoom: '',
bearing: '',
tilt: '',
mapView:null,
}
},
mounted() {
let that = this
geolocation.enableLocationRequest(true, true).then(() => {
geolocation.isEnabled().then(value => {
if (!value) {
console.log("NO permissions!");
return false;
} else {
console.log("Have location permissions");
geolocation
.getCurrentLocation({
timeout: 20000
})
.then(location => {
if (!location) {
console.log("Failed to get location!");
} else {
that.latitude = location.latitude
that.longitude = location.longitude
that.zoom = 14
that.bearing = 0
that.altitude = 0
}
});
return true;
}
});
})
},
methods: {},
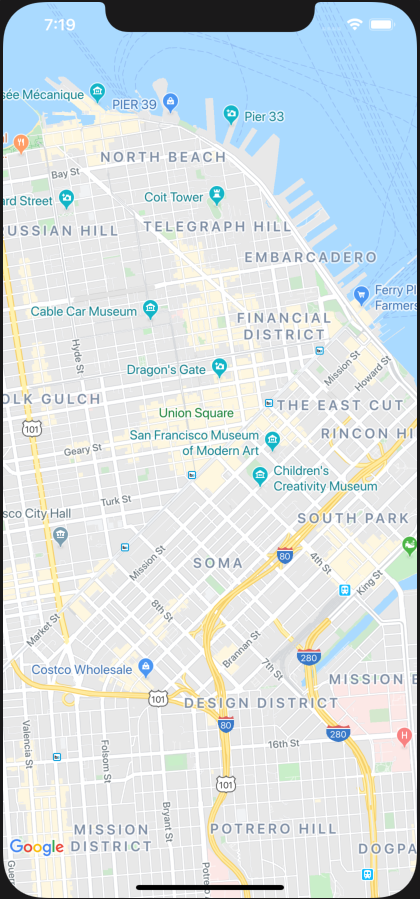
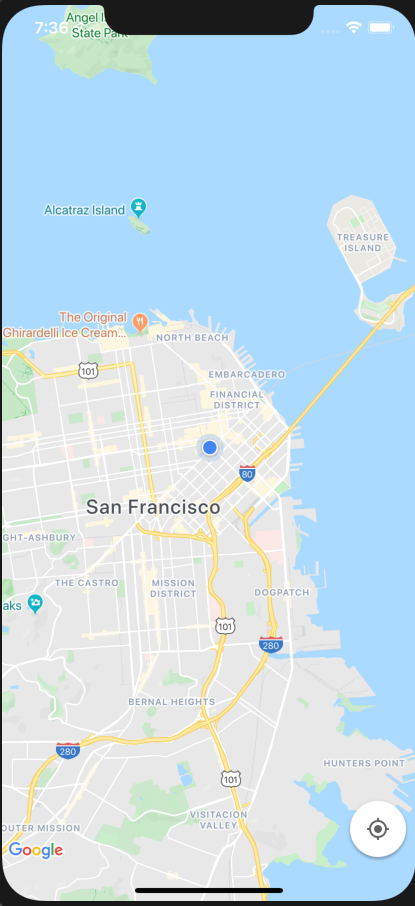
}Run the app now on the iOS simulator, allow location permissions, and you should now see something like the following if your simulator has the default San Francisco location set.
Let's improve our map by showing the current user location. We'll configure out MapView by adding a new function that is called once the map component has been loaded and ready to use. Add the following functions to the methods section:
		onMapReady(args) {
            this.mapView = args.object;
            this.mapView.myLocationEnabled = true;
            this.mapView.zoomGesturesEnabled = true;
            var gMap = this.mapView.gMap;
            if (isAndroid) {
                uiSettings = gMap.getUiSettings();
                uiSettings.setMyLocationButtonEnabled(true);
                gMap.setMyLocationEnabled(true);
            }
            if (isIOS) {
                gMap.myLocationEnabled = true;
                gMap.settings.myLocationButton = true;
                this.mapView.on("myLocationTapped", event => {
                    geolocation.isEnabled().then(enabled => {
                        if (enabled) {
                            geolocation.getCurrentLocation({
                                maximumAge: 5000,
                                timeout: 20000
                            }).then(location => {
                                gMap.animateToLocation(location);
                            });
                        }
                    });
                });
            }
        },
		onMarkerSelect() {},
        onMarkerInfoWindowTapped() {},
The onMapReady function is run once the map component has initialized. First we store a reference to the map component for later use by other functions . We then configure the map to show the current user location, and enable a floating location button on each platform that is used to center the map on the current user's location. Finally, we enable the display of a compass button to orient the map north (only shown if the user has rotated the map), and allow zoom gestures. You'll note that for iOS, we've added a small workaround to fix a bug with this plugin that affects newer iOS versions, and prevents the map from centering when the button is tapped. Run the app on the simulator and you should now see a blue pulsing dot showing your device's current location, as well as the floating button used to center the map on that location.
Run the app on an Android simulator now. You will probably run into a few problems that will hang or crash the map plugin. In order to avoid one common problem with this plugin on Android, you should set the version of Google Play Services in app/App_Resources/Android/before-plugins.gradle file (if the file does not exist, just create it):
android {
	project.ext {     googlePlayServicesVersion = "16.+"  }
}
Once that's ready, you'll run into another problem on Android when trying to enable display of the current user's location without having permission to location yet in onMapReady(). To avoid this, we'll use a flag isMounted that is set after permissions status has been resolved in mounted(), and only enable the current location setting on Android after location permission has been granted by the user and the MapView has been initialized. This approach may lead to a race condition since we expect the map plugin to finish loading before the permissions check in mounted(), otherwise the button may not be enabled and shown. To avoid this, we'll also check if the mapView variable has been assigned in mounted() and permissions check have been completed before enabling this setting here as well. In a more realistic application, you'd probably hide the map screen with a loader or v-if until everything else is ready and the map can start initializing. Update the default section so it contains these changes:
data() {
return {
latitude: '',
longitude: '',
zoom: '',
bearing: '',
tilt: '',
mapView: null,
isMounted: false
}
},
mounted() {
let that = this
geolocation.isEnabled().then(function(isEnabled) {
if (!isEnabled) {
geolocation.enableLocationRequest(true, true).then(() => {
that.isMounted = true
if (isAndroid && that.mapView) {
let uiSettings = that.mapView.gMap.getUiSettings();
uiSettings.setMyLocationButtonEnabled(true);
that.mapView.gMap.setMyLocationEnabled(true);
}
geolocation
.getCurrentLocation({
timeout: 20000
})
.then(location => {
if (!location) {
console.log("Failed to get location!");
} else {
that.latitude = location.latitude
that.longitude = location.longitude
that.zoom = 14
that.bearing = 0
that.altitude = 0
}
});
}, (e) => {
console.log("Error: " + (e.message || e));
}).catch(ex => {
console.log("Unable to Enable Location", ex);
});
} else {
that.isMounted = true
if (isAndroid && that.mapView) {
let uiSettings = that.mapView.gMap.getUiSettings();
uiSettings.setMyLocationButtonEnabled(true);
that.mapView.gMap.setMyLocationEnabled(true);
}
geolocation
.getCurrentLocation({
timeout: 20000
})
.then(location => {
if (!location) {
console.log("Failed to get location!");
} else {
that.latitude = location.latitude
that.longitude = location.longitude
that.zoom = 14
that.bearing = 0
that.altitude = 0
}
});
}
}, function(e) {
console.log("Error: " + (e.message || e));
});
},
methods: {
onMapReady(args) {
this.mapView = args.object;
var gMap = this.mapView.gMap;
this.mapView.settings.myLocationEnabled = true;
this.mapView.settings.myLocationButtonEnabled = true
this.mapView.settings.compassEnabled = true
this.mapView.settings.zoomGesturesEnabled = true;
if (isAndroid && this.isMounted && geolocation.isEnabled()) {
let uiSettings = gMap.getUiSettings();
uiSettings.setMyLocationButtonEnabled(true);
gMap.setMyLocationEnabled(true);
}
if (isIOS) {
gMap.myLocationEnabled = true;
gMap.settings.myLocationButton = true;
this.mapView.on("myLocationTapped", event => {
geolocation.isEnabled().then(enabled => {
if (enabled) {
geolocation.getCurrentLocation({
maximumAge: 5000,
timeout: 20000
}).then(location => {
gMap.animateToLocation(location);
});
}
});
});
}
},
onMarkerSelect() {},
onMarkerInfoWindowTapped() {},
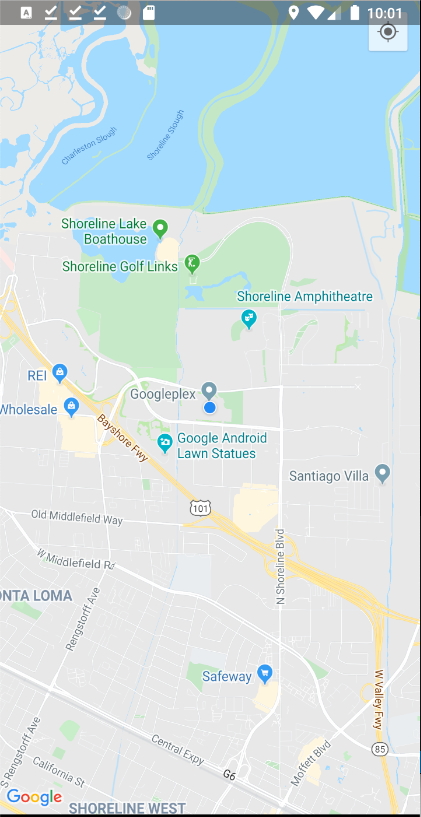
},Run the app on an Android simulator and you should now see something similar to:
Adding Map Markers
We've got a map that shows our current location, but now let's make it useful by adding markers for locations of interest. Let's set our current location in the simulator to the coordinates of 645 San Antonio Rd, Mountain View, CA 94040, USA. We'll use example map markers for a few places near that location found by searching Google Maps for grocery stores, and make note of the name and location information. Add the following import to the top of your script section:
const mapsModule = require("nativescript-google-maps-sdk");
Then add a new data variable to store the array of markers to be rendered by our app:
			markers: [{
                    name: 'Whole Foods',
                    address: '4800 El Camino Real',
                    city: 'Los Altos',
                    state: 'CA',
                    zip: '94022',
                    type: 'Grocery Store',
                    latitude: '37.398933',
                    longitude: '-122.110570',
                },
                {
                    name: 'Trader Joe\'s',
                    address: '590 Showers Dr',
                    city: 'Mountain View',
                    state: 'CA',
                    zip: '94040',
                    type: 'Grocery Store',
                    latitude: '37.402180',
                    longitude: '-122.110888',
                },
                {
                    name: 'Safeway',
                    address: '645 San Antonio Rd',
                    city: 'Mountain View',
                    state: 'CA',
                    zip: '94040',
                    type: 'Grocery Store',
                    latitude: '37.402079',
                    longitude: '-122.111946',
                },
                {
                    name: 'Walmart',
                    address: '600 Showers Dr',
                    city: 'Mountain View',
                    state: 'CA',
                    zip: '94040',
                    type: 'Grocery Store',
                    latitude: '37.400774',
                    longitude: '-122.109642',
                },
            ]
Now we'll add markers using the following code added to the end of onMapReady:
			this.markers.forEach(element => {
                var marker = new mapsModule.Marker();
                marker.position = mapsModule.Position.positionFromLatLng(
                    element.latitude,
                    element.longitude
                );
                marker.title = element.name;
                this.mapView.addMarker(marker);
            })
Now if you run the app you should see something similar to:
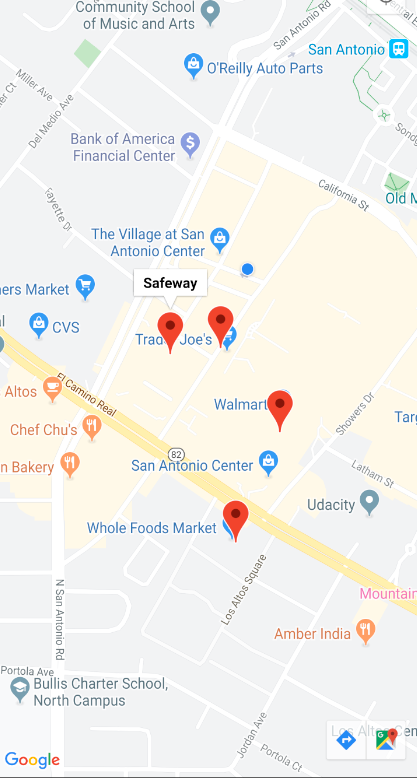
When a marker is tapped, the map will center on that marker and display the marker's title. We can make this better by popping up a window with more information, like those you get when using Google Maps via their app or website. Replace the block of code just added with:
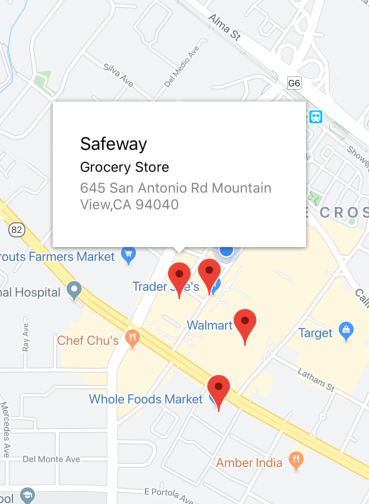
			this.mapView.infoWindowTemplate = `<StackLayout orientation="vertical" width="240" height="140"  >
        	    <Label text="{{title}}"  marginTop="26" marginLeft="20"    textWrap="true" color="black"  fontSize="18" />
                <Label text="{{type}}"  marginLeft="20"    textWrap="true" color="gray"  fontSize="12" />
                <Label text="{{address}}"  marginLeft="20"    textWrap="true" color="gray"  fontSize="14" />
            </StackLayout>`;
            this.markers.forEach(element => {
                var marker = new mapsModule.Marker();
                marker.position = mapsModule.Position.positionFromLatLng(
                    element.latitude,
                    element.longitude
                );
                marker.title = element.name;
                marker.type = element.type
                marker.address = element.address + ' ' + element.city + ',' + element.state + ' ' + element.zip
                this.mapView.addMarker(marker);
            })
We've added an XML template to use for the popup, which references properties we've also added to each marker object. You can experiment with styling and using local images in these popups, as well as implement the marker tap handler if you want to perform an action such as navigating to a details page for that location.
Search Box with Google Places
Let's make this map more interactive and add a search box connected to Google Places to find results and render markers based on those results. We'll need to get another api key for Google Places, which will require the same steps as the Google Maps key, except this time we'll just generate a single key restricted by API to only Google Places and use that for both platforms. Once you've got that key, add the following to the XML section inside the <StackLayout> and above the MapView component:
<SearchBar hint="What are you looking for?" v-model="searchPhrase" @submit="onSubmit" textFieldHintColor="gray" marginTop="20" />This will render a search bar component at the top of the page, and will bind the search query to a new local variable searchPhrase which we'll add to our data export section as searchPhrase: '',. Add a new import to the top of your script section so we can make http calls: import * as http from "http";. We'll need to setup a URL request to the API server that contains the current user location, the maximum distance for results of 1000 meters, the search query submitted by the user and the restricted Google Places API key. Any results returned will be parsed and added as new markers on the map, after first removing all old markers. This will happen inside the new onSubmit function added to the methods section:
onSubmit() {
let that = this
this.mapView.removeAllMarkers()
let searchurl = "https://maps.googleapis.com/maps/api/place/nearbysearch/json?location=" + this.latitude + "," + this.longitude + "&radius=1000&keyword=" + encodeURI(this.searchPhrase) + "&key=YOUR_API_KEY"
http
.request({
url: searchurl,
method: "GET",
timeout: 10000,
headers: { "Content-Type": "application/json" }
})
.then(function(data) {
if (data.statusCode == 200) {
let result = JSON.parse(data.content);
let results = result.results
results.forEach(element => {
var marker = new mapsModule.Marker();
marker.position = mapsModule.Position.positionFromLatLng(
element.geometry.location.lat,
element.geometry.location.lng
);
marker.title = element.name;
marker.type = element.types[0]
marker.address = element.vicinity
that.mapView.addMarker(marker);
})
} else {
console.log("Error requesting youtube metadata! Returned: ");
console.dir(data);
}
})
.catch(e => {
console.log("Error retreiving youtube metadata");
console.error(e);
});
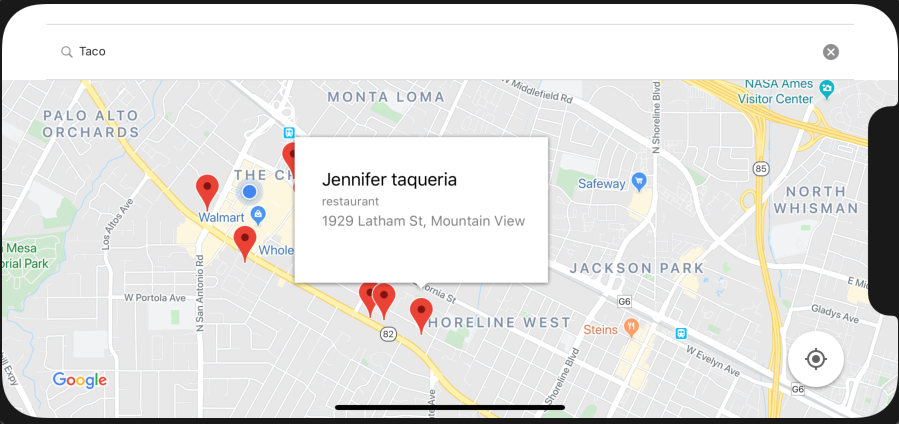
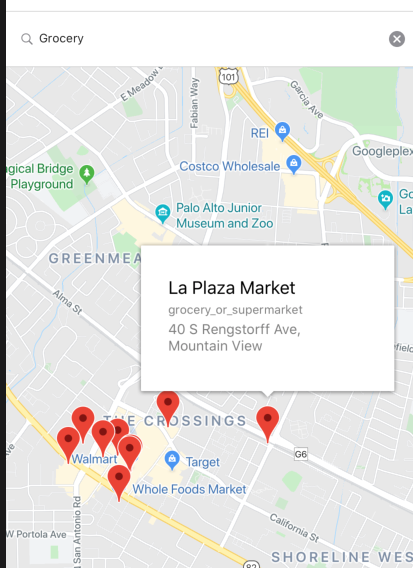
},This function first builds the query string for the Google Places API call by using the current user location, a search radius of 1 km, the search query and the API key. You can read more about how to use and interpret results from this call here. Once the call completes, we will check for a valid status code and then process any results returned by creating new markers and adding them to the map. Remove the example markers variable array from the data section, and remove the code that added these example markers in onMapReady. Run the code now and search for "grocery" and you should see something like:
This works so far, but if the user is moving around then the initial location we obtained when loading the app will no longer be accurate. To ensure we're sending our current location for search results, we can request the current location from the device before issuing the query, ensuring we'll get results for our current location instead of a past one. Modify the onSubmit function to now be:
		onSubmit() {
            let that = this
            geolocation
                .getCurrentLocation({
                    timeout: 20000
                })
                .then(location => {
                    if (!location) {
                        console.log("Failed to get location!");
                    } else {
                        that.latitude = location.latitude
                        that.longitude = location.longitude
                        that.mapView.removeAllMarkers()
                        let searchurl = "https://maps.googleapis.com/maps/api/place/nearbysearch/json?location=" + that.latitude + "," + that.longitude + "&radius=1000&keyword=" + encodeURI(that.searchPhrase) + "&key=AIzaSyCnnXo6rqBp4ItB__nC80OyoLDYjxWcxBQ"
                        http
                            .request({
                                url: searchurl,
                                method: "GET",
                                timeout: 10000,
                                headers: { "Content-Type": "application/json" }
                            })
                            .then(function(data) {
                                if (data.statusCode == 200) {
                                    let result = JSON.parse(data.content);
                                    let results = result.results
                                    results.forEach(element => {
                                        var marker = new mapsModule.Marker();
                                        marker.position = mapsModule.Position.positionFromLatLng(
                                            element.geometry.location.lat,
                                            element.geometry.location.lng
                                        );
                                        marker.title = element.name;
                                        marker.type = element.types[0]
                                        marker.address = element.vicinity
                                        that.mapView.addMarker(marker);
                                    })

                                } else {
                                    console.log("Error getting google places data");
                                    console.dir(data);
                                }
                            })
                            .catch(e => {
                                console.log("Error getting google places data");
                                console.error(e);
                            });
                    }

                });
        },
While this does work, a better alternative would be to setup a location watcher using the geolocation plugin function watchLocation and have that update the app's current user location in the background when the device location changes.
Bounding the Map
Another feature you will probably want to implement is to have the map zoomed and centered so it fits all the markers returned from the search results. This will require native calls specific to each platform to create a new bounding box from all the markers and then applying that to the MapView to center it on that box. For Android we can calculate the bounding box once all the markers have been added to the map. For iOS, we'll need to perform operations before, during, and after all markers have been added. Update onSubmit to be:
		onSubmit() {
            let that = this
            geolocation
                .getCurrentLocation({
                    timeout: 20000
                })
                .then(location => {
                    if (!location) {
                        console.log("Failed to get location!");
                    } else {
                        that.latitude = location.latitude
                        that.longitude = location.longitude
                        that.mapView.removeAllMarkers()
                        let searchurl = "https://maps.googleapis.com/maps/api/place/nearbysearch/json?location=" + that.latitude + "," + that.longitude + "&radius=1000&keyword=" + encodeURI(that.searchPhrase) + "&key=AIzaSyCnnXo6rqBp4ItB__nC80OyoLDYjxWcxBQ"
                        http
                            .request({
                                url: searchurl,
                                method: "GET",
                                timeout: 10000,
                                headers: { "Content-Type": "application/json" }
                            })
                            .then(function(data) {
                                if (data.statusCode == 200) {
                                    let result = JSON.parse(data.content);
                                    let results = result.results
                                    var bounds
                                    let padding = 100
                                    if (isIOS) {
                                        bounds = GMSCoordinateBounds.alloc().init();
                                    }
                                    results.forEach(element => {
                                        var marker = new mapsModule.Marker();
                                        marker.position = mapsModule.Position.positionFromLatLng(
                                            element.geometry.location.lat,
                                            element.geometry.location.lng
                                        );
                                        if (isIOS) bounds = bounds.includingCoordinate(marker.position);
                                        marker.title = element.name;
                                        marker.type = element.types[0]
                                        marker.address = element.vicinity
                                        that.mapView.addMarker(marker);
                                    })
                                    if (isAndroid) {
                                        var builder = new com.google.android.gms.maps.model.LatLngBounds.Builder();
                                        that.mapView.findMarker(function(marker) { builder.include(marker.android.getPosition()); });
                                        bounds = builder.build();
                                        var cu = com.google.android.gms.maps.CameraUpdateFactory.newLatLngBounds(bounds, padding);
                                        that.mapView.gMap.animateCamera(cu);
                                    }
                                    if (isIOS) {
                                        var update = GMSCameraUpdate.fitBoundsWithPadding(bounds, padding);
                                        that.mapView.gMap.animateWithCameraUpdate(update);
                                    }
                                } else {
                                    console.log("Error getting google places data");
                                    console.dir(data);
                                }
                            })
                            .catch(e => {
                                console.log("Error getting google places data");
                                console.error(e);
                            });
                    }

                });
        },
Custom Marker Icons
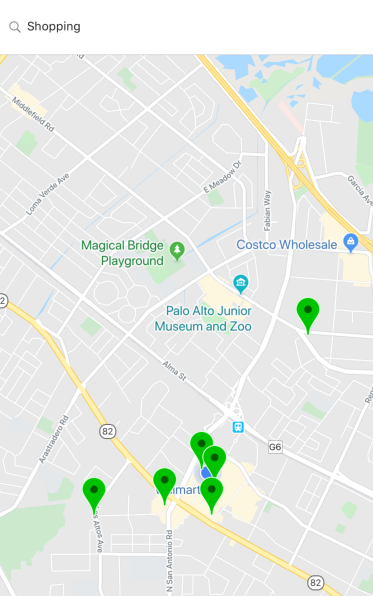
Besides customizing the popup for each marker, we can take it one step further and also customize the appearance of the markers themselves. The simplest change we can make is to the modify the color of the marker icon. To do this we can simply assign each marker a color using marker.color="COLOR". Let's change all the markers to be green instead of red by adding marker.color="green" to onSubmit in the loop where we add the markers to the map. Now your map and markers should look like:
Using images is almost as easy, although you'll have to be careful with the image size used and the way they are rendered on iOS and Android platforms. Let's comment out the marker color assignment and add the following lines instead:
 // marker.color = "green"
let imageSource = ImageSource.fromFileSync("~/images/foodicon.png");
const icon = new Image();
icon.imageSource = imageSource;
marker.icon = icon;
that.mapView.addMarker(marker);
We've downloaded a 48x48 icon image and placed it in the /app/images/ directory. We also need a few Nativescript image libraries, so add these imports to the script section:
import { ImageSource } from "tns-core-modules/image-source";
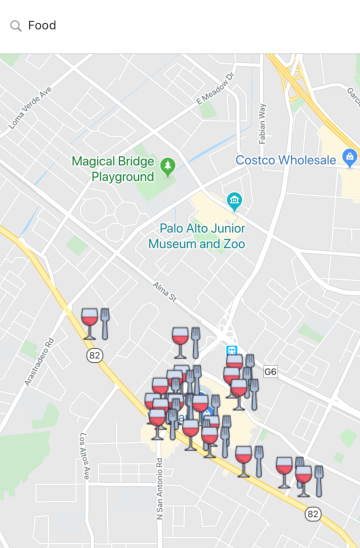
import { Image } from "tns-core-modules/ui/image";Run the app, perform a search and you should now have markers with this icon instead of the default pin marker:
Done!
That's it for this post. If you'd like to download the final source files, you can find them on Github.