
In this post I'll go over how to create a simple app using Nativescript that uses the device camera to take photos, displays those pictures in a simple image gallery, uses Font Awesome icons, and maintains state for the gallery across app runs. This is an updated version of a previous post, but now using Nativescript 6.1.2 with Vue instead of Javascript.
Creating a new app using the Nativescript CLI
Nativescript 6.1.2 was released recently, and I'll be using this version in the post. I upgraded to the latest version of the CLI using the following command:
npm install -g nativescript
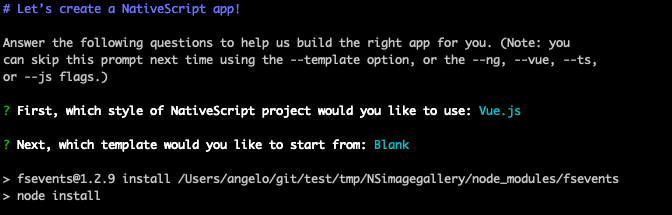
With the new CLI installed, we’ll create a new app using the Nativescript CLI, perform a Nativescript CLI diagnostic check, and then run the basic app in the iOS simulator to make sure everything is working normally. We’ll begin by setting up a new application named NSimagallery6 using the following command.
tns create NSimagegallery6The CLI will ask you which language style you wish to use and which template structure to scaffold your new app with. Select "Vue.js" as the style and "Blank" as the template.
Once it’s done scaffolding, you can change to that directory, add the iOS platform and then make sure your Nativescript app environment is ok by using the tns doctor CLI command.
cd NSimagegallery6
tns platform add ios
tns doctor
The downloaded template will probably target slightly older Nativescript platform versions, so you may see a warning like the following after running tns doctor.

Updating a mobile platform version with the Nativescript CLI can be done by removing the platform and re-adding it to the project using the following commands. The CLI will update the package.json file with the current platform version. Alternatively, you can also edit the package versions in package.json manually.
tns platform remove ios
tns platform add ios
Run the app on a simulator or device using:
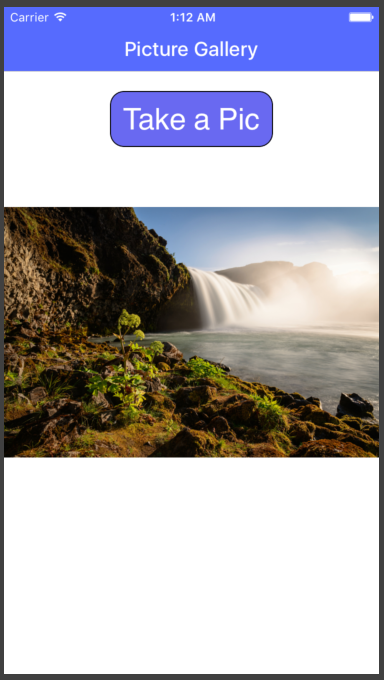
tns run iosYou should see the following screen on your iPhone simulator if everything is running ok.
Next, look at the folder structure of the newly created app and you'll see the following:
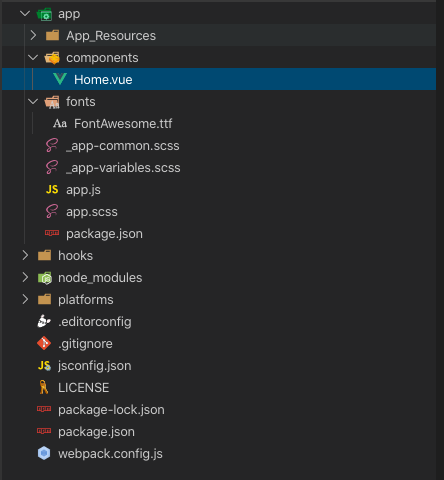
One major difference with this new version of the Vue Blank App template, is that it now comes preconfigured to support use of Font Awesome icons with the Nativescript application. You'll see the FontAwesome.ttf file inside the /app/fonts folder which is loaded by /app/app.scss as an import of /app/_app-common.scss, and used via a CSS class named fa. The template app uses a Font Awesome icon displayed at the start of the center text. You can find other (and more recent) versions of app templates on the Nativescript App Templates repo on Github.
Creating a basic camera app
The template application consists of a single page displaying a Vue component page with a simple message in the center, loaded as the main entry page into the app inside app/app.js. You can enable more verbose debug messages from the Vue interpreter in this file by adding Vue.config.silent = false; after the initial import code. We'll want the first version of our application to be a single page displaying a button to take a photo, and an Image field to display the last photo taken by the app, so we'll use the existing template structure and replace the contents of the main page for the app.
First, install the Nativescript camera plugin using the following CLI command, which will allow us to access the device camera to take pictures.
tns plugin add nativescript-cameraWe will now modify the Home page component in/app/components/Home.vue to be:
<template>
    <Page class="page">
        <ActionBar class="action-bar">
            <Label class="action-bar-title" text="Picture Gallery"></Label>
        </ActionBar>
        <StackLayout>
            <Label text="Take a Pic" @tap="takePicture" class="take-picture-icon" />
            <Image :src="cameraImage" class="picture-gallery" stretch="aspectFit" />
        </StackLayout>
    </Page>
</template>

<script>
const cameraModule = require("nativescript-camera");
export default {
    computed: {
    },
    data() {
        return {
            cameraImage: null
        };
    },
    methods: {
        takePicture() {
            let that = this;
            cameraModule
                .takePicture({
                    width: 300,  //these are in device independent pixels
                    height: 300, //only one will be respected depending on os/device if
                    keepAspectRatio: true, //    keepAspectRatio is enabled.
                    saveToGallery: false //Don't save a copy in local gallery, ignored by some Android devices
                })
                .then(imageAsset => {
                    that.cameraImage = imageAsset
                })
        }
    },
    mounted() {
        cameraModule.requestPermissions().then( //request permissions for camera
            success => { //have permissions
            },
            failure => { //no permissions for camera
            }
        )
    }
}
</script>

<style scoped lang="scss">
.take-picture-icon {
    horizontal-align: center;
    background-color: rgb(105, 105, 241);
    padding: 12;
    border-width: 1.2;
    border-color: black;
    border-radius: 14;
    margin-top: 20;
    color: white;
    font-size: 30;
}
.picture-gallery {
    margin-top: 60;
}
</style>
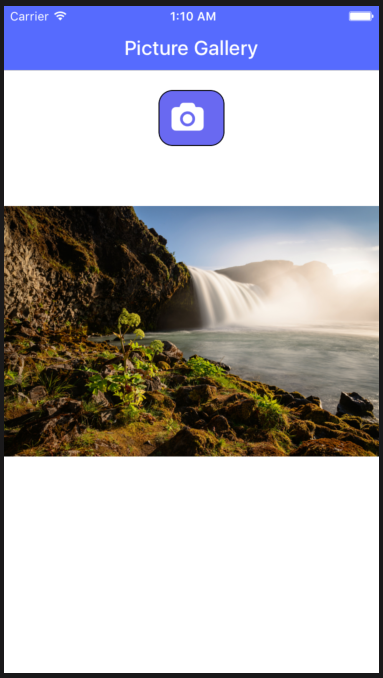
We've removed the example message from the Vue template, and added a Label that acts and looks like a Button, as well as an Image element that will display the last picture taken with the camera. Inside the code section is the takePicture() function, which calls the Nativescript Camera plugin to take a picture when the button is tapped, and then sets that picture as the Image source displayed below the button. The mounted() function is run once the page is loaded, and calls requestPermissions() in the Camera plugin to get local permissions for the application to access the device camera (and photo library when using the iOS emulator to choose a device image since the simulator has no camera).
Run the app on the iOS simulator with tns run ios, tap the "Take a Pic" button, choose an image from the simulator gallery, and you should see something similar to:
Camera permissions for Android and iOS builds
Besides local permissions, you will need to add some additional permissions for the build process to allow camera access. For iOS, edit "app/App_Resources/iOS/Info.plist" and add the following keys:
<key>NSPhotoLibraryUsageDescription</key>
<string>To access saved pictures</string>
<key>NSCameraUsageDescription</key>
<string>To take new pictures</string>
For Android, edit "app/App_Resources/Android/AndroidManifest.xml" and add the following permission:
<uses-permission android:name="android.permission.CAMERA"/>
Using Font Awesome icons with Nativescript
Instead of using text for your picture button, you can make use of Font Awesome icons. The Font Awesome library can be used to inject scalable icons in your Nativescript app, saving you the headache of designing your own images and the multiple resolution versions needed for all possible screen sizes on Android and iOS. They're also incredibly easy to use in Nativescript apps, especially since the Blank App template comes with the font file and css class already setup.
When you wish to use a particular icon, you'll have to first lookup the unicode value for the icon. For this app, I'll use the solid Camera icon, as the regular and light versions are only available as part of the Font Awesome Pro package. On the info page you'll see the unicode for this particular icon, which is f030. Whenever you wish to use an icon in your app, make note of the code, and then use the unicode formatted as  as the text.decode value of a label with the fa class assigned.
Let's update our app with this icon by changing the label from <Label text="Take a Pic" @tap="takePicture" class="take-picture-icon" /> to now be <Label text.decode=" " @tap="takePicture" class="take-picture-icon fa" />.
Save and re-run the app and it should now look like:
Displaying multiple pictures
Let's now make this app more useful, and instead of only displaying the last picture taken, we'll use a simple image gallery to display all pictures taken so far. We'll use the Vue v-for directive on the Image element, and nest it in a StackLayout to render all pictures taken by the camera, which will now be stored in an array. This will be nested inside a ScrollView container so we can scroll up and down through the images.
Edit /app/components/Home.vue so it contains:
<template>
<Page class="page">
<ActionBar class="action-bar">
<Label class="action-bar-title" text="Picture Gallery"></Label>
</ActionBar>
<StackLayout>
<Label text.decode=" " @tap="takePicture" class="take-picture-icon fa" />
<ScrollView class="picture-gallery" orientation="vertical">
<StackLayout>
<Image v-for="image in arrayPictures" class="gallery-item" :src="image" stretch="aspectFill" />
</StackLayout>
</ScrollView>
</StackLayout>
</Page>
</template>
<script>
const cameraModule = require("nativescript-camera");
export default {
computed: {},
data() {
return {
arrayPictures: []
};
},
methods: {
takePicture() {
let that = this;
cameraModule
.takePicture({
width: 300, //these are in device independent pixels
height: 300, //only one will be respected depending on os/device if
keepAspectRatio: true, // keepAspectRatio is enabled.
saveToGallery: false //Don't save a copy in local gallery, ignored by some Android devices
})
.then(imageAsset => {
that.arrayPictures.unshift(imageAsset)
})
}
},
mounted() {
cameraModule.requestPermissions().then( //request permissions for camera
success => { //have permissions
},
failure => { //no permissions for camera
}
)
}
}
</script>
<style scoped lang="scss">
.take-picture-icon {
horizontal-align: center;
background-color: rgb(105, 105, 241);
padding: 12;
border-width: 1.2;
border-color: black;
border-radius: 14;
margin-top: 20;
margin-bottom: 20;
color: white;
font-size: 30;
padding-left: 20;
}
.picture-gallery {
margin-top: 20;
}
.gallery-item {
margin: 10;
}
</style>
The takePicture() function will now save each picture taken inside the arrayPictures array ( unshift is used instead of push to display the newest photo first). Nativescript Vue will now render an Image for each element of the array inside a scrollable area below the button.
Run the app, take two or more pictures and you'll see each picture displayed vertically in a scrollable area, similar to the screenshot below.

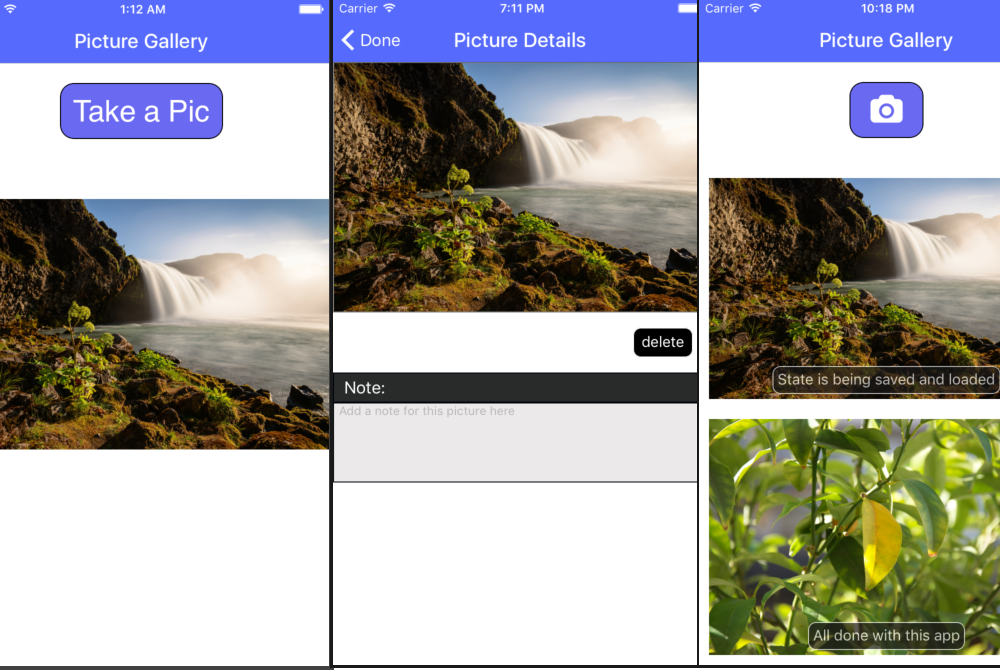
Add a detail page for annotation and deletion
So far we've got a simple camera app with an image gallery, but it's a bit basic. Let's make it more useful by adding a new details page to view the image full screen when a gallery item is tapped. On that new page, we will then add support for annotating each picture(with the note displayed on top of each gallery image), and a button to delete a picture from the gallery.
First, let's add the note text field to be displayed in a Label over each Image in our gallery by replacing the Image tag ( <Image v-for="image in arrayPictures" class="gallery-item" :src="image" stretch="aspectFill"/>) in /app/components/Home.vue with:
<GridLayout cols="*" rows="*" @tap="tapPicture" v-for="image in arrayPictures">
    <Image class="gallery-item" col="0" row="0" :src="image" stretch="aspectFill" />
    <StackLayout :visibility="image.note&&(image.note.length>0)  ? 'visible' : 'hidden'" col="0" row="0" class="note-picture-wrapper">
        <Label textWrap="true" verticalAlignement="bottom" :text="image.note" class="note-picture-text"></Label>
    </StackLayout>
</GridLayout>
The GridLayout is used to overlay a Label over the Image by having them both placed at the same row and column. The Label is nested inside a StackLayout to allow it to be styled so the text area can be shaded and translucent. The v-ifstatement in the Label ensures this shaded overlay is shown only if there is any text for that picture. We'll need to add some new style classes to the bottom of /app/components/Home.vue for the new label:
.note-picture-wrapper {
  background-color: #1a1919;
  opacity: 0.7;
  border-width: 1;
  border-radius: 8;
  color: #ffffff;
  border-color: #ffffff;
  margin: 15;
  vertical-align: bottom;
  horizontal-align: center;
}
.note-picture-text {
  font-size: 15;
  vertical-align: center;
  horizontal-align: center;
  padding: 4;
}
Now we'll add the new tapPicture() function, as well as updating the takePicture() function to assign each image a unique id (set to current Unix timestamp and used as the key in the v-for directive), as well as initialize an empty note string associated with each image. Change the methods:{} section to:
    methods: {
        tapPicture(image) {
            let navContextObj = {
                image: image,
                arrayPictures: this.arrayPictures
            };
            this.$navigateTo(ImageDetails, {
                animated: true,
                transition: {
                    name: "slideLeft",
                    curve: "easeInOut",
                    duration: 100
                },
                props: { navObject: navContextObj }
            });
        },
        takePicture() {
            let that = this;
            cameraModule
                .takePicture({
                    width: 300, //these are in device independent pixels
                    height: 300, //only one will be respected depending on os/device if
                    keepAspectRatio: true, //    keepAspectRatio is enabled.
                    saveToGallery: false //Don't save a copy in local gallery, ignored by some Android devices
                })
                .then(imageAsset => {
                    imageAsset.note = ''
                    imageAsset.id = new Date().getTime()
                    that.arrayPictures.unshift(imageAsset)
                })
        }
    },
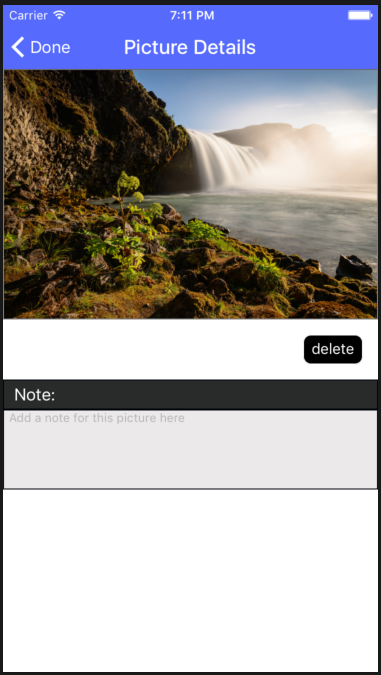
The tapPicture function will navigate to a new page (/app/components/ImageDetails.vue), and pass the tapped image and the image gallery array as a prop. Passing them as members of an object ensures the reference to the original image array is passed for use in the details page. Let's create this file and edit it so it contains:
<template>
    <Page class="page" ref="page" actionBarHidden="false" backgroundSpanUnderStatusBar="true">

        <ActionBar class="action-bar" title="Picture Details">
            <NavigationButton text="Done" android.systemIcon="ic_menu_back" @tap="$navigateBack()" />
            <Label class="action-bar-title" text="Picture Details"></Label>
        </ActionBar>
        <ScrollView orientation="vertical">
            <StackLayout>
                <Image class="picture-full" stretch="aspectFit" :src="navObject.image" />
                <GridLayout columns="*,*" rows="60,30,*,300">
                    <StackLayout col="1" row="0" class="delete-picture-icon-wrapper" @tap="deletePicture">
                        <Label verticalAlignement="bottom" text="delete" class="delete-picture-icon"></Label>
                    </StackLayout>
                    <Label col="0" colSpan="2" row="1" text="Note:" class="section-label" />
                    <TextView col="0" colSpan="2" row="2" class="text-picture" hint="Add a note for this picture here" editable="true" v-model="navObject.image.note" />
                    <Label col="0" colSpan="2" row="3" text="" />
                </GridLayout>
            </StackLayout>
        </ScrollView>
    </Page>
</template>

<script>
export default {
    name: "image-details-page",
    data() {
        return {};
    },
    props: {
        navObject: {
            type: Object
        },
    },
    components: {},
    computed: {},
    created() {},
    mounted() {},
    methods: {
        deletePicture() {
            let pictureIndex = this.navObject.arrayPictures.indexOf(this.navObject.image);
            this.navObject.arrayPictures.splice(pictureIndex, 1);
            this.$navigateBack()
        }
    }
};
</script>

<style scoped>
.delete-picture-icon {
    font-size: 15;
    vertical-align: center;
    horizontal-align: center;
}

.delete-picture-icon-wrapper {
    background-color: #000000;
    border-width: 1;
    border-radius: 8;
    color: #ffffff;
    border-color: #ffffff;
    margin: 15;
    vertical-align: center;
    horizontal-align: right;
    height: 30;
    width: 60;
}

.text-picture {
    border-width: 1;
    border-style: solid;
    border-color: #01060c;
    height: 80;
    background-color: rgb(235, 233, 233);
}

.section-label {
    background-color: #292b2b;
    border-width: 1;
    border-style: solid;
    border-color: #01060c;
    color: white;
    padding-left: 10;
    padding-top: 5;
    padding-bottom: 5;
}

.picture-full {
    border-width: 1;
    border-color: gray;
}
</style>
Looking at the XML in the top section, you'll see the ActionBar element is similar to the main page, but we now add a NavigationButton to let the user navigate back to the first page. Below that we display the image tapped on the first page, a delete button, and a text area so the user can enter a note(bound to the image object's note variable) for the selected image. The extra label at the bottom with a GridLayout assigned height of 300 is there to provide some buffer space when the on-screen keyboard pops up while making changes to the image note text. The deletePicture() function is the only method on this page, and removes the current image from the image gallery array before navigating back to the main page.
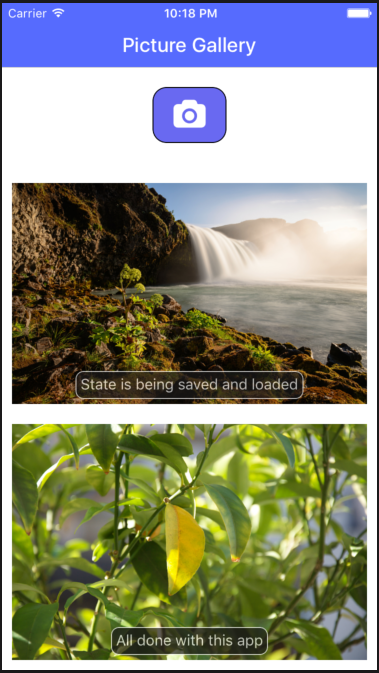
Maintain image gallery state
Now we have a functional image gallery app that allows us to add new pictures from the camera, annotate them and delete images. The biggest problem now is that when we close the app and re-open it, all the images and their notes will be gone. Our final step to making this a useful app is to maintain the state of the images and their associated notes across app runs. The Nativescript ApplicationSettings module allows us to save and load text data from the app's local storage, so we can use that to maintain state across app runs. In order to use it for this image gallery, we'll need to start saving pictures as files on the device since we can't store binary data easily using this module. Instead, we'll use this module to store a stateful array of filenames and notes that are updated whenever changes are made, and reloaded when the app is run next.
We'll be using a few more library modules, so add the following to the top of the code section in/app/components/Home.vue:
const applicationSettings = require("application-settings");
const fsModule = require("tns-core-modules/file-system");
const imageSourceModule = require("tns-core-modules/image-source");
applicationSettings will be used to save and load application state on the device. fsModule will be used to save and load the pictures to local device storage when used with imageSourceModule , which is used for working with images.
Modify the takePicture() method so it now contains the following:
      takePicture() {
            let that = this;
            cameraModule
                .takePicture({
                    width: 300, //these are in device independent pixels
                    height: 300, //only one will be respected depending on os/device if
                    keepAspectRatio: true, //    keepAspectRatio is enabled.
                    saveToGallery: false //Don't save a copy in local gallery, ignored by some Android devices
                })
                .then(imageAsset => {
                    imageSourceModule.fromAsset(imageAsset).then(
                        savedImage => {
                            let filename = "image" + "-" + new Date().getTime() + ".png";
                            let folder = fsModule.knownFolders.documents();
                            let path = fsModule.path.join(folder.path, filename);
                            savedImage.saveToFile(path, "png");
                            var loadedImage = imageSourceModule.fromFile(path);
                            loadedImage.filename = filename;
                            loadedImage.note = "";
                            that.arrayPictures.unshift(loadedImage);
                            that.storeData();
                        },
                        err => {
                            console.log("Failed to load from asset");
                        }
                    );
                })
        },
We'll also need some new methods to load and save the current image gallery state. Add the following functions to the methods:{} section
    storeData() {
            let localArr = [];
            this.arrayPictures.forEach(entry => {
                localArr.push({ note: entry.note, filename: entry.filename });
            })
            applicationSettings.setString("localdata", JSON.stringify(localArr));
        },
        loadData() {
            let strData = applicationSettings.getString("localdata");
            console.log(strData)
            if (strData && strData.length) {
                let localArr = JSON.parse(strData);
                localArr.forEach(entry => {
                    const folder = fsModule.knownFolders.documents();
                    const path = fsModule.path.join(folder.path, entry.filename);
                    var loadedImage = imageSourceModule.fromFile(path);
                    loadedImage.filename = entry.filename;
                    loadedImage.note = entry.note;
                    this.arrayPictures.unshift(loadedImage);
                })
            }
        },
After taking a picture, we will now save the picture as an image file to the application's local device storage, and use the Image Asset loaded from the saved image. Anytime a change is made by the addition or removal of a picture, we'll call the new function storeData to save the array of image notes and filenames to local storage.
When images are removed from the gallery using deletePicture, or when their notes have changed, we'll need to update the saved state. We can handle both of these by updating the state just before navigating back from the details page. We'll use the beforeDestroy Vue lifecycle hook on the details page to call our storeData function. Since that function is defined on the main page, we'll also need to pass a reference to that function as part of the navigation context. Add the following to export default { in /app/components/ImageDetails.vue
beforeDestroy() {
    this.navObject.storeData()
},
We'll pass this function reference as part of the main page's navigation context by modifying tapPicture in /app/components/Home.vue:
let navContextObj = {
    image: image,
    arrayPictures: this.arrayPictures,
    storeData:this.storeData
};
This hook is run whenever the user leaves the details page, so any changes to image notes or deletion of the image will be saved to state before returning to the main page.
Done!
That's it for this post. If you'd like to download the final source files, you can find them on Github.