
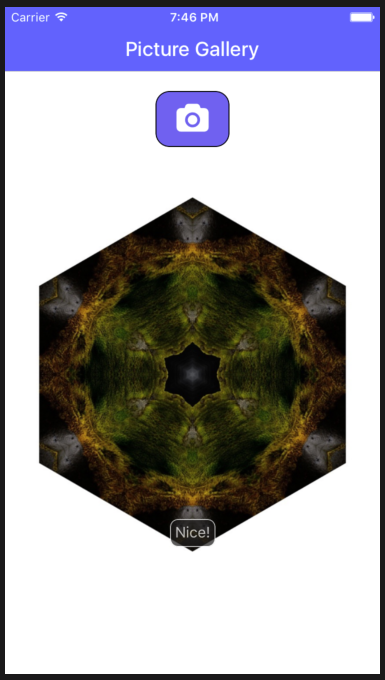
In a previous post, I went over how to create a Nativescript Vue image gallery app that uses the device camera to take photos, displays those pictures in a simple image gallery, uses Font Awesome icons, and maintains state for the gallery across app runs. This post will show how to extend this app to allow adding images from the device, and how to use Nativescript to resize, save and edit images in your own application.
Nativescript 6.3.2 was released recently and will be the version used in this post (use this version if you're coding your own copy from here or the Github repo to avoid errors from breaking version changes). Clone the camera gallery app from the previous post using:
git clone https://github.com/drangelod/nsimagegallery6 ns6imagesChange to that directory and make sure your Nativescript app environment is ok using tns doctor. You'll get some warnings to update the Nativescript platform and core modules packages to match the current CLI version.

You can do this by editing package.json. Using a tool like NCU, we'll see that some other packages can be updated:
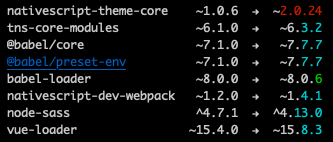
For this post, we'll only update tns-core-modules and nativescript-dev-webpack to their latest versions. After editing package.json, have NPM update the packages by running npm i. You'll get a warning about some changes to nativescript-dev-webpack so you'll also need to run ./node_modules/.bin/update-ns-webpack --configs . Once that's all done, run the app on your simulator to ensure the image gallery is working properly.
Using Device Images in Your Application
The gallery application lets you take new pictures with the device camera, but it would be nice to add images already on your device. In order to use device images, Nativescript has the nativescript-imagepicker plugin which allows us to select an image from the device to work with. Install this plugin with the CLI command:
tns plugin add nativescript-imagepickerFirst we'll need to add some permissions to the Android and iOS configuration files, as you'll need these before you can release your application to the App store. Edit app/App_Resources/Android/src/main/AndroidManifest.xml and add the following permission requests to the other entries if not already present:
<uses-permission android:name="android.permission.CAMERA"/>
<uses-permission android:name="android.permission.READ_EXTERNAL_STORAGE"/>
<uses-permission android:name="android.permission.WRITE_EXTERNAL_STORAGE"/>
You will also run into a problem using this plugin on newer versions of Android, so add the following to the <application tag:
android:requestLegacyExternalStorage="true" Next open the app/App_Resources/iOS/Info.plist file and add the following iOS permissions if not already present:
<key>NSCameraUsageDescription</key>
<string>Take pictures for the gallery</string>
<key>NSPhotoLibraryUsageDescription</key>
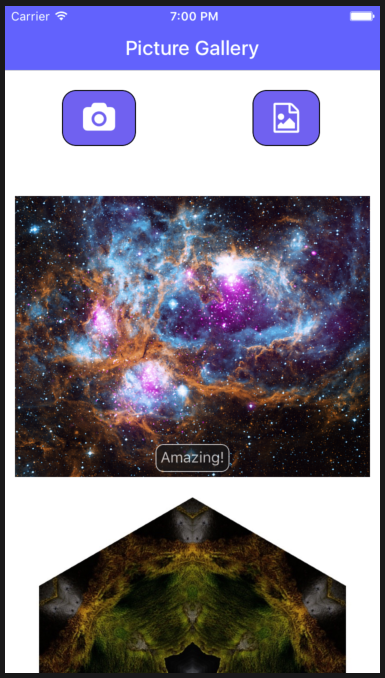
<string>Add images from your device</string>With permissions added, now we'll edit the Home.vue component to add a new button and the function it will call to use the image picker plugin. We'll modify the XML in Home.vue and remove the original Label element before adding a new GridLayout that will display both buttons side by side:
<GridLayout columns="*,*" rows="auto" verticalAlignment="center">
<Label col="0" row="0" text.decode=" " @tap="takePicture" class="take-picture-icon fa" />
<Label col="1" row="0" text.decode=" " @tap="chooseImage" class="take-picture-icon fa" />
</GridLayout>Add the import for the new plugin to the top of your <script> section:
const imagepicker = require("nativescript-imagepicker");Now we can add the chooseImage function to the methods:{ object, which will call the plugin to let the user select an image from the device and then add the selected image to the gallery:
chooseImage(){
    let that = this
    let context = imagepicker.create({ mode: "single" });
    context
        .authorize()
        .then(() => {
            return context.present();
        })
        .then(selection => {
            const imageAsset = selection.length > 0 ? selection[0] : null;
            imageSourceModule.fromAsset(imageAsset).then(
                savedImage => {
                    let filename = "image" + "-" + new Date().getTime() + ".png";
                    let folder = fsModule.knownFolders.documents();
                    let path = fsModule.path.join(folder.path, filename);
                    savedImage.saveToFile(path, "png");
                    var loadedImage = imageSourceModule.fromFile(path);
                    loadedImage.filename = filename;
                    loadedImage.note = "";
                    that.arrayPictures.unshift(loadedImage);
                    that.storeData();
                },
                err => {
                    console.log("Failed to load from asset");
                    console.log(err)
                }
            );
        })
        .catch(err => {
            console.log(err);
        });
}
Run the application, tap on the right button to use the image picker, and select an image from your device to add to the gallery. You can download images to test with from a site like NASA, although you'll notice that large images will take significantly longer to load and render in the gallery than small images. Large image sizes are especially problematic if you'll be uploading app images to a server, or downloading them again later, since you don't need large images for display on mobile phones. Instead, let's work on reducing the size/dimensions of images obtained from the camera or from the device for a smoother app experience.
Resizing Images with Nativescript
In another post, I discussed how to use native code with Nativescript to more precisely control image dimensions/size to avoid excessively large image files such as those typically produced by modern phone cameras. We'll apply those same concepts here to ensure that images from both the camera and image picker plugins are shrunk if they are larger than a chosen threshold. For this post, we'll limit the size of gallery images to have the larger dimension be a maximum of 500 pixels, with the other dimension scaled down to maintain the original image aspect ratio. Each platform will require appropriate native code calls for resizing the image returned by the image picker plugin if both dimensions exceed 500 pixels.
For both iOS and Android, we'll need to detect if both dimensions are larger than 500 pixels, and then calculate the scaling ratio needed to reduce width and height to have the larger dimension be 500 pixels. To do this in Nativescript, we'll first need convert the ImageAsset returned by the plugin into an ImageSource, from which we can get the dimensions for the image. For each platform, a native call to a graphics library will be then used to resize the ImageSource before it's saved to the device file system and state using Nativescript calls like before. The new chooseImage function will look like:
	chooseImage() {
            let that = this
            let context = imagepicker.create({ mode: "single" });
            context
                .authorize()
                .then(() => {
                    return context.present();
                })
                .then(selection => {
                    const imageAsset = selection.length > 0 ? selection[0] : null;
                    imageAsset.options.autoScaleFactor = false;
                    imageAsset.options.keepAspectRatio = true;
                    imageSourceModule
                        .fromAsset(imageAsset)
                        .then(imageSource => {
                            var newheight = imageSource.height,
                                newwidth = imageSource.width
                            if (imageSource.width > 500 && imageSource.height > 500) {
                                if (imageSource.width > imageSource.height) {
                                    newwidth = 500
                                    newheight = Math.round(500 * (imageSource.height / imageSource.width))
                                } else {
                                    newheight = 500
                                    newwidth = Math.round(500 * (imageSource.width / imageSource.height))
                                }
                            }
                            if (imageSource.width > 500 && imageSource.height > 500) {
                                if (isAndroid) {
                                    try {
                                        var bitmap = android.graphics.BitmapFactory.decodeFile(imageAsset.android, null);
                                        var newBitmap = android.graphics.Bitmap.createScaledBitmap(bitmap, newwidth, newheight, true);
                                        imageSource.setNativeSource(newBitmap);
                                        let filename = "image-" + new Date().getTime() + ".jpg";
                                        let folder = fsModule.knownFolders.documents();
                                        let path = fsModule.path.join(folder.path, filename);
                                        imageSource.saveToFile(path, "jpeg");
                                        imageSource.filename = filename;
                                        imageSource.note = "";
                                        that.arrayPictures.unshift(imageSource);
                                        that.storeData();
                                    } catch (err) {
                                        console.error(err);
                                    }
                                } else {
                                    let manager = PHImageManager.defaultManager();
                                    let options = new PHImageRequestOptions();
                                    options.resizeMode = PHImageRequestOptionsResizeMode.Exact;
                                    options.deliveryMode = PHImageRequestOptionsDeliveryModeHighQualityFormat;
                                    manager.requestImageForAssetTargetSizeContentModeOptionsResultHandler(
                                        imageAsset.ios, { width: newwidth, height: newheight },
                                        PHImageContentModeAspectFill,
                                        options,
                                        function(result, info) {
                                            let filename = "image" + "-" + new Date().getTime() + ".jpg";
                                            let folder = fsModule.knownFolders.documents();
                                            let path = fsModule.path.join(folder.path, filename);
                                            let newasset = new imageAssetModule.ImageAsset(result);
                                            newasset.options.autoScaleFactor = false;
                                            newasset.options.keepAspectRatio = true;
                                            newasset.height = newheight
                                            newasset.width = newwidth
                                            imageSourceModule
                                                .fromAsset(newasset)
                                                .then(newimageSource => {
                                                    newimageSource.saveToFile(
                                                        path,
                                                        "jpeg"
                                                    );
                                                    newimageSource.filename = filename;
                                                    newimageSource.note = "";
                                                    that.arrayPictures.unshift(newimageSource);
                                                    that.storeData();
                                                });
                                        }
                                    );
                                }
                            } else {
                                let folder = fsModule.knownFolders.documents();
                                let filename = "image-" + new Date().getTime() + ".jpg";
                                let path = fsModule.path.join(folder.path, filename);
                                imageSource.saveToFile(path, "jpeg");
                                imageSource.filename = filename;
                                imageSource.note = "";
                                that.arrayPictures.unshift(imageSource);
                                that.storeData();
                            }
                        })
                        .catch(err => {
                            console.error(err);
                        });
                });
        },
You'll see we've added a new section that detects if both dimensions are greater than 500, and calculates the scaled height and width of the image so that the larger dimension is a maximum of 500 pixels. We then use the isAndroid and isIOS platform library functions to determine which type of device is being used (add import { isAndroid, isIOS } from "tns-core-modules/platform"; to your imports section to use these helpers). For Android devices, we make native calls to android.graphics.Bitmap.createScaledBitmap to resize the image. For iOS, we call PHImageManager.requestImageForAssetTargetSizeContentModeOptionsResultHandler to scale the image. One thing to notice is that the iOS library call will return the filename for the scaled image instead of an image object, so we have an extra step to load the image from the file and then save it on our own app documents folder to work with.
Resizing device camera images
As I mentioned in the previous post on working with images in Nativescript, the camera plugin generally does a pretty good job of resizing the camera images to the requested max dimension, especially for iOS although not as reliably on Android. We'll add similar code to the takePicture function for scaling large images for those devices where the camera plugin fails to resize them automatically.
takePicture() {
let that = this;
cameraModule
.takePicture({
width: 500, //these are in device independent pixels
height: 500, //only one will be respected depending on os/device if
keepAspectRatio: true, // keepAspectRatio is enabled.
saveToGallery: false //Don't save a copy in local gallery, ignored by some Android devices
})
.then(imageAsset => {
imageAsset.options.autoScaleFactor = false;
imageAsset.options.keepAspectRatio = true;
imageSourceModule
.fromAsset(imageAsset)
.then(imageSource => {
var ratio = 1,
newheight = imageSource.height,
newwidth = imageSource.width
if (imageSource.width > 500 && imageSource.height > 500) {
if (imageSource.width > imageSource.height) {
newwidth = 500
newheight = Math.round(500 * (imageSource.height / imageSource.width))
} else {
newheight = 500
newwidth = Math.round(500 * (imageSource.width / imageSource.height))
}
}
if (imageSource.width > 500 && imageSource.height > 500) {
if (isAndroid) {
try {
var downsampleOptions = new android.graphics.BitmapFactory.Options();
var bitmap = android.graphics.BitmapFactory.decodeFile(imageAsset.android, null);
var newBitmap = android.graphics.Bitmap.createScaledBitmap(bitmap, newwidth, newheight, true);
imageSource.setNativeSource(newBitmap);
let filename = "image-" + new Date().getTime() + ".jpg";
let folder = fsModule.knownFolders.documents();
let path = fsModule.path.join(folder.path, filename);
imageSource.saveToFile(path, "jpeg");
imageSource.filename = filename;
imageSource.note = "";
that.arrayPictures.unshift(imageSource);
that.storeData();
} catch (err) {
console.error(err);
}
} else {
let manager = PHImageManager.defaultManager();
let options = new PHImageRequestOptions();
options.resizeMode =
PHImageRequestOptionsResizeMode.Exact;
options.deliveryMode = PHImageRequestOptionsDeliveryModeHighQualityFormat;
manager.requestImageForAssetTargetSizeContentModeOptionsResultHandler(
imageAsset.ios, { width: newwidth, height: newheight },
PHImageContentModeAspectFill,
options,
function(result, info) {
let folder = fsModule.knownFolders.documents();
let path = fsModule.path.join(folder.path, filename);
let filename = "image-" + new Date().getTime() + ".jpg";
let newasset = new imageAssetModule.ImageAsset(result);
imageSourceModule
.fromAsset(newasset)
.then(newimageSource => {
newimageSource.saveToFile(path, "jpeg");
newimageSource.filename = filename;
newimageSource.note = "";
that.arrayPictures.unshift(newimageSource);
that.storeData();
});
}
);
}
} else {
let filename = "image" + "-" + new Date().getTime() + ".jpg";
let folder = fsModule.knownFolders.documents();
let path = fsModule.path.join(folder.path, filename);
imageSource.saveToFile(path, "jpeg");
imageSource.filename = filename;
imageSource.note = "";
that.arrayPictures.unshift(imageSource);
that.storeData();
}
})
})
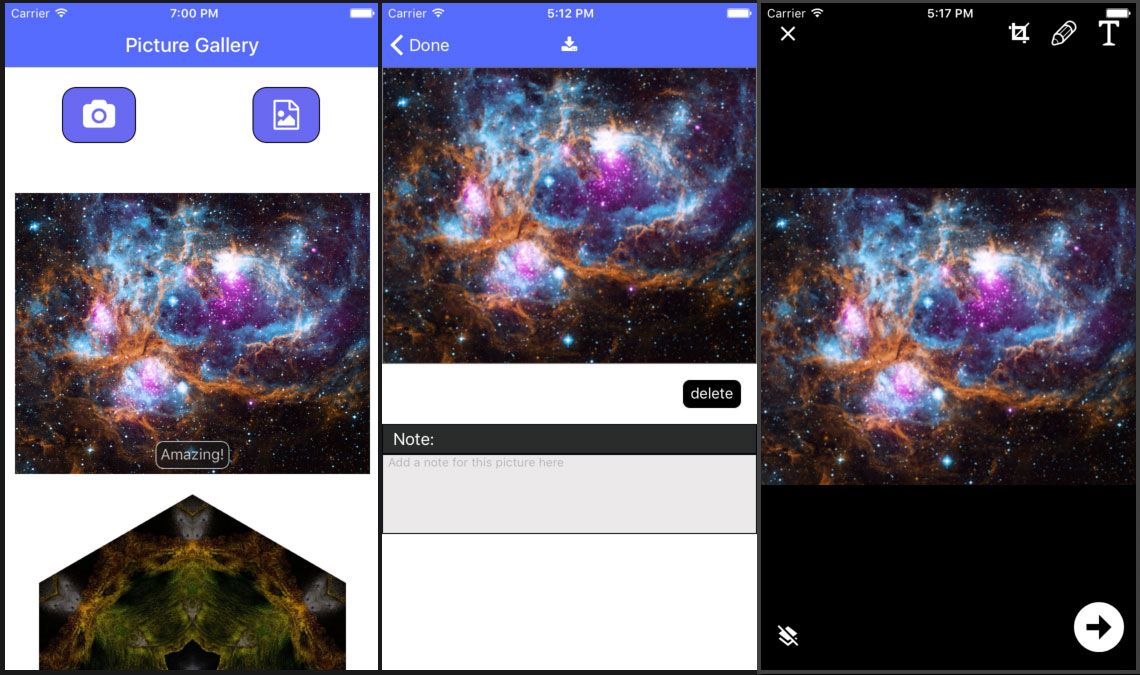
},Saving images to your device
Now that we're able to load scaled images from either the camera or device into our gallery app, let's allow the user to save images from the gallery to the device's photo gallery. This will require permission to allow the app to write to device storage and a few more native calls for each platform. Since we've already added permissions requests to access the device camera and photo library in Home.vue from the first post, we don't need to do anything else here, although we'll do another check on iOS using a native call to show how it's done if you're not using the camera and image picker plugins in your application. On Android, you can use the nativescript-permissions plugin to request permissions before accessing the device storage in this situation.
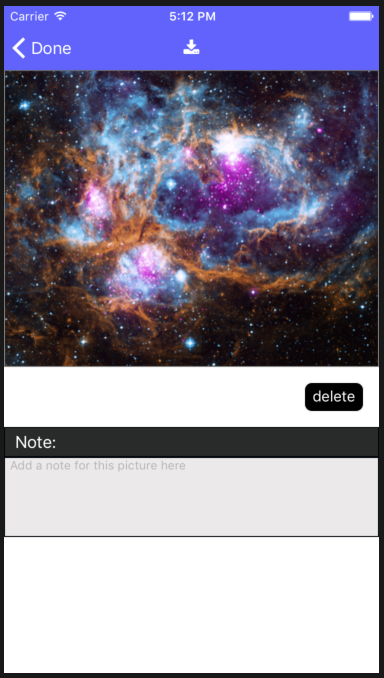
We'll update app/components/ImageDetails.vue XML and script sections to be:
<template>
<Page class="page" ref="page" actionBarHidden="false" backgroundSpanUnderStatusBar="true">
<ActionBar class="action-bar" title="Picture Details">
<NavigationButton text="Done" android.systemIcon="ic_menu_back" @tap="$navigateBack()" />
<Label text.decode="" @tap="downloadImage()" class="take-picture-icon fa" />
</ActionBar>
<ScrollView orientation="vertical">
<StackLayout>
<Image class="picture-full" stretch="aspectFit" :src="curImage" />
<GridLayout columns="*,*" rows="60,30,*,300">
<StackLayout col="1" row="0" class="delete-picture-icon-wrapper" @tap="deletePicture">
<Label verticalAlignement="bottom" text="delete" class="delete-picture-icon"></Label>
</StackLayout>
<Label col="0" colSpan="2" row="1" text="Note:" class="section-label" />
<TextView col="0" colSpan="2" row="2" class="text-picture" hint="Add a note for this picture here" editable="true" v-model="navObject.image.note" />
<Label col="0" colSpan="2" row="3" text="" />
</GridLayout>
</StackLayout>
</ScrollView>
</Page>
</template>
<script>
const imageSourceModule = require("tns-core-modules/image-source");
const imageAssetModule = require("tns-core-modules/image-asset/image-asset");
const fsModule = require("tns-core-modules/file-system");
const applicationModule = require("application");
import { isAndroid, isIOS } from "tns-core-modules/platform";
export default {
name: "image-details-page",
data() {
return { curImage: ''};
},
props: {
navObject: {
type: Object
},
},
components: {},
computed: {},
created() {},
beforeDestroy() {
this.navObject.storeData()
},
mounted() {
this.curImage = this.navObject.image
},
methods: {
deletePicture() {
let pictureIndex = this.navObject.arrayPictures.indexOf(this.navObject.image);
this.navObject.arrayPictures.splice(pictureIndex, 1);
this.$navigateBack()
},
downloadImage() {
let that = this
let folder = fsModule.knownFolders.documents();
let path = fsModule.path.join(folder.path, this.navObject.image.filename);
let imageSource = imageSourceModule.fromFile(path)
if (isIOS) {
PHPhotoLibrary.requestAuthorization((result) => {
if (result === PHAuthorizationStatus.Authorized) {
var CompletionTarget = NSObject.extend({
"thisImage:hasBeenSavedInPhotoAlbumWithError:usingContextInfo:": function(
image,
error,
context
) {
if (error) {
console.error("Unable to save to library, please try again.")
}
}
}, {
exposedMethods: {
"thisImage:hasBeenSavedInPhotoAlbumWithError:usingContextInfo:": {
returns: interop.types.void,
params: [UIImage, NSError, interop.Pointer]
}
}
});
var completionTarget = CompletionTarget.new();
UIImageWriteToSavedPhotosAlbum(
imageSource.ios,
completionTarget,
"thisImage:hasBeenSavedInPhotoAlbumWithError:usingContextInfo:",
null
);
console.log("Image saved to device")
} else {
if (isIOS) alert({ title: "Save Failed!", okButtonText: "OK", message: "Allow permission in Settings > Privacy > Photos to save an image to your device!" })
else alert("Save Failed! No permissions to save to this device.")
}
});
} else {
function broadCast(imageFile) {
var mediaScanIntent = new android.content.Intent(
android.content.Intent.ACTION_MEDIA_SCANNER_SCAN_FILE
);
var contentUri = android.net.Uri.fromFile(imageFile);
mediaScanIntent.setData(contentUri);
applicationModule.android.foregroundActivity.sendBroadcast(
mediaScanIntent
);
alert("Image saved to device")
}
var folderPath = android.os.Environment.getExternalStoragePublicDirectory(
android.os.Environment.DIRECTORY_DOWNLOADS
).toString();
let filename = "galleryimg_" + new Date().getTime() + ".jpg";
let savepath = fsModule.path.join(folderPath, filename);
var saved = imageSource.saveToFile(savepath, "jpeg");
if (saved) {
broadCast(new java.io.File(savepath));
} else {
alert("Error: Unable to save file!");
}
}
},
}
};
</script>Looking at the XML section, you'll see a new Font Awesome icon button was added that calls a new downloadImage() function. A few imports were also added at the top of the script section to allow the new function to work with device images and file system. The downloadImage() function first loads the image from the local app file system, and then uses this for native calls on each platform. For Android, we broadcast a ACTION_MEDIA_SCANNER_SCAN_FILE Intent, which asks the OS to save the current image to the device. Upon error or completion, an alert is shown to the user which you could replace with a toast message in a real app. For iOS, first we check authorization using PHPhotoLibrary.requestAuthorization before calling UIImageWriteToSavedPhotosAlbum to save the current image to the iOS Photo Album. We don't notify the user on iOS here because using native code to make graphic related Nativescript calls will crash the app, so you'll have to use another approach to inform the user when the image is saved to the device.
Editing Images in Nativescript
If you'd also like to allow the user to edit images, you can use the nativescript-photo-editor plugin in your app. Add it with the CLI using:
tns plugin add nativescript-photo-editorAdd the following imports for this plugin to the script section of ImageDetails.vue
import { PhotoEditor, PhotoEditorControl } from "nativescript-photo-editor";
const photoEditor = new PhotoEditor();
Now we'll add a new edit button to the GridLayout where the delete button is currently rendered:
 <StackLayout col="0" row="0" class="delete-picture-icon-wrapper" @tap="editImage">
     <Label verticalAlignement="bottom" text="edit" class="delete-picture-icon"></Label>
</StackLayout>
Add the new editImage() function called by this button:
	editImage() {
            let that = this
            let folder = fsModule.knownFolders.documents();
            let path = fsModule.path.join(folder.path, this.navObject.image.filename);
            photoEditor
                .editPhoto({ imageSource: this.curImage })
                .then(newImage => {
                    newImage.filename = that.curImage.filename
                    newImage.note = that.curImage.note
                    that.curImage = newImage;
                    let pictureIndex = that.navObject.arrayPictures.indexOf(that.navObject.image);
                    that.navObject.arrayPictures.splice(pictureIndex, 1, newImage);
                    newImage.saveToFile(path, "jpeg");
                })
                .catch(e => {
                    console.error(e);
                });
        },
This function will send the current image to the plugin for editing. If the user saves the edited image, then this new image will be assigned the same filename and notes as the original, and replace the original image on the current page, in the state array and on the file system. Run the app on the iOS simulator, tap the edit button and you'll see the plugin in action.
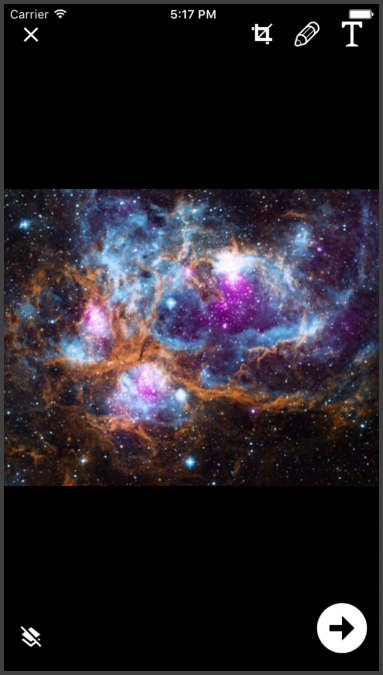
If you run this on newer iOS device like the iPhone XS, you'll run into a slight problem where the plugin is displayed as a modal instead of full screen, which interferes with drawing on the image due to interference with the scroll handler. To solve this, edit node_modules/nativescript-photo-editor/photo-editor.ios.js and add the following line to PhotoEditor.prototype.editPhoto with the other viewController settings:
viewController.modalPresentationStyle = 0;Done!
That's it for this post. If you'd like to download the final source files, you can find them on Github.